
Imagine going from a content idea to having videos, posts, and images live on 10 different platforms – all within 60 minutes. Sounds like a fantasy, right? In the age of AI, this “60-Minute Content Gauntlet” is closer to reality than you think. Welcome to the AI Content Assembly Line, where creators 10× their output without 10× the budget, time, or effort. This comprehensive guide will walk you through a proven AI content repurposing workflow – from brainstorming and scripting to video production, clipping, and distribution. We’ll spotlight the best tools (and clever tricks) at each stage so you can 10x your content output and reach audiences across YouTube, Instagram, TikTok, podcasts, blogs, and beyond.
It’s not hype: with the right stack of AI tools, a bit of creativity, and a dash of realism, you can crank out quality content like a factory – without turning into a bland content robot. Ready to see how a solo creator can achieve what used to require a whole team? Let’s dive into the assembly line.
Table of Contents:
- Introduction
- Brainstorming Content Ideas with AI Prompts
- AI Scriptwriting: From Outline to Draft in Minutes
- AI Voice-Over & Avatars: Recording Without Recording
- Video Editing & Highlight Clipping with AI
- Auto-Captions & Multilingual Dubbing
- AI Image & GIF Generation for Thumbnails and Beyond
- Scheduling Content & A/B Testing with AI
- Closing the Loop: Analytics and Iteration
- Conclusion
- FAQs
Introduction
Content creators today are under pressure to be everywhere at once – YouTube, TikTok, Instagram, podcasts, blogs, you name it. Traditionally, repurposing one idea across all these channels took tons of work. But now, imagine an assembly line (think Henry Ford, but for content) where AI tools handle the heavy lifting at each step. The result? You can ideate, script, film, edit, caption, design, and publish across platforms in a fraction of the time it used to take.
This isn’t about replacing creativity with robots – it’s about augmenting your creativity so you produce 10× the output without burning out. In this guide, we’ll follow a creator on a one-hour sprint to turn a single idea into a smorgasbord of content: a YouTube video (with an AI-generated script and voice-over), a podcast episode, a set of vertical video clips for TikTok/Reels, auto-captioned and dubbed versions for international viewers, eye-catching AI-generated thumbnails and images, and a queue of social posts scheduled and ready to roll. All with a tool stack you can mostly get for under $50 a month (or even free).
Along the way, we’ll highlight novel insights and real-world gotchas. Expect some “pro tips” and Quick Win callouts at each stage, plus a few fun mini-experiments – like a Clip-Finder Cage Match between two AI editing apps, or a Voice-Clone Trust Test to see if your audience can tell the difference between you and your AI double. We’ll also address the weak spots: AI can be amazingly fast, but it can also misfire (think bland scripts, wobbly voice clones, or cringe-worthy automated captions). Knowing these ahead of time will save you from awkward moments and help you refine your workflow.
So, whether you’re a YouTuber looking to repurpose video to Shorts, a podcaster wanting to convert a podcast to clips with AI, or an entrepreneur seeking an AI content repurposing workflow that doesn’t break the bank – this guide is for you. Let’s step onto the assembly line and start creating!
Brainstorming Content Ideas with AI Prompts
Every great piece of content starts with a great idea. But even the best creators have those days where the idea well runs dry. Enter AI brainstorming tools, your always-on, tireless ideation partner. Using AI tools to brainstorm video ideas can feel like having a creative team on standby, ready to spitball concepts at any hour.
Tools & Techniques for AI-Powered Brainstorming: The go-to here is often ChatGPT (particularly GPT-4 for its richer output) or Claude by Anthropic. Simply feed these AI models a prompt like, “Give me 5 unique video ideas for a cooking YouTube channel that combine trending TikTok challenges with healthy recipes”. In seconds, you’ll have a list of ideas, possibly angles you hadn’t considered. Other writing aids like Jasper and Writesonic have built-in templates for content ideas (e.g. Jasper’s “Blog Post Ideas” or Writesonic’s topic generator), which can spark topics tailored to different platforms. These AI systems are essentially your idea factory. One strategy some creators use is an “Idea Factory Friday” ritual: spend one hour a week with an AI, brainstorming and refining ideas to fill up your content calendar.
Quality In, Quality Out: To avoid generic suggestions, be specific in your prompt about your niche or audience. For example, instead of asking “What should I make a video about?”, you might prompt: “I run a travel vlog for budget travelers. What destinations or travel hacks are trending that I could make a video about next month?” By giving context (budget travel, upcoming month trends), the AI can tailor its suggestions. You can even feed it data – if you have notes from an analytics tool about what topics performed well before, include that. ChatGPT or Claude can incorporate those insights and brainstorm ideas that align with proven winners.
Volume and Variety: One of the joys of AI brainstorming is sheer volume. In a minute, you can have 10, 20, or 50 ideas to consider. Don’t just stop at the first decent idea. Push the AI further. Try prompts like, “Now give me a crazier idea” or “What’s a controversial take on this topic?” Sometimes the wild ideas can be toned down into something fresh. You could also ask for ideas in different formats: “How can I turn this topic into a podcast episode? A Twitter thread? An infographic?” This begins your mindset of repurposing from the very start – thinking of the multi-platform possibilities of an idea right when it’s born.
Quick Win: Use AI for Content Gaps – Not sure what your audience is craving? Ask AI to analyze existing content. For example: “Here are my last 5 video titles and their view counts… What content gaps or new angles should I explore?” An AI content calendar generator can quickly identify themes you haven’t covered or seasonal topics around the corner. It’s like having a strategist on call.
Real-world failure point: AI might feel creative, but it doesn’t truly know your audience. It might suggest doing a meme review video when that’s totally off-brand for you. So treat its ideas as starting points, not gospel. Many creators find the initial AI suggestions a bit bland. That’s normal – it’s averaging out what it’s seen. The trick is to iterate. If the first round is cliché (e.g. “10 Tips for X”), say “those are too generic, give me something edgy or niche.” With a few rounds of refining prompts, you’ll strike gold.
By the end of this brainstorming phase, you should have a solid concept for your next piece of content – one that excites you and has potential across multiple platforms. For our running example, let’s say our AI-assisted brainstorming session yields the idea: “The 60-Minute Content Gauntlet Challenge” – a meta-video where we attempt to create content in 1 hour (how fitting!). We’ll use this as the seed and see it through the assembly line.
Sample Prompts You Can Paste Straight into ChatGPT or Claude
Niche-Specific Trend Hunter
I run a [CATEGORY / NICHE] YouTube channel for [AUDIENCE DESCRIPTION].
• List 10 fresh video ideas tied to trends on TikTok, Instagram Reels, or X from the past 30 days.
• For each idea, add a one-sentence hook + why it will resonate with my audience in the next 8 weeks.
Audience-Data Remix
Here are my last 5 video titles with view counts:
1) “[TITLE 1]” – [VIEWS]
2) “[TITLE 2]” – [VIEWS]
3) “[TITLE 3]” – [VIEWS]
4) “[TITLE 4]” – [VIEWS]
5) “[TITLE 5]” – [VIEWS]
Using this data, propose 12 new content ideas that:
• Expand on the best-performing themes
• Fill gaps I haven’t covered
• Can be produced in under [X] hours each
Format-Flip & Edgy Angle Generator
My channel helps [AUDIENCE] with [TOPIC].
I’m tired of generic “Top 10 Tips” videos.
• Pitch 7 unconventional or slightly controversial concepts that challenge common advice.
• For each concept, suggest one spin-off format: podcast clip, Twitter thread, or infographic.
• End with one wildcard idea that’s risky but could go viral.
AI Scriptwriting: From Outline to Draft in Minutes
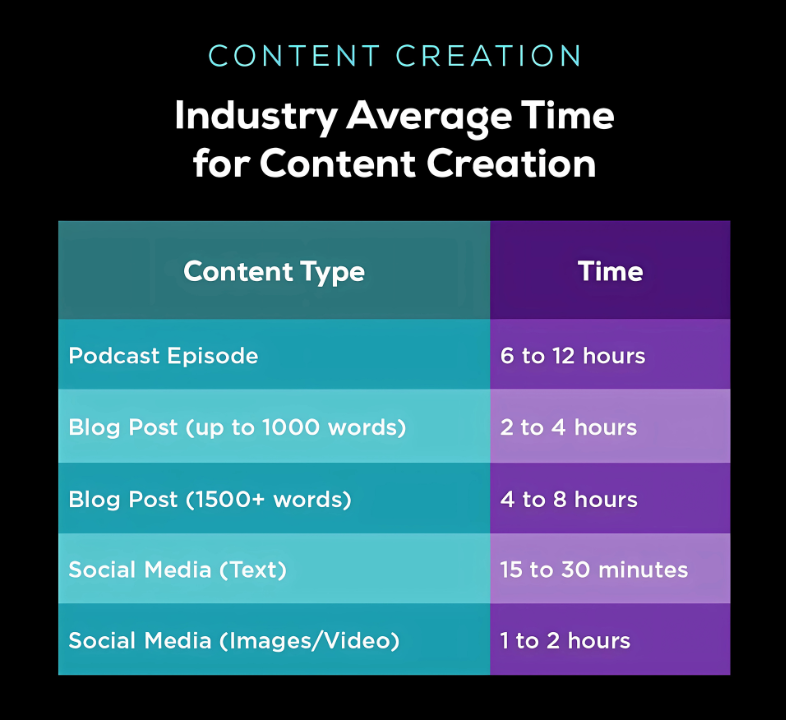
With a shiny new idea in hand, the next step is turning it into a script or outline. This is where an AI script writer for YouTube (or blogs, or podcasts) becomes your best friend. Writing can be time-consuming – you might spend hours crafting a YouTube script or blog post. But AI can collapse that process to minutes, giving you a solid first draft to build on.
Drafting the Script with ChatGPT or Claude:
Let’s stick with our example idea: “60-Minute Content Gauntlet Challenge”. We need a script for a YouTube video (maybe a 5-10 minute video) explaining and demonstrating the concept. Using ChatGPT, you could prompt something like: “Write a YouTube video script for a creator attempting to create content for 10 platforms in 60 minutes. Make it energetic, include a few jokes, and structure it with a clear intro, steps for each part of the workflow, and a conclusion.” Within seconds, ChatGPT will produce a multi-paragraph script, complete with dialogue-style narration and even suggestions for on-screen text or actions (if you ask for those). Claude can do similarly, and sometimes it’s great for longer scripts because it can handle larger prompts – meaning you could feed it a more detailed outline or even some research data and it will weave that in.
Other Scriptwriting Helpers:
Beyond the big-name AI chatbots, tools like Jasper have specific “video script” templates. Writesonic can similarly generate scripts or at least flesh out talking points if you prefer to speak more spontaneously. There’s also QuillBot, which isn’t a script generator per se but is fantastic for polishing and paraphrasing. For example, if the AI script has a sentence that sounds awkward or too formal, you can run it through QuillBot to rephrase it in a snappier way. Think of it as your AI copyeditor. This is especially handy if you worry that the AI’s writing is a bit stale – QuillBot can inject some freshness or at least give you alternatives.
Outline First, then Expand:
A pro tip in using AI for writing is to start with an outline. You can ask the AI for a structured outline (e.g., key sections or talking points for the video). Once you’re happy with the flow, then say “great, now expand each point into a full script with details and examples.” This tends to yield a more coherent result than one giant prompt asking for a full script off the bat. It also lets you inject your own points in the outline stage – ensuring your unique insights make it in. Remember, novelty and authenticity are what will keep your content from feeling like just another AI assembly line product.
Title and Description Generation:
Now that you have a script draft, don’t forget the surrounding metadata. For a YouTube video, you’ll need a catchy title and maybe a video description. AI to the rescue again – ask ChatGPT to act as an AI title generator for YouTube and pitch you, say, 5 different title options. You can be specific: “Give me 5 title ideas under 60 characters, with a bit of intrigue, for the video script above.” It might return titles like “I Made Content for 10 Platforms in 1 Hour (Challenge)” or “10x Output, 1/10th the Time: AI Content Challenge”. Not bad! You can then mix and match phrases or pick the best one. Similarly, generate a video description or a short blurb for social media posts promoting the video.
Pro Tip: Spice it Up – AI first drafts can read a bit flat or generic, so don’t be afraid to inject your personality. Add an anecdote or a quirky remark that only you would say. One trick: ask the AI to add a bit of humor or use a casual tone if the first pass is too stiff. For instance, "rewrite the last paragraph with a witty, conversational tone". You might also use emoji or informal asides if that fits your style, especially for scripts destined for TikTok or Instagram where a lighter tone wins.
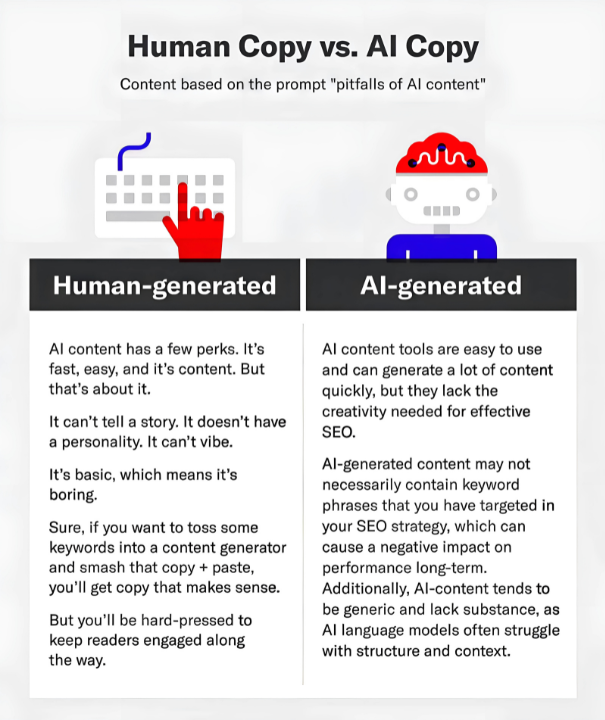
Real-world failure point: While an AI script writer for YouTube can save you tons of time, it’s not guaranteed to get facts right. If your content includes any data or claims (like “CTR gains 15% from better thumbnails”), double-check those. AI sometimes just makes things up (hallucination alert!). Also, watch out for blandness – AI might default to safe, overused phrases (“In today’s video, we’re going to…”). A quick edit pass can fix this: swap in more dynamic language or hooky opening lines. For example, instead of “In this video we will explore…”, you might punch it up to “Alright, time to see if I can survive the wildest content creation challenge I’ve ever attempted…”. That kind of personal touch keeps your content feeling human and engaging.
By the end of the scriptwriting phase, you should have a solid script or at least a set of talking points. If you’re more of a podcast person than a video person, this script could double as your podcast episode notes. (And yes, if you recorded a podcast conversation instead, you could also go in reverse and have AI summarize/transcribe it – think AI podcast transcript free via tools like Whisper or Descript – but for this guide we’re starting with script-to-content rather than content-to-script.)
Now, script in hand, let’s move to actually producing the content – and here comes the fun part: you may not need a camera or a microphone at all.
Video Editing & Highlight Clipping with AI
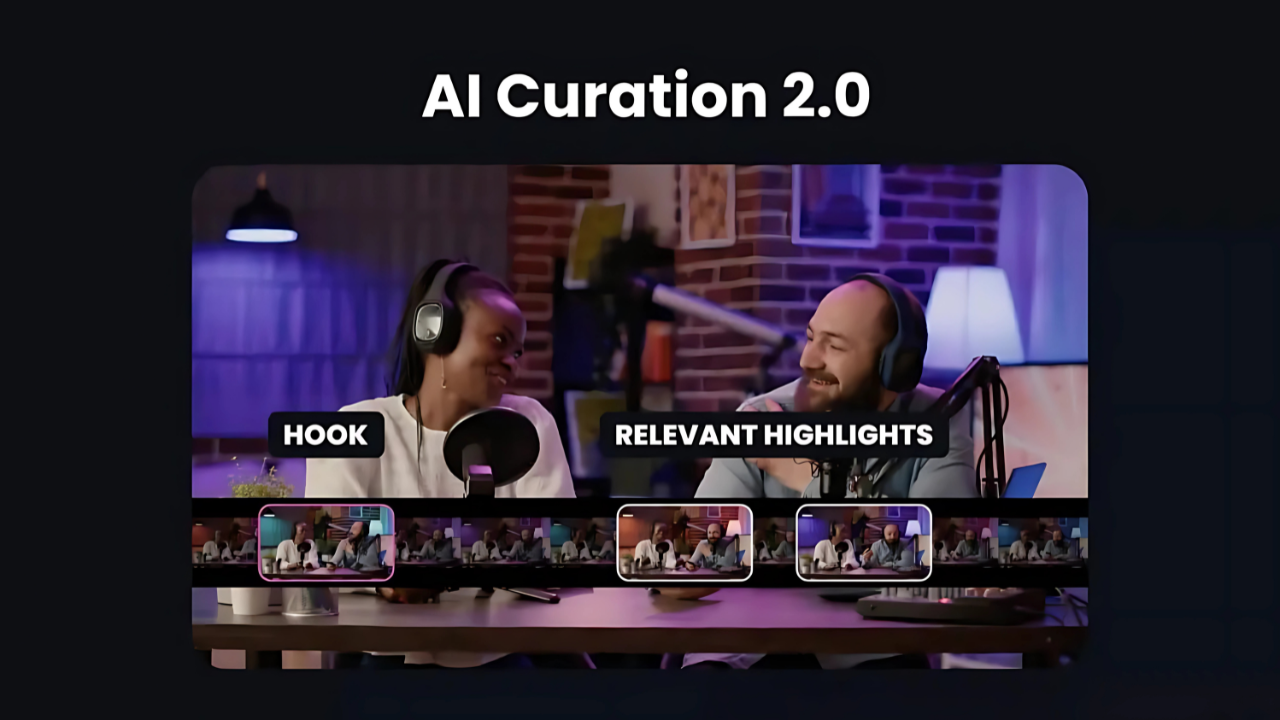
Now that the “master content” (our full video/podcast) is ready, it’s time to repurpose it. This means transforming that one piece into multiple shorter, platform-specific pieces. The prime target: turning a longer video or podcast into punchy short-form videos for TikTok, Instagram Reels, YouTube Shorts, and Facebook. Short videos are how you extend reach nowadays, and doing this manually for each good clip is tedious. Fortunately, the last year saw an explosion of AI short-form video maker tools that do the heavy lifting.
Highlight Clip Finders:
Leading the pack are tools like Opus Clip, Klap, and Vidyo. These are like having a junior video editor scour your video for the best bits. Upload your full video (or paste the link if it’s online), and they will analyze the speech and visuals to auto-select highlight moments. For example, Opus Clip uses AI to gauge which parts of a video might go viral – it looks at things like the punchiness of quotes and even your emotional tone, then it spits out a bunch of 15-60 second clips complete with captions and even a suggested title on each (they call it a “virality score”). Klap is a very similar AI highlight clip finder – it also cuts your video into multiple shorts, and some users find Klap allows a bit more customization in editing after the AI’s initial cut. It’s almost like a Clip-Finder Cage Match between these services; both are good, and often creators will try a couple and see which one picks the better clips from their content.
For our use case, we’d feed our ~5-10 minute “assembly line” video into Opus Clip and generate, say, 5 separate vertical videos from it: maybe one is a 30-second clip of the intro challenge setup, another is a tip about a specific tool (like a quick soundbite of “Use DALL-E 3 for thumbnails – trust me, it’s a game changer!”), and so on. These come out formatted as tall 9:16 videos, perfect for TikTok/Reels/Shorts, with bold captions on-screen (since most people watch shorts on mute initially, captions are key – these tools auto-generate them).
Best AI Video Editor for TikTok/Reels:
If someone asked me today what’s the best AI video editor for TikTok and Reels, I’d say these highlight tools are strong contenders because they save the most time. However, they’re not the only approach. If you prefer a bit more control while still getting AI help, check out Descript or Veed. Descript is an amazing audio/video editor that works off the transcript of your video – you edit the text to edit the video. Want to cut out a tangent? Delete that paragraph from the transcript, and the video’s corresponding section is gone. It also has a Remove Filler Words feature (one click to delete all the “ums” and “uhs” – magic!). Descript recently added a video clip suggestion feature too, where it can identify highlights based on the transcript (similar to Opus Clipbut within your editor, and you can tweak it). Veed is a cloud-based video editor that’s beginner-friendly and has some AI up its sleeve: auto-subtitles, auto-translations, and even a “Clean Audio” button that uses AI to improve your sound quality. While these might not fully automate highlight selection, they simplify the editing process if you want to manually create clips or edit your AI-generated ones (like adding a logo, progress bar, or meme graphics).
From Podcast to Clips:
What if your main content was an audio podcast or a Zoom recording? The process is similar. You might use Descript to get an AI podcast transcript free of your episode (Descript gives some free transcription hours, and Whisper AI via tools like FireCut or others can also transcribe accurately). Then you could identify juicy quotes to turn into audiograms or video snippets. Tools like Headliner (not AI per se, but automated audiograms) or again Opus Clip can use the transcript to find highlights. The key is that AI doesn’t care if it’s a talking-head video or just audio – the algorithms look at the words and speech patterns. So yes, you can convert a podcast to clips with AI pretty handily: imagine uploading an hour-long podcast and getting ten 1-minute animated quote cards with subtitles that you can share on socials.
Quick Win: Batch Processing – Have several videos or podcasts to chop up? Some AI tools let you queue multiple jobs or use templates. If you’re using a more manual editor like Descript for this, you can speed up work by using multitrack editing (e.g. apply the same intro/outro to all your clips in one go) or using macros to automate repetitive cuts. This is where the idea of batch video editing cloud AI comes in: you might not find a single tool that batch-edits completely autonomously, but with a bit of setup, you can automate large parts of editing for multiple files. For example, you could script Descript or Premiere (with the FireCut plugin) to auto-remove silences, add captions, and export in bulk.
Mobile Creators and Other Tools:
If you primarily shoot on your phone and want to edit on mobile, look into CapCut, an AI editing app for mobile creators (it’s free and made by the TikTok folks). CapCut has auto-captions, some auto-curation features like “highlight clips” (it can auto-sync your video to music beats and find exciting bits), and even template styles for Reels. It’s not as intelligent as Opus Clip in content selection, but it’s handy for quick edits on the go, especially for Reels/Shorts. We’re focusing on the automated side, but you can always manually refine AI outputs in these apps too.
Real-world failure point: The first time you use an AI clip cutter, you might be a bit disappointed by what it picks. For instance, maybe it grabbed a clip that cuts off just before the “punchline” of your story, or it included a clip where you’re referencing something from earlier that isn’t in the clip (making it confusing out of context). AI isn’t psychic – it doesn’t always get what part will truly resonate. Treat the AI’s clips as suggestions, not final products. You must review them. The good news is reviewing a handful of 30-second clips is way easier than manually scrubbing through a 30-minute video yourself. So you still saved time. Just don’t blindly post without checking. AI caption generator accuracy is usually high for clear spoken English, but names and niche terms might be wrong – quickly fix any misspellings in the captions for a professional look. This little polish can be the difference between looking like a slick creator versus someone who blindly auto-posts raw machine output.
At this point, our one hour assembly line has given us a main video and a set of short videos. We’ve covered YouTube and maybe a podcast feed with the main content, plus TikTok, Instagram, and YouTube Shorts with the clips. But we’re not stopping at video. Next, we’ll look at broadening our reach with captions, translations, and visual assets.
Auto-Captions & Multilingual Dubbing
.png)
Your content is edited and clipped – great! Now, two important enhancements for modern audiences: captions (subtitles) and dubbing (different languages). Captions increase engagement and accessibility. Dubbing unlocks entirely new audience demographics. AI makes both surprisingly easy, even for solo creators.
Auto-Captions Everywhere:
By now, you might have captions on your short clips from the previous step (Opus Clip and friends burn-in subtitles by default). But let’s say you also want a caption file for your full video or you want to style captions differently. If you’re looking for a free AI caption maker for Reels or other platforms, you have options. The Instagram app and TikTok have built-in auto-caption features – just toggle them on, and they’ll generate subtitles for you (using speech recognition AI behind the scenes). For more control, Descript can export subtitle files (.srt) which you can upload to YouTube or elsewhere. Even YouTube itself will auto-caption your videos after you upload (usually fairly accurately for many languages), though you might want to edit for perfect accuracy.
There are also dedicated caption tools like Kapwing or Veed that let you auto-generate and then adjust the styling (fancy fonts, colors) for captions on any video. So, no more manually transcribing – the AI does it in seconds. One tip: always glance through the auto-captions and fix any proper nouns or weird phrasings. This is like a quick caption accuracy test – if the AI thought you said “conten assembly lion”, you’ll want to correct that to “content assembly line” before publishing!
One-Click Dubbing to Other Languages:
Why stop at subtitles if you can dub the audio too? The idea of “releasing your video in Spanish an hour after you released it in English” would have been wild a few years ago. Now, it’s increasingly common. For instance, HeyGen (as mentioned earlier) offers a feature that’s essentially a multilingual AI dubbing tool. You upload your finished video (say you talking or your avatar video in English), select a target language (Spanish, Portuguese, Hindi, Chinese – they support dozens), and it will generate a new version of your video where the spoken dialogue is replaced by an AI-generated voice speaking the translated script. It even attempts to lip-sync if there’s a person on screen. So it really is nearly one-click dub video into Spanish, or whichever language.
Synthesia has a similar capability for videos made on their platform – you can switch the avatar’s speech to another language since they have the text script. In fact, Synthesia’s avatar voices can speak 140+ languages/accents, so you could make one video and publish it in English, Spanish, and Japanese just by changing the output settings. Their newer “translate video” features can take an existing video (not just avatar ones) and do a voice-over swap too.
By now, you might be thinking, “Wow, we’ve got content flying out in every direction – video, clips, captions, multiple languages!” Yes – and we’re still within our mythical 60-minute sprint if all goes well. But we’re not done repurposing yet. The assembly line also churns out images, thumbnails, and posts. Let’s fire up the visual generators next.
AI Image & GIF Generation for Thumbnails and Beyond
Visuals are a huge part of content creation. Thumbnails can make or break a YouTube video’s success. Eye-catching images or memes can boost a tweet or Instagram post engagement. But not everyone is a Photoshop wiz or has a design team. That’s where AI image generators come into play, letting you conjure up custom graphics in minutes. In our content assembly line, now is the time to create the supporting images: YouTube thumbnail, blog post banner, maybe some memes or quote graphics to share on social media – all leveraging generative AI.
One-Minute Thumbnails
- DALL·E 3 (Bing Image Creator) and Midjourney: type a scene—“futuristic content assembly line, bright cartoon style, 60-minute stopwatch”—and you’ll get four high-res options in under 20 seconds.
- Canva’s Magic Design or Fotor AI Thumbnail Maker: choose the best AI image, drop it into Canva, remove its background, add your face + headline text, export at 1280×720 px. Whole job: ~5 minutes.
Quick Extras for Social
- Pika Labs (text-to-video) turns that same illustration into a 3-second looping GIF—perfect for X, Threads, or Story teasers.
- Pebblely auto-places product shots (T-shirts, cameras, coffee mugs) into lifestyle backdrops when you need merch or B-roll stills.
Test Before You Post
Generate two or three thumbnail variations, then:
- Drop them into TubeBuddy Thumbnail A/B or a private poll with friends.
- Keep the winner. Even a 15 % CTR bump is worth the extra two minutes.
Reality check: AI loves neon cyberpunk and can mangle faces or text. Always scan for weird fingers, nonsense lettering, or off-brand colors—then tweak in Canva before going live. A little polish keeps your visuals looking pro, not procedural.
Scheduling Content & A/B Testing with AI
.png)
You’ve got a mountain of content pieces ready to go – congratulations! The final steps are about getting your content out to the world and optimizing its performance. This means scheduling posts across platforms and iterating through different titles, captions, or formats to see what hits best. It’s a lot to manage, but yes, AI can help here too.
AI as Your Social Media Scheduler:
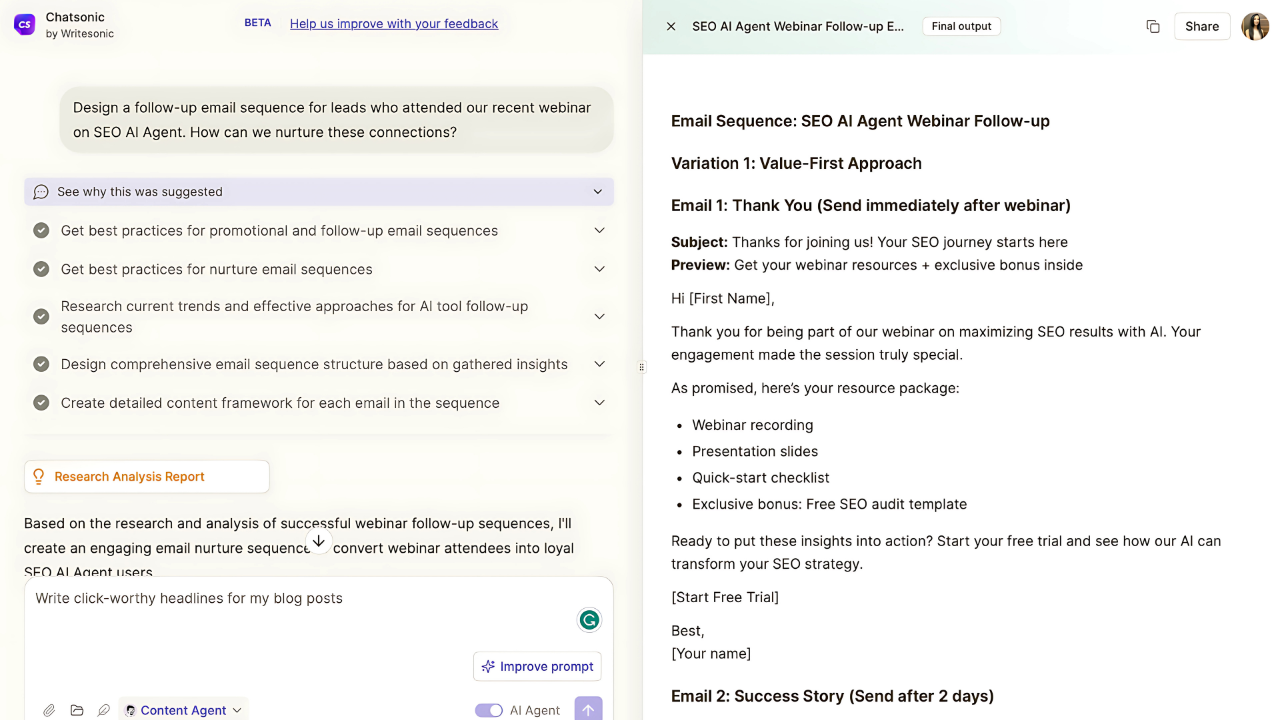
First, let’s tackle scheduling. Traditional tools like Buffer, Hootsuite, or Later help queue up posts across multiple platforms. Some of these are now integrating AI features. For example, Buffer’s AI Assistant can draft post captions for you given a link or a summary. But even if you don’t have a fancy integrated tool, you can manually use AI to prepare your posts. Think of it like this: for each platform – Twitter (now X), Instagram, LinkedIn, Facebook, YouTube (community tab), etc. – you want to tailor the caption or description. You can prompt ChatGPT with something like: “Here’s my new video’s title and a few key points. Write me a catchy tweet (max 280 chars) teasing the video, a slightly longer Instagram caption with a couple of hashtags, and a more professional LinkedIn post announcement.” Boom, you get platform-specific copy. This is effectively an AI content calendar generator in action, helping you plan what to say, where, and when.
Now, actual scheduling (like posting at 10am on Tuesday) usually requires using the platforms or third-party apps – not so much an AI task, but here’s where AI can suggest optimal times if you provide context. You might ask, “When is the best time to post a TikTok video about tech on a weekday?” and get a generalized answer. Some tools (like Later’s suggestions or even TikTok’s analytics) might give insights on your audience’s peak times; AI can interpret those for you if needed.
Social Media Captions – Optimized and A/B Tested:
We have all these AI-generated clips and images; writing engaging captions for each can be exhausting. Generate Instagram captions AI free using ChatGPT or Writesonic: for instance, “Write an engaging Instagram caption for a Reel about creating content quickly with AI. Include 2-3 relevant hashtags (e.g., #contentcreator #AItools). Make it energetic and inviting to comment.” Instantly, you get a caption that you can tweak. Do the same for a LinkedIn post (with a more explanatory tone), a Facebook post (maybe more personal voice), etc.
Remember the secondary keywords: if relevant, slip them naturally. For example, your LinkedIn post could mention “using a simple AI tool stack under $50” (if that’s appealing to a professional crowd). Your tweet could highlight “AI content repurposing workflow tricks”. This not only hits those keyword notes but also makes your promotion posts richer.
A/B Testing Titles, Captions, Thumbnails:
Sometimes, you don’t know what will resonate best. AI made multiple title suggestions, multiple thumbnail options – why choose just one if you can experiment? On certain platforms you can do an A/B test: for example, on YouTube, some creators will change the title after a day if the video isn’t performing – effectively testing Title A vs Title B. If you have two thumbnails, you might swap to the second one after the first 24 hours and see if click-through improves. There are even tools (like TubeBuddy’s Legend tier) that automate this, essentially an automate thumbnail A/B testing AI approach, though the “AI” is more in analysis than swapping.
For social media posts, A/B testing is trickier since once something’s posted you can’t really test two captions on the exact same audience. But you could do something like: post two different hooks from your video as separate tweets a few hours apart, both linking to the video, and see which gets more engagement. AI can generate those two variations easily (“Give me two distinct tweet hooks highlighting different angles of this content”). This is especially useful for Twitter/X, where posting multiple times is fine. On Instagram or LinkedIn, you might only post once – so you’d better choose the right angle. AI can help refine that angle by simulating what might sound catchiest. If you’re unsure, ask a friend or run a quick poll among trusted followers (“Which of these two descriptions makes you want to click more?”).
Content Calendar and Consistency:
If you’re planning to do this assembly line regularly (say, weekly content drops), AI can also help plan a content calendar. It could be as simple as a spreadsheet where you list each piece and platform – but you can also ask ChatGPT to generate a calendar view: “Help me organize the following content pieces into a two-week content calendar with dates and platform notes.” This ensures you don’t accidentally spam all platforms on the same day with everything. You might schedule the YouTube video on Monday, the first wave of short clips on Tuesday, some images on Wednesday, another short on Thursday, etc., to maximize lifespan. There are emerging AI social media scheduler tools that attempt to do this automatically – essentially they’ll soon let you upload a batch of content and an AI will schedule and even repost variations at optimal times.
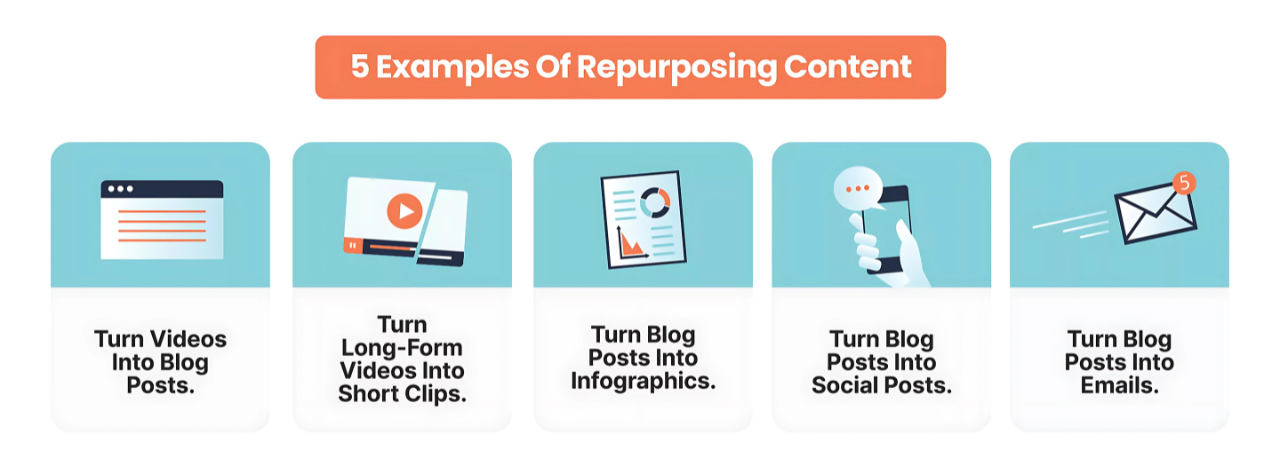
Quick Win: Recycle and Reformat – One secret of high-output creators: they don’t let any content piece die on one platform. Use AI to recycle content in new formats. For example, take your video transcript and ask for a blog post version (yes, auto-generate a blog from the video using AI). It might require some cleaning up, but suddenly you have an article for your website or Medium. Or compile a few tips from your video into an email newsletter – again, AI can help draft it quickly. This way, your one piece of content turns into a whole content ecosystem. The assembly line never truly ends – it just keeps looping content back into new forms (like an infinite content recycler). Just be mindful to space things out and maybe tweak the messaging so people who follow you in multiple places don’t get the exact carbon copy post (that can feel spammy).
Real-world failure point: The biggest challenge at this stage is organization. With so many pieces, it’s easy to lose track – which clip did I post where? Did I remember to update the YouTube thumbnail? AI won’t magically know what you’ve done or not done (unless you log it somewhere). So, whether through a project management tool or a trusty notebook, maintain a checklist or dashboard. Some creators use Notion or Airtable to track content status by platform. If that’s too much, even a simple Google Sheet listing each asset and checkmarks for platforms can do wonders. And while scheduling tools are great, be careful not to set and forget everything – occasionally algo changes or quirks might mean a post fails. So, still keep an eye on your scheduled posts to ensure they actually went out.
We’ve now assembled and distributed the content. In a whirlwind hour, a single idea has mushroomed into multiple videos, posts, and more, reaching audiences far and wide. But the story doesn’t end at hitting “Publish.” The final piece of our assembly line is actually a loop – feeding results back into the next cycle. Let’s talk analytics and continuous improvement.
Closing the Loop: Analytics and Iteration
1. Pull Your Stats
Grab a quick snapshot from each platform:
- YouTube: views, watch time, click-through rate.
- TikTok/Reels: total views, likes, average watch-time.
- Blog/Email: page views, open rate.
2. Ask AI What It Sees
Paste a short data dump into ChatGPT or Claude:
“Here are my last five video titles, view counts, and watch times—what patterns jump out? Give me two ideas to try next week.”
The model can spot simple trends (titles with numbers win, Spanish dubs outperform English, etc.). Treat the suggestions as clues, not commands.
3. Adjust the Next Batch
- Double-down on formats or topics that spiked.
- Fix weak spots (slow intro? swap in a faster hook).
- Keep the good thumbnail or caption styles; drop the duds.
4. Track Basic ROI
Make a two-column sheet: Hours/Costs vs. Results (views, followers, sales). After a month you’ll see which slices of the assembly line pay off—and which you can skip.
5. Test, Don’t Guess
AI lets you pump out variations in minutes, so run simple experiments:
- Two thumbnails → poll friends or use TubeBuddy’s thumbnail split-test.
- Two captions → post A on Monday, B on Wednesday, compare likes.
Pick the winner, scrap the rest.
6. Keep Tools Manageable
If hopping among ten apps feels messy, switch to “all-in-one” suites—Canva now does design, basic video, and AI copy; Descript records, transcribes, and edits. Fewer tabs, same output.
7. Stay Human
Use the time saved to reply to comments, ask viewers what they want next, and show you’re listening. Authentic engagement beats any algorithm tweak.
8. Watch for Burnout
AI makes it easy to post daily, but you still have to plan, check, and interact. If the pace feels frantic, slow the conveyor belt. Quality > quantity—every time.
Do this loop weekly: pull numbers → chat with AI → tweak → publish. In a month your content machine will feel smarter, faster, and—most important—still true to you
Conclusion
We’ve reached the end of the assembly line for this article, but for you it might just be the beginning of a new, supercharged content creation journey. We took a single concept – “AI Content Assembly Line” – and walked it through brainstorming, scripting, voice-over, video production, editing, captioning, image creation, scheduling, and feedback. Each step, we leveraged AI to accelerate and multiply our efforts. What used to demand a team of specialists (writer, video editor, graphic designer, social media manager) and days or weeks of time, you can now accomplish largely on your own in a single focused sprint. It’s a bit mind-boggling!
Let’s temper the hype with reality: your first run might not be 60 minutes flat. And that’s okay. There’s a learning curve to any new tool. You might spend an afternoon playing with different AI tools, figuring out which ones fit your style. But even that is time well spent, because once your workflow clicks, you’ll feel like you’ve discovered a secret hack. Suddenly, keeping up a consistent presence on all those platforms feels doable rather than daunting.
Throughout this guide, we’ve emphasized the balance of speed and quality. Yes, you can 10× your output, but always aim to keep the personal touch. AI can churn out content, but you make it resonate by adding your stories, your humor, your perspective. That’s what will prevent the “race to the bottom” of generic AI spam and instead build an audience that values your prolific yet valuable output.
One more thing: the tools and techniques we discussed are evolving rapidly. What’s cutting-edge today (like DALL·E 3’s image gen or HeyGen’s dubbing) might be old news a year from now, replaced by even more powerful AI tools for content repurpose. Stay curious and keep experimenting. The fact that you read a 7,000+ word pillar article about AI content workflows shows you’re dedicated to leveling up your creator game – and that mindset is your biggest asset.
So, go ahead – assemble your own content assembly line, tweak it, make it yours. Whether you take on the “60-Minute Content Gauntlet” as a fun challenge or simply use these insights to save a few hours on your next project, the potential is huge. Creators who embrace these AI tools early will have an edge in both creativity and efficiency. You can output more without burning out, reach wider audiences without huge budgets, and free up time to focus on the creative ideas that no AI can replace.
Now, time to put this into practice: set a timer, fire up your favorite AI tool, and create something amazing in the next hour. You might surprise yourself at just how much you accomplish. Happy creating, and welcome to the future of content – it’s an assembly line, but it’s also a playground. 🚀
FAQs
It’s possible, though it might take some practice and the right tool setup. The “60 minutes” is an ambitious challenge scenario, assuming you’ve got a well-honed process. In reality, your first run might take a bit longer as you get used to each tool. But generally, yes – AI can drastically cut down the time. For example, writing a script might go from 2 hours to 10 minutes with AI, editing video from 3 hours to 15 minutes, etc. Summing all those savings, creating content for many platforms in an hour is within reach. The key is planning and using the AI outputs intelligently rather than starting from scratch for each piece.
Not at all. In fact, many tools have free tiers or inexpensive plans. You could string together a mostly-free workflow: for instance, use ChatGPT’s free version for brainstorming and even script (though the paid GPT-4 can be better), use CapCut (free) for clipping and captions, leverage Bing’s DALL·E 3 (free with a Microsoft account) for images, and maybe a free trial of an avatar tool for one video. That said, paying for a couple of well-chosen tools can make life easier – and still not break the bank. For under $50/month, you could likely get a subscription to a top-notch tool in each category (writing, video editing, voice, etc.). Example: Opus Clip has a plan around $19, a premium ChatGPT is $20, and maybe a voice tool or image tool fills the rest, many of which are even cheaper or one-time credits. You don’t need all the tools at once either; you can subscribe to one, do a batch of work, then switch. The stack we discussed in this guide can be mixed and matched to your budget. Many creators start with mostly free methods and only invest in paid tools once they see real returns (like growth or income) from the content. So, a simple AI tool stack under $50 is definitely feasible – and if content creation is part of your business, that investment can pay for itself quickly in time saved.
Auto-captions these days are surprisingly accurate for many scenarios, often 90-95% accuracy for clear spoken English. They might mess up proper nouns, industry jargon, or if someone has a heavy accent or there’s background noise. So you usually get a very good first draft of captions, but a quick proofread is wise, especially for names or technical terms (no AI knows your unique product name or slang until you teach it). As for translations: AI translators like DeepL or the latest from Google are quite good for many major languages, but they can still produce awkward phrasing or miss context, especially with idioms or humor. It’s best if a human (who knows the target language) can review AI-translated captions or scripts. If that’s not possible, you might keep translations simple and clear to avoid mistakes. Also, some languages with AI voice-over may have slight pronunciation quirks. Overall, these tools get you like 80% of the way to professional quality with almost no effort – but that last 20% (the polish) is where a human touch ensures there are no embarrassing errors.
First, get a transcript of your video or podcast. Many AI tools do this automatically (Opus Clip and Klap will transcribe as they analyze; or you can use Descript or even YouTube’s auto captions to get a transcript). Once AI has the transcript, tools like Opus Clip use algorithms to pick out quotable, engaging sections – often based on where the speech is exciting or the content is rich. They’ll cut those sections out, add subtitles, and format everything into short videos. In practice, you upload your video (or audio) to the AI service, wait a few minutes, and then you’ll receive a selection of clip files. Review those and choose the best. For a podcast (audio-only), you might use a tool that can add visuals to your audio clip – for example, Kapwing or Headliner will turn audio into a video with a waveform and captions. The key is the AI saves you from scrubbing through the entire recording yourself. It’s like having an assistant find all the sound bites for you. Just keep an eye out to ensure each clip still makes sense on its own (sometimes you might need to tweak the start/end point).
Generally, if you’re cloning your own voice or using an avatar to represent yourself, it’s considered ethically fine – with a couple of notes. First, transparency is appreciated: your audience might like to know if an avatar or clone is being used, especially if it’s interacting as if it’s you. Some creators put a note like “(AI-generated voice)” in the description. The bigger ethical concerns are around using someone else’s voice or likeness without permission – that’s a no-go. Using AI to make it sound like a famous actor is usually illegal and unethical. Also, consider the potential disconnect with your audience. If everything is AI-generated (voice, face, etc.), you might lose some personal connection. That’s not a moral issue per se, but a strategic one. In summary: using AI voices/avatars is a powerful tool, just use it honestly and in a way that respects creators’ rights and your audience’s trust.
It’s a workflow where AI tools assist at each stage of content creation, allowing one idea to be quickly transformed into multiple pieces of content. Think of it like a factory assembly line for content: you use one AI to brainstorm ideas, another to write a script, another to generate a video or audio, others to create short clips, images, captions, etc. The result is a bundle of content (videos, posts, images, etc.) produced very efficiently. It’s not a physical assembly line, but a metaphor for stringing together AI services so you can repurpose and distribute content fast.
If we’re talking specifically about creating short vertical videos for TikTok, Instagram Reels, or YouTube Shorts, tools that automatically find and format highlights are the most helpful. Opus Clip is one of the best for this – it detects compelling moments in a longer video and outputs ready-to-post vertical clips with captions. Klap is another strong choice, very similar in function. Both of these save tons of time compared to manual editing. If you prefer doing some editing yourself but want AI assistance, CapCut (mobile app) offers auto-captions and some smart editing templates, and Veed (web app) provides easy editing with features like auto subtitles and filters. So the “best” might be Opus Clip for full automation, but if you need a free solution, CapCut is a great mobile-friendly alternative. It also depends on your content – try a couple and see which output you like more.


.png)


