
Creating videos is hard enough; choosing the right video editing tools shouldn’t make it harder. Many new creators start by trimming clips on a smartphone, then wonder if they need the same complex software used in Hollywood. The result? Confusion, wasted time, and stalled creativity.
This guide is your roadmap from your first clip to a Hollywood-level production. We break down the ideal video editing tools at every stage of your creator journey. Whether you’re editing on a phone or already dabbling on desktop, you’ll learn when to stick with simple apps and when to upgrade to more powerful software. By the end, you’ll know exactly how to progress from beginner-friendly tools to professional post-production—without the overwhelm.
Table of Contents
- Stage 1: Phone-Only Start
- Stage 2: Cloud Collaborative Growth
- Stage 3: Pro Desktop Finishing
- Stage 4: Archive & Repurpose Loop
- Conclusion
- FAQs
Stage 1: Phone-Only Start – Mobile Creation on the Go
Every creator’s journey often begins with the simplest setup: a smartphone. In Stage 1, you rely entirely on a phone or tablet for filming, editing, and posting. The appeal is clear—it’s accessible, fast, and budget-friendly. When you’re just starting out, a mobile video editing app can cover all the basics without overwhelming you.
Why Start Editing on a Phone? For beginners, using a phone feels natural. You can shoot a clip and immediately trim or spice it up on the same device. Need to cut out a false start or awkward pause? A few taps on a video trimmer built into your app, and it’s gone. Want to punch in on a shot or reframe for social media? Mobile editors let you crop and adjust aspect ratios on the fly, essentially serving as a quick video cropping and trimming tool. Best of all, you can do this anywhere—on the couch, during a commute, or right at the event you’re filming.
What Can Today’s Mobile Editors Do? Don’t underestimate phone apps. Modern mobile editors are surprisingly powerful:
- They handle multiple video tracks (so you can add music or overlay text and images).
- They offer video speed adjustment tools to create slow-motion effects or timelapses.
- Many include one-click filters and templates to give your footage a polished look.
- AI comes to mobile: apps like CapCut – Video Editor (the popular TikTok editing app) offer features like auto-captions (turning speech into on-screen text), background removal, and even basic AI suggestions that identify the best parts of your footage.
- You can even record voiceovers directly in the app, effectively making it a mini voiceover video editor for narrating your clips.
Tool Highlight: CapCut. One standout in Stage 1 is CapCut. It’s a free mobile editing app available on both iPhone and Android, and it exports videos with no watermark. That makes CapCut arguably one of the best free video editing software options for beginners. It offers a full toolkit: you can split and merge clips, add transitions, apply catchy music tracks, and overlay stickers or effects. The app also has a slew of trending templates that let you create stylized videos (popular on TikTok and Instagram Reels) by simply dropping your own clips into a preset sequence. Originally launched for TikTok creators, CapCut is actually made by the same company behind TikTok. No surprise it’s often considered the go-to TikTok video editor for trending content. In short, CapCut functions as a social media video editor built for the short-form video era. If you’re looking to create a snappy TikTok or an Instagram Reel, CapCut’s intuitive timeline and special effects make it a go-to choice.
iPhone vs Android: If you have an iPhone, you also have Apple’s iMovie pre-installed – a simple video editing app for iPhone that covers basic needs (trimming, adding titles, music, and filters). On Android, aside from CapCut, popular video editing apps for Android include KineMaster and FilmoraGo, which offer robust features (though their free versions might slap on a watermark). Ideally, you want a free video editor no watermark solution. This is why CapCut stands out: it exports clean videos without any logos. Whatever you choose, pick an app that doesn’t limit your creativity with watermarks or low quality output.
Quick Win: Use templates for instant style. Load your clips into a ready-made template in apps like CapCut or Canva – the app will auto-apply transitions, music, and effects, giving you a polished video with minimal effort.
Limits of Phone-Only Editing
Creating content with just a phone is liberating, but it has limits. On a small screen, doing precise edits (like fine-tuning cuts to the beat of music or color correcting footage) can be fiddly. Mobile apps also have performance constraints – editing a 20-minute YouTube video in 4K resolution on a phone might be sluggish or even crash. And while you can do picture-in-picture or multi-track edits, it’s not as comfortable as on a desktop. Think of Stage 1 tools as ideal for short-form needs: vlogs, TikToks, Reels, Shorts, and quick video messages. For longer, more complex projects, you’ll start feeling the itch for a bigger screen and more horsepower.

However, Stage 1 is the perfect training ground. You learn storytelling, timing, and the fundamentals of cutting footage without needing expensive gear. Many viral creators on TikTok and Instagram started out editing solely on their phones. It’s a stage where you focus on content over technical perfection. And the gap between mobile and desktop editors is closing – phones today can even handle basic 4K video editing in a pinch, and apps are adding advanced features with each update.
Mini Story: The Phone-Only Vlogger – Anna, a travel vlogger, began her journey with just her Android phone. During a trip to Bali, she recorded dozens of clips of her adventures. Each evening, she sat by the beach trimming and stitching videos in CapCut. She added upbeat music and on-screen captions to share her travel tips. The result? A series of 60-second travelogues that she posted to TikTok and Instagram Reels. One of her Bali clips went viral, racking up hundreds of thousands of views. All of it was done without a PC. Encouraged by the response, Anna kept improving her phone editing skills. She learned to play with video speed adjustments for dramatic slow-motion waterfall shots and used voiceover narration to add context to her clips. Only after she grew to a million followers did she even consider using a computer to edit. Stage 1 carried her quite far – proving that a phone-only start can take you from zero to internet hero.
Stage 2: Cloud Collaborative Growth – Leveling Up with Online Tools
After mastering quick edits on your phone, you might start craving more versatility and a larger workspace. Stage 2 is all about moving into the cloud: using online video editors that run in your web browser. This is a natural next step for many growing creators who want to collaborate with others or work from both a laptop and a phone seamlessly. The good news is there are plenty of good video editing software options that don’t require a powerful computer at all—just an internet connection.
Why Go Online?
Cloud-based editing platforms offer a few big advantages:
- Bigger Canvas, Familiar Feel: Editing on a computer (through your browser) gives you more screen real estate and precision. You can drag and drop clips on a timeline with a mouse and keyboard, which often feels easier after months of pinching and tapping on a phone screen.
- No Heavy Hardware Needed: Because the processing is done on the platform’s servers, these online video editing platforms don’t demand a high-end PC. Whether you’re on a modest laptop or borrowing a friend’s computer, you can edit high-resolution footage without worrying about your device’s specs. It’s essentially cloud video editing software doing the heavy lifting remotely.
- Collaboration: Perhaps the biggest draw of Stage 2 tools is easy collaboration. When your content starts involving a team—say you have a friend helping with edits or you’re sending drafts to a client—cloud editors shine. Multiple people can often work on or review a project together. You might share a link to your edit, and a collaborator can leave comments or even tweak the video from wherever they are. No more sending giant files back and forth – everyone accesses the same project in the cloud. This kind of cloud collaboration is a game-changer for small creator teams.
- Instant Access & Sharing: Your projects are saved online, which means you can start editing on your desktop at home and later make a quick tweak from your phone or tablet. Also, publishing directly to platforms like YouTube or Instagram from these editors is usually just one click, since they’re already online.
Tool Highlights in the Cloud:
Several web-based editors have become popular for creators in Stage 2:
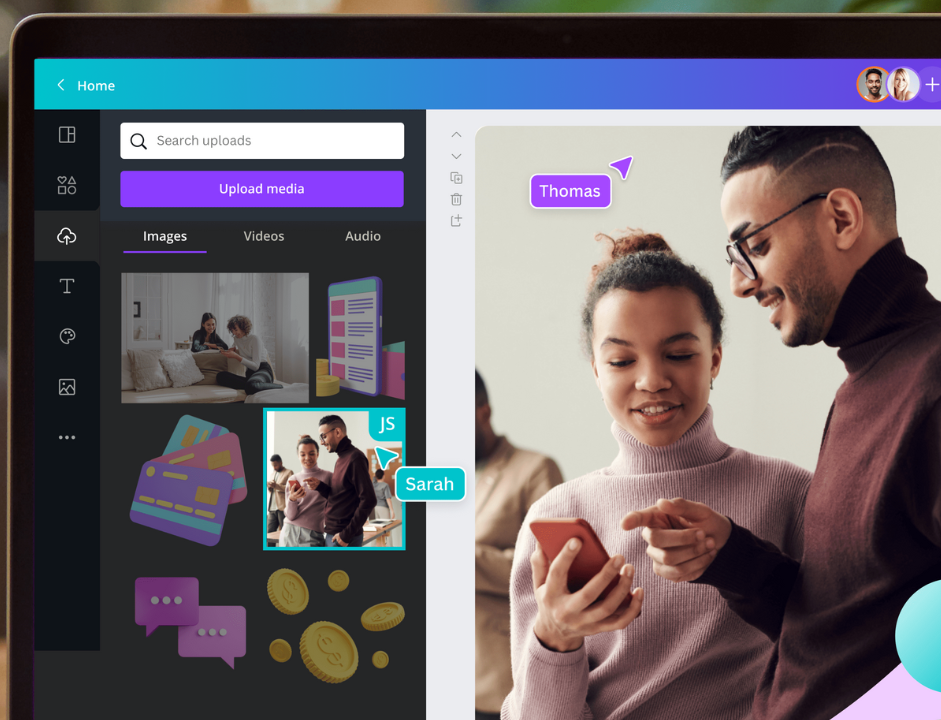
- Canva Video Editor: Known originally for graphic design templates, Canva now offers an intuitive video editor within your browser. Its strength is in templates and graphics – you can start with a beautifully designed intro or scene and just swap in your own footage and text. Canva’s timeline is straightforward, and it’s great for making social media videos, promos, or simple YouTube intros. Plus, because it’s cloud-based, you and your team can collaborate in real time, leaving comments or trying out different edits on a shared project. If you’ve used Canva for posters or Instagram posts, the video editor feels like a natural extension, complete with access to Canva’s vast library of stock images, clips, and music.
- VEED.io: Veed is an online video editing platform built with content creators in mind. It's particularly handy for making captioned videos and quick social clips. Veed gained popularity as an easy way to add subtitles, progress bars, and motion text to videos (think of those Facebook or LinkedIn clips where the text animates as you watch). With Veed, you can invite team members to view or edit projects, and it even has a brand kit feature for business users to keep logos, fonts, and colors consistent. It’s a solid choice when you need to produce content quickly and keep everything in the cloud.
- InVideo (InVideo AI): InVideo takes the template game to the next level. It offers thousands of pre-made video templates for all kinds of content—from YouTube outros to TikTok promos. What sets InVideo apart is its embrace of AI. It has an “AI video editor” mode where you can give it a script or even just an idea, and it will try to assemble a draft video for you using stock footage and automated voiceovers. InVideo essentially acts like a creative assistant: for example, you could type “15-second travel ad for Paris” and it might generate a quick video with Eiffel Tower clips, music, and text all laid out. You can then tweak the result to your liking. Collaboration is also baked in; much like Google Docs for video, multiple people can log in and edit or comment simultaneously. This makes InVideo a powerful online video editing platform for teams working remotely.
All these cloud tools are either free with limitations or have free trials, making them easy to test out. Canva’s free plan is generous (though some premium templates or stock media require a Pro subscription). Veed offers a free tier that works for short clips (with a small watermark, unless you upgrade). InVideo has a free plan that lets you export videos with a tiny watermark; their paid plans remove that and unlock higher resolutions. The bottom line is that Stage 2 doesn’t necessarily add a lot of cost to your workflow unless you decide the premium features are worth it.
New Powers (and a Few Drawbacks):
By transitioning to cloud editors, you gain features like:
- Multi-Track Editing: Most online editors let you stack a few video and audio tracks, which is perfect for picture-in-picture effects or mixing background music with narration.
- Rich Text and Graphics: Typing text on videos is easier, and you have more fonts and motion graphic options (great for creating captions, lower-thirds, or title cards).
- Auto Subtitles & Transcription: Many cloud platforms integrate AI transcription. For example, Veed or CapCut’s web version can automatically generate subtitles for your video with decent accuracy. This saves tons of time if you need captions for YouTube or social media (where watching without sound is common).
- Anywhere Access: Start a project in the office, continue on your home PC, even make tweaks from a mobile browser in a pinch. Your edits aren’t tied to a single device.
- Asset Libraries: With cloud tools, you often get huge libraries of royalty-free media. Need a stock video of a city skyline or a background music track? It’s built-in. This can elevate the production value of your videos with minimal effort.
However, keep in mind a few challenges:
- Internet Dependence: A slow or spotty internet connection can make cloud editing frustrating. Uploading large video files takes time, and if you’re working with hours of footage, you might be staring at progress bars more than you’d like.
- Limited Fine-Tuning: Browser-based tools, while powerful, still aren’t as precise or feature-rich as desktop giants. You might not get the absolute fine control over color grading or audio mixing that you’d have on a full program. For instance, doing advanced color correction or working with very high-bitrate footage could be cumbersome online.
- Export Times & Queues: Since rendering (exporting the final video) happens on the server, it might queue your job if lots of people are exporting at once. Usually it’s reasonably fast, but occasionally a long video might take a while. The quality is typically great though—these platforms optimize settings for you. And an upside: you can often close your browser and get an email when your video is done processing in the cloud.
Stage 2 is where many creators produce their first “professional-looking” pieces. In fact, for many up-and-coming YouTubers, these cloud-based editors are the best video editing software for YouTube at this stage. They hit the sweet spot: more capabilities than a mobile app, but far simpler (and often cheaper) than high-end desktop suites. You might still be making Instagram or TikTok content, but now it has cleaner cuts, captions, and custom graphics thanks to these tools. More importantly, if you’re working with an editor friend or a small team, you’re developing a workflow where everyone can contribute. This collaborative muscle will be really useful as you grow.
Pro Tip: Leverage templates and presets. Don’t start from scratch – use the ready-made templates (and preset styles) in cloud editors like Canva or InVideo. They save time and give your videos a consistently polished look with minimal work.
Experiment: Remote Team Editing – To illustrate Stage 2’s collaboration power, let’s consider a quick experiment. Imagine you and a friend are co-editing a vlog. You’re in New York, and your friend is in London. Using an online platform like Veed or Canva, you upload the raw clips to a project and share the editing link. While you arrange the clips on the timeline, your friend starts adding funny captions and stickers at highlight moments. You can see each other’s edits in real-time, almost like you’re both in the same editing room even though you’re continents apart. There’s no need to send large video files via email or drive; everything sits in the shared cloud project. By the time you’re done, you have a complete vlog with both of your inputs, and it’s already synced online ready to publish. This kind of seamless teamwork simply wasn’t possible back in the purely desktop editing days.
By the end of Stage 2, you’ll have a solid grasp of intermediate editing skills. You’ll know how to leverage online video editing platforms to speed up production (thanks to templates and AI helpers) and collaborate effectively. You might even dabble in features like auto-cutting silences or text-to-video conversions, giving you a taste of the cutting-edge tech in content creation. When your projects start demanding even more – higher quality, more intricate effects, or when you simply want absolute control (the kind only a desktop video editor can provide) – that’s the sign you’re ready to move to Stage 3.
Stage 3: Pro Desktop Finishing – Going Pro with High-End Software
You’ve honed your skills on mobile and experimented with cloud tools. Now you’re tackling bigger projects or simply demanding more control and quality. Stage 3 is where you graduate to professional desktop editing software. This is the realm of powerful programs running on a PC or Mac – the same kind of tools used to cut Hollywood films or top YouTube channels. The leap to Stage 3 often happens when you find the cloud or mobile options limiting. Maybe you want to edit a short film, craft a detailed tutorial series, or just crave the precision that only the best editing software can offer. Here, you’ll meet the heavyweights: applications like Adobe Premiere Pro and Blackmagic DaVinci Resolve, which frequently top industry lists of the best video editing software available.
Why Go Pro on Desktop?
Desktop editing software brings a suite of advantages that cloud or mobile simply can’t match:
- Full Creative Control: You get an unrestricted timeline with dozens (even hundreds) of tracks if needed. Video on top of video, multiple audio tracks, images, titles – a complex project with layers and overlays is no problem. You can make microscopic adjustments, from trimming a clip at the exact frame to fine-tuning the timing of a title down to the millisecond.
- Advanced Effects & Precision: Need to do color grading to make all your shots look consistent and cinematic? Want to key out a green screen and add a different background? How about adjusting audio levels so that your voiceover, music, and sound effects are perfectly balanced? Pro software has you covered. These tools often include built-in motion graphics capabilities or integrate with dedicated apps for high-end graphics and visual effects. While a cloud tool might offer basic filters, a pro desktop app will let you tweak color curves, apply tracking masks, stabilize shaky footage, or create complex transitions. In short, you can achieve broadcast and film-quality polish.
- Performance (With the Right Hardware): A big reason to go desktop is to harness your computer’s power. A capable PC with a strong CPU and a beefy GPU (graphics card) can handle high-resolution video like 4K or even 8K, scrubbing through footage smoothly and rendering (exporting) faster. This is where GPU vs cloud rendering becomes a consideration. With a top-notch GPU, your desktop might export a video faster than real-time. On the other hand, if you have an older machine, heavy projects can still bog down – whereas a cloud editor would shift that burden to its servers. Professionals often invest in high-performance rigs because, in the long run, a powerful system saves countless hours when editing regularly.
- Offline & Secure Workflow: With desktop software, you’re not relying on an internet connection. You have all your files locally, which can be faster to access (no upload/download needed) and more secure if you’re working on sensitive projects. It’s you, your computer, and your footage – no potential cloud outages or privacy concerns.
- Extensibility: Pro editors are often expandable ecosystems. You can install plugins or extensions to add functionality (for example, special effects packs, advanced color grading tools, or even AI plugins that do things like auto-cut silences). This modability means if there’s a feature you wish for, chances are someone has made a plugin or script for it.
Premiere Pro – The Industry Workhorse:
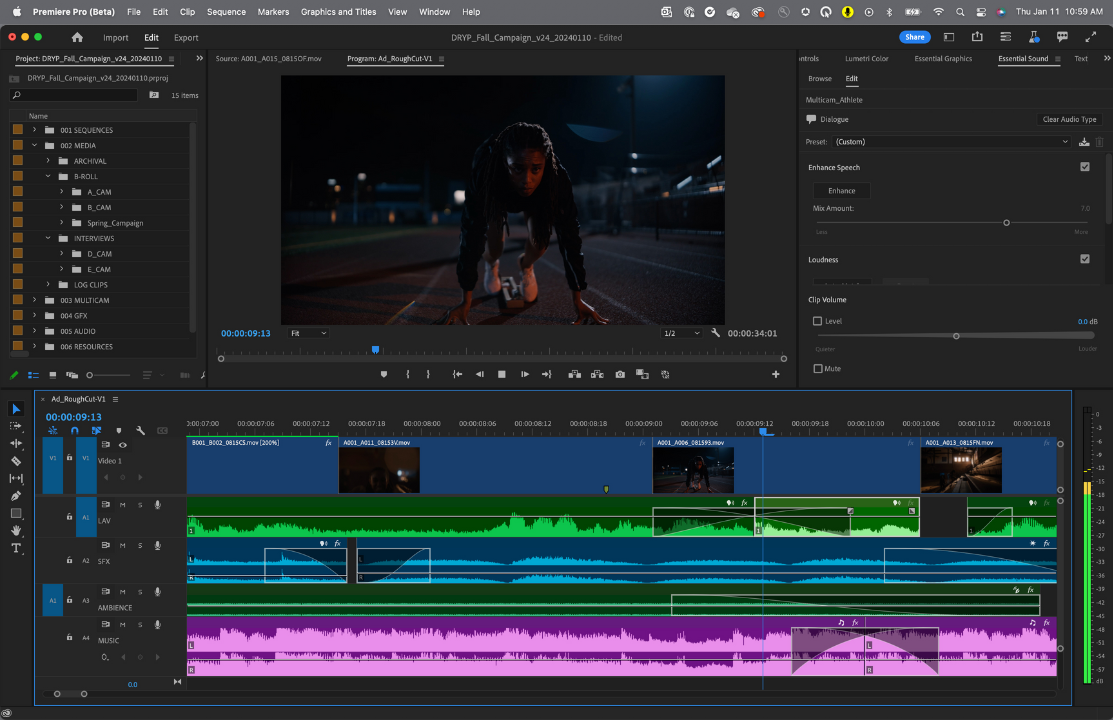
Adobe’s video editing software, Premiere Pro, is practically synonymous with professional video editing. As Adobe’s flagship editor, Premiere Pro has been used on everything from YouTube vlogs to feature films. If you ask “what do most YouTubers use to edit?”, Premiere is one of the top answers (alongside a couple of others). Its interface is a classic timeline with separate tracks for video, audio, effects, etc. Premiere offers a vast array of tools: multi-camera editing (for switching between angles in an interview, for example), a rich set of color correction and grading options (via the Lumetri Color panel), and powerful audio mixing controls. It also tightly integrates with Adobe’s suite of other apps. Need fancy motion graphics or animations? Edit your sequence in Premiere, then hop into After Effects (Adobe’s famed motion graphics video editor companion) and bring the results back in seamlessly. Need to tweak a photo or graphic for your video? Premiere works hand-in-hand with Photoshop and Illustrator. One thing to note: Premiere Pro software is subscription-based (as part of Adobe Creative Cloud). It runs roughly $20–$30 per month for just Premiere Pro, or more if you opt for the full CC suite. It’s a significant investment over time, but many pros justify it for the constant updates and the ecosystem integration. Adobe has also been adding AI-powered features (like Auto Reframe, which automatically creates a vertical video from a horizontal one by tracking the subject, or text-based editing that lets you cut video by editing a transcript). These keep Premiere on the cutting edge, though the software can be demanding on your PC and has a steeper learning curve than Stage 1 or 2 tools.
DaVinci Resolve – The Free Hollywood-Level Editor:
In the debate of “Premiere vs DaVinci,” Blackmagic’s DaVinci Resolve video editor often comes up as a top contender. It’s widely considered one of the best video editing software for YouTube creators and even film professionals. One big reason is value: DaVinci Resolve offers a powerful free version that covers nearly everything a solo creator needs. In fact, it's arguably the best free video editor at the professional level. There’s no watermark, no time limit, and only a handful of ultra-advanced features are disabled in the free edition. DaVinci originally started out as an elite color grading tool (used in Hollywood to give movies their distinct look) and has evolved into a full-blown editing suite. Resolve is like having several pro applications in one: a module for editing (cuts, timeline, etc.), a module for advanced color grading, one for visual effects (Fusion, similar to After Effects), and one for audio post-production (Fairlight). You can switch between these with a click, within the same software. For a YouTuber, this means you can edit your video, perfect the colors, add visual effects or motion titles, and mix the audio all in one program without bouncing between different apps. The learning curve is a bit steep (Resolve is a powerhouse), but many creators find it worth it. The free version of Resolve has no limits on export quality up to 4K, which already covers most creators’ needs. The paid Studio version (a one-time purchase around $300) unlocks support for higher resolutions (8K and beyond), adds more advanced AI-based tools, and gives performance boosts for things like noise reduction. Considering that single purchase price, many find it a fantastic deal compared to ongoing subscriptions. Resolve is also cross-platform (Windows, Mac, and even Linux), making it accessible no matter your setup.
Hardware Matters:
Entering Stage 3 often means thinking about your computer as much as the software. High-end software demands a capable machine. This is where the earlier question of cloud versus local power really comes in. To get smooth playback of your timeline in Premiere or Resolve, your computer needs a decent CPU (for all the number-crunching and codec decoding) and ample RAM (video editing eats memory). Most critically, a strong GPU will accelerate effects, transitions, and especially encoding/decoding certain video codecs. For example, applying heavy noise reduction to a video or adding multiple color correction nodes might be painfully slow without GPU acceleration – with a good graphics card, those tasks become much more feasible in real-time. Some creators faced with an underpowered PC might still do rough cuts in a cloud editor or use proxy editing (creating lower-quality copies of footage to edit smoothly, then swapping back to full quality for export). But ideally, if you’re moving to Stage 3, investing in hardware upgrades goes hand-in-hand. The beauty is that once your rig is up to par, editing on desktop can be very efficient. Exports that took an hour on an old laptop might finish in 10 minutes on a workstation. Scrubbing through a heavy 4K project becomes smooth. It’s an upfront cost, but it pays off if you’re making video creation your career or serious hobby.
Pro Tip: Organize and optimize. In pro editing software, a tidy project is key. Keep your files in order (use bins/folders) and use proxies for large 4K footage. Also, create presets for tasks you do often to speed up your workflow.
Mini Story: From Vlogger to Filmmaker – Consider the journey of Jake, a YouTuber who started off editing on his phone, then moved to an online editor for his growing channel. As his storytelling ambitions grew, he decided to film a short documentary about local artists. With hours of interview footage and B-roll, Jake stepped up to video editor for PC tools, choosing DaVinci Resolve on a moderately powerful computer. The first thing he noticed was the freedom: he could stack multiple layers of video to cut between angles, fine-tune color so all his shots matched, and use keyframes to animate text exactly how he envisioned. At first, the software felt overwhelming compared to the simplicity of mobile apps. But after a few weeks, Jake got comfortable with the layout and learned core techniques through online tutorials. When he finished the documentary, the difference was stunning – the pacing, visual quality, and sound were leaps and bounds ahead of his earlier work. Viewers commented that the video “felt like a real movie.” Importantly, Jake also learned the value of his Premiere vs DaVinci choice: he initially tried Premiere Pro via a trial, but it strained his older PC and he wasn’t keen on the subscription. Switching to DaVinci Resolve, he found it ran smoother and, being free, fit his budget. The experience taught him that the “best” tool can differ for each creator, but Stage 3 tools as a whole unlocked a level of professionalism he couldn’t achieve before.
By the end of Stage 3, you are effectively a self-sufficient video producer. You can take a project from raw footage to polished output all on your computer. The skills you’ve built—technical editing, color grading, sound mixing, and more—enable you to create content ready for prime time. It’s the level where if someone said, “Can you edit this to look like a real movie or TV segment?”, you now have the confidence to say yes. But there’s one more stage that completes the content creation loop, ensuring nothing you’ve made goes underutilized.
Stage 4: Archive & Repurpose Loop – Maximizing Your Content’s Lifespan
After pouring effort into creating great videos, smart creators don’t simply move on and forget them. Instead, they enter Stage 4, which is all about squeezing every ounce of value from your content. This stage focuses on two things: archiving your footage properly and repurposing your content into new formats. Think of it as closing the loop of the content cycle – and feeding it back into the start.
Why Archive?
As you progress through stages 1, 2, and 3, you’ll accumulate a mountain of raw clips, edited videos, project files, and more. Archiving is about organizing and preserving this treasure trove:
- Save your raw footage and final edits on reliable storage (external hard drives, SSDs, or cloud storage services). This ensures that months or years later, you can still access your original material.
- Keep your project files from the editing software as well. If you ever need to revisit a video to update it or pull some clips out, having the original project file (Premiere Pro project, DaVinci Resolve project, etc.) will save you tons of time.
- Use a consistent naming convention and folder structure. For example, you might have folders by date or project name, with subfolders for raw footage, exports, thumbnails, etc. This way, when you’re looking for that one great clip from last year, you can find it quickly instead of digging through chaos.
- Consider creating proxies or lower-resolution copies of your best footage for quick reference. You might not always want to plug in a drive with 4K masters just to skim through your past shots. Smaller preview files can help you review footage without the heavy lifting.
- Archiving also means backing up. Ideally, have your content in at least two places (e.g., on an external drive and in a cloud backup). Drives can fail, and nothing hurts more than losing irreplaceable footage. Cloud options like Google Drive, Dropbox, or dedicated backup services can provide peace of mind.
Proper archiving might sound mundane, but it’s the safety net for your creative work. It turns your one-time videos into a library of assets you can draw from anytime.
The Power of Repurposing:
Once your content is safely stored, Stage 4 gets fun and strategic. Repurposing means taking existing videos or footage and reusing them in fresh ways to reach wider audiences or reinforce your message. This is where you truly maximize ROI (return on investment) on every piece of content you make. For example:
- Did you film a 30-minute YouTube tutorial? You can trim it down into a series of short tips for TikTok or Instagram. A single long video might yield five or ten quick-hit clips that perform well on social media.
- Got a backlog of livestreams or webinars? You can edit highlight reels or “best of” compilations from them. An hour-long stream could be condensed into a 5-minute highlight video showcasing the key moments.
- Have a great story or rant from a podcast recording? Turn the audio into an engaging video by adding visuals or caption text, effectively creating a new piece of content for platforms like YouTube, LinkedIn, or Twitter.
- Even within the same platform, repurposing works. You can take older YouTube videos and cut together a retrospective or an updated “remastered” version. Many creators do “reacting to my old videos” or “update on X topic” by reusing clips from previous content.
Repurposing isn’t just about cutting things down; it can also mean reformatting. For instance:
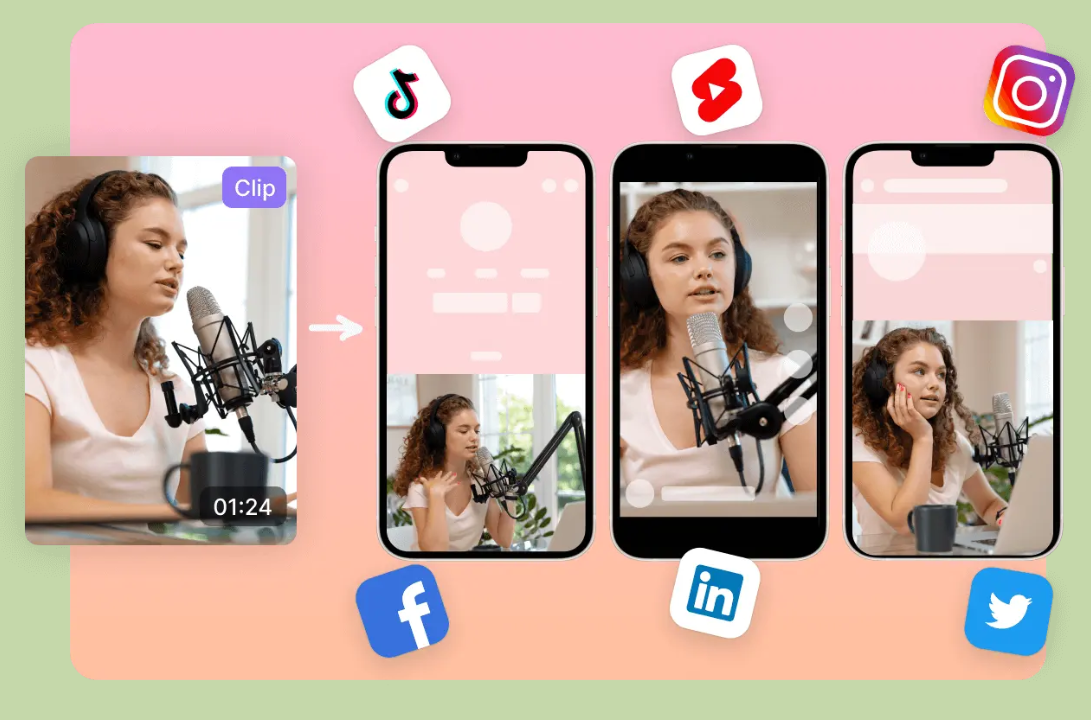
- Vertical Video Adaptation: If your primary content is widescreen (16:9) for YouTube, you can create vertical versions (9:16) for mobile-first platforms. This might involve cropping and re-framing shots to keep the subject in view. Tools like Adobe Premiere Pro have an Auto Reframe feature (using AI to follow the action in a vertical frame), and some mobile apps or cloud tools can serve as a quick vertical video editing tool. There are also stand-alone AI tools emerging to do this reframing for you automatically.
- Bite-sized Teasers: Create 15-second teaser trailers for your longer videos. These can be posted on Twitter, Instagram Stories, or TikTok to entice viewers to watch the full piece elsewhere.
- Transcriptions and Blog Posts: A video’s content can be transcribed (Stage 2 and 3 tools often do auto-transcription). That transcript can be turned into a blog post or article on your website. Similarly, you can pull key quotes from your video to make quote images for social media. While not a video editing task per se, it’s leveraging your video content in other formats to broaden its reach.
- Audio Spin-offs: If you have content that’s heavy on talking (like a tutorial, interview, or discussion), consider releasing just the audio as a podcast episode. Many podcasters simply take the audio track from a video conversation and publish it in podcast feeds. It’s an example of one piece of content living in multiple mediums.
Tool Highlights for Repurposing:
There are specific tools and software that shine in Stage 4 by using automation and AI to help repurpose content quickly:
- OpusClip (AI Highlights Generator): OpusClip is an AI-driven tool that can take a long video (like a recorded talk or a lengthy vlog) and automatically generate short, punchy clips from it. It acts as an AI video highlights generator, identifying quotable moments or exciting segments, then cutting and merging them into shareable snippets. OpusClip even adds captions and a title if you want, so the output is ready to post. For a creator with an archive of lengthy videos, OpusClip can rapidly produce dozens of Shorts or Reels that would be tedious to create manually. For example, if you upload a 45-minute webinar recording, OpusClip might produce a half-dozen compelling 1-minute clips that capture the best insights from that webinar. OpusClip is just one example of the new AI editing assistants available. Similar tools are emerging rapidly – all vying to be the best AI video editor that can shorten tedious tasks for creators.
- Descript: This is a unique tool that treats video editing like editing a document. It transcribes your video and lets you cut or move sections by editing text. It’s extremely handy for repurposing because you can search for keywords or quotes in your footage and quickly snip them out without scrubbing through timelines. Descript also has a nifty overdub feature to AI-generate your voice for small tweaks, and it doubles as a great audio/podcast editor. It’s essentially a text-based video editor and a voiceover video editor combined, ideal for turning long recordings into polished excerpts.
- Canva & Resizing Templates: We mentioned Canva’s video capabilities in Stage 2, and it remains usefulhere. Canva has templates for different social platforms and an easy “resize” tool. You can take a YouTube thumbnail or a video graphic and quickly adapt it to vertical or square formats using Canva. While this is more about graphics, it complements video repurposing by making platform-specific visuals (e.g., turning a 16:9 video title card into a 9:16 Instagram Story graphic).
- Batch Processing in Pro Software: In tools like Premiere Pro or DaVinci Resolve, you can set up templates or use batch export (or Adobe Media Encoder for Premiere) as a kind of batch video editing software solution. Say you have 10 older videos and you want to add the same new intro to all of them – rather than doing it by hand one by one, you could set it up once and use a batch render to apply the change to all. Similarly, if you want to export the same video in multiple formats (horizontal, vertical, etc.), you can queue those exports and let the computer run. This kind of automation becomes a big time-saver when repurposing content at scale.
Quick Win: Turn one video into many. Take one of your longer videos and cut out 2–3 key moments (30–60 seconds each). Add captions and share those clips on TikTok, Reels, or Shorts. One big video now gives you several new posts.
Mini Story: The Recycling Creator – Mia runs a tech review channel on YouTube. After two years, she has a library of long, in-depth review videos – some over 20 minutes each. When Mia enters Stage 4, she realizes there’s a goldmine in her archives. She takes one of her popular 20-minute smartphone review videos and feeds it into an AI tool (OpusClip). Within minutes, the AI spits out eight short clips: highlights of her talking about the camera, battery life, performance, etc., each around 30 seconds with captions and punchy titles for vertical viewing. Mia quickly fine-tunes these clips (choosing the best subtitles and visuals for each) and posts them across TikTok, Instagram, and YouTube Shorts over the next week. The result? People who never saw her original review get bite-sized info on those platforms – and many become intrigued and click through to watch the full YouTube video. She essentially gained fresh traffic on an old video, thanks to repurposing. Plus, those short clips themselves gathered new followers on her social accounts. All the while, Mia also started organizing her older footage on an external hard drive and a cloud backup. When a new phone launches, she easily locates B-roll footage of the previous model from last year (since it’s neatly archived) and repurposes it in a comparison video. Stage 4 turned her from just a content creator into a content librarian and strategist, amplifying her reach without always having to film something new.
At Stage 4, you’ve closed the loop: content leads to more content. By archiving diligently, you preserve your hard work. By repurposing smartly, you amplify it. Many creators find that Stage 4 is what elevates them from just making videos to running a sustainable content machine. You’re now getting maximum mileage out of every shoot and edit. And as you do this, you feed back into Stage 1 ideas (for example, those short clips on TikTok might inspire you to film a follow-up full video, which starts the cycle anew). This continuous improvement loop is the hallmark of an experienced content creator.
Conclusion
From shooting your very first clip on a phone to applying Hollywood-caliber edits on a high-end workstation, the journey through video editing tools is an evolution. The key lesson is that there’s no single “best” editor for everyone – it’s about the best fit for your current stage as a creator. In Stage 1, simplicity and speed are your friends. In Stage 2, collaboration and convenience take center stage. By Stage 3, precision and power become paramount. And finally, Stage 4 teaches you that a creator’s work is never done – every video can have multiple lives if you archive and repurpose it wisely.
As you grow, don’t be afraid to mix and match tools from different stages. A seasoned professional might still whip out a phone to quickly trim a social media clip (Stage 1 skills in action), and a beginner might dabble with a cloud template (Stage 2) to give their video extra polish. The beauty of today’s landscape is the flexibility: there are video editing tools for every need, every budget, and every level of expertise. By mapping your progress through these stages, you can invest your time (and money) smartly – learning just what you need, when you need it. That means less frustration, more creation.
Ultimately, becoming a successful content creator isn’t just about mastering one software; it’s about understanding the process. Now you have a roadmap. Embrace the stage you’re in, make the most of the tools at your disposal, and know when it’s time to step up to the next level. With the right tool at the right time, you’ll go from that first rough clip to a final cut that truly stands out – and you’ll enjoy the journey along the way.
FAQs
AI features have become incredibly helpful in modern video editing, but their importance varies depending on your workflow. In many cases, AI can handle tedious tasks and save you significant time – for instance, automatically generating subtitles (Capté, Veed), finding the best clip highlights (OpusClip), or suggesting stock media for your script (InVideo). If you find yourself spending hours on tasks like cutting out silences, resizing videos, or cleaning up audio, an AI-equipped tool could be a game changer by automating those jobs in seconds. This is especially important for creators who produce a high volume of content or have a small team – AI becomes like an assistant. However, AI isn’t everything. A tool still needs a solid foundation of manual editing capabilities and reliability. Some AI features can be gimmicky or might not get things 100% right, so you should view them as aids, not total replacements for your input. For example, an AI might miss context and cut a clip awkwardly, meaning you’ll still need to review and adjust. The best approach is to identify which AI features matter to you: if you dread editing captions, choose a tool with strong auto-caption AI; if you want creative suggestions, pick one with AI effects or generative abilities. If your content style is straightforward and you don’t need those fancy tricks, you might not need much AI at all. In summary, AI features are important insofar as they remove friction from your process. Many creators who embrace features like auto-editing and smart effects report dramatically faster turnaround times. Just ensure the tool’s AI has a good reputation (stable, accurate) by reading reviews or trying it out. When used wisely, AI can feel like having an extra pair of hands in the editing room – one that works tirelessly and lets you focus on the storytelling and creative decisions that matter.
It’s normal for your needs to evolve – maybe you start with quick Instagram videos and later move into longer YouTube documentaries or a team project. If you feel you’ve outgrown your current editor, you have a couple of options. One is to upgrade within the tool’s ecosystem if possible. For example, if you began on Canva Free and now need more storage or premium assets, moving up to Canva Pro might solve your issues without you learning a new interface. Likewise, CapCut has higher-tier plans (Standard/Pro) that unlock more capabilities, which could extend its usefulness for you. Alternatively, it might be time to switch to a more advanced platform. Many creators graduate from a beginner tool to something more robust (like eventually moving to Adobe Premiere Pro, DaVinci Resolve, or Final Cut for full-scale editing). The good news is the fundamentals you learned will carry over – cutting, timeline management, etc., are similar concepts in pro software, just with more depth. When switching, plan it during a period you can afford extra learning time (not right before a major deadline). Also, ensure you can transfer your assets: always save your raw video files, exports, and any graphics so you can import them into the new software. One more approach is hybrid use – keep using your simple tool for what it does well, but handle new needs in another app. For example, maybe you keep using Veed for quick projects but hire an editor with Premiere for a complex project, or you do basic cuts in CapCut then fine-tune color and sound in a higher-end tool. Outgrowing a tool isn’t a failure; it’s growth. Treat it as a sign you’re ready for the next level. The key is to continuously evaluate your toolkit – if something is slowing you down or limiting your creative vision, it’s time to explore other solutions that better match where you are now as a creator.
Absolutely – many creators stack tools to leverage each one’s strengths. It’s common to, say, use OpusClip to auto-generate clips from a long video, then fine-tune those clips in CapCut or add titles in Canva. Using multiple tools can be efficient if each tool handles a specific task exceptionally well. The key is a smooth hand-off: ensure the tools you pick can import/export in compatible formats (most use standard .mp4 video files, so that’s usually fine). An example workflow might be: edit your main video in a simple editor, export it, then run that through another app for captions or fancy effects. Or vice versa – design a cool animated intro in Canva, download it, and drop it into your timeline in Veed alongside your footage. There’s no rule that you must stick to one editor for everything. The caution is to not overcomplicate things – juggling too many apps might introduce extra rendering steps or quality loss. But in moderation, combining tools is a smart way to get the best of each. Many of the tools we discussed complement each other, and moving files between them is straightforward. As you experiment, you’ll find a toolkit mix that maximizes speed and quality for your workflow.
You can absolutely begin with free video editing tools and still create professional-looking content. Many top creators start on free plans like CapCut, Veed, or Canva Free and only upgrade once their needs outgrow the limitations (such as watermarks or export quality caps). Free tools today offer robust features – often enough for casual or even semi-pro projects. Paying for a video editor typically gets you benefits like higher output quality (e.g., 4K), no watermarks, access to premium effects or stock libraries, and better support. Our advice: start free and only invest in a paid plan once you consistently feel limited by the free version. This way, you avoid spending money until you’re sure the extra features or freedom from limitations will genuinely save you time or improve your content.
Online (cloud-based) video editors have come a long way – for many everyday purposes, they can absolutely match desktop software in results, with the bonus of convenience. Modern web editors like Veed, Canva, or Clipchamp (to name another) are capable of producing crisp 1080p or even 4K videos with transitions, effects, and all the polish of a desktop-edited video. They simplify a lot of tasks and eliminate the need for a powerful computer since processing can happen on the cloud. That said, “traditional” desktop software (like Adobe Premiere Pro, Final Cut Pro, or DaVinci Resolve) still has the edge in certain areas: they’re typically more powerful when it comes to advanced features (detailed color grading, special effects, motion graphics, plugin support) and can handle very large, complex projects better. Professional editors working on films or high-end YouTube content often prefer desktop programs for that granular control and reliability with huge files. However, those tools also have a steep learning curve and cost, which isn’t necessary for most creators’ needs. If you’re a solo creator making content for social media or doing simple edits, online editors are not just “good enough” – they’re often ideal. They allow collaboration (share a link and someone can review your edit), and you never worry about software updates or file compatibility between devices. One consideration is internet dependency: if you have slow or unstable internet, cloud editing can be frustrating, whereas desktop software works offline (aside from downloading assets). Also, privacy can be a factor – if you’re editing super confidential footage, some prefer to keep files locally rather than upload to a cloud service. In summary, for a huge segment of creators – especially those prioritizing speed, ease, and accessibility – online editors are as good as needed and will produce professional results. Traditional desktop software is “better” in an absolute sense for complex work, but it can be overkill. Many people actually use a hybrid approach: quick projects online, big projects on desktop. Evaluate what you’re creating: if a web editor checks all your boxes, don’t hesitate to use it. The quality of your content ultimately comes from your creativity and consistency, and both online and offline tools are just means to that end. Happy editing!
To dodge overspending or falling victim to shiny-object syndrome, take a strategic approach. First, use free trials whenever possible – test the full features of an editor for a week or so to see if it truly fits your workflow. Second, be clear on what you need. It’s easy to be lured by fancy AI features or ultra-advanced tools that you might never actually use. Make a list of your must-have features (e.g., auto-captions, specific effects, collaboration) and choose a tool that meets those needs without a ton of extras you don’t require. Third, start with short-term subscriptions. Instead of paying for an annual plan upfront, try month-to-month for a couple of months. This way if you realize a tool isn’t worth it, you can cancel without a large sunk cost. Finally, focus on one solution at a time. It’s tempting to subscribe to multiple apps when they’re all being hyped, but this can lead to paying for several tools and using none effectively. Master one editor that covers 80% of your needs rather than juggling (and paying for) five different ones. In summary, trial, evaluate, and commit slowly – and you’ll spend your budget on the tool that truly boosts your creation process.
For most beginners, an easy-to-use editor like CapCut or Canva is a great start. These tools have intuitive drag-and-drop interfaces and plenty of templates, so you won’t be overwhelmed. CapCut, for example, is free and very beginner-friendly – you can trim clips, add music, and apply effects with almost no learning curve. Starting with a simple tool lets you focus on content rather than complex settings. As you gain confidence, you can stick with it or move to more advanced software if needed, but many creators find that beginner-oriented apps already do everything they require for social media and basic YouTube videos.
Long-form YouTube videos and short TikToks often benefit from different toolsets. For YouTube or longer videos, you’ll value an editor that offers fine control – the ability to handle multiple audio tracks, precise cuts, and perhaps advanced features like color correction. Tools like Veed (for an easy online option) or even moving up to intermediate desktop software as you grow might be suitable for YouTube content. They help manage longer timelines and integrate elements like B-roll, chapter cuts, etc. On the other hand, for short-form vertical videos destined for TikTok, Instagram Reels, or YouTube Shorts, speed and trendy effects are key. CapCut and Picsart are fantastic here – CapCut has all the meme-style effects and sounds popular on TikTok, and Picsart lets you quickly add captions, stickers, and fun filters on your phone. These tools cater to the quick turnaround and punchy visuals short videos thrive on. That said, there’s overlap: you can certainly edit YouTube videos on CapCut and make TikToks with Veed or Canva. It’s more about what each excels at. Many creators actually use a combo: for example, edit the main YouTube video in one tool, then use another specialized app to reformatt highlights for Shorts. Choose the primary platform you’re targeting and pick the tool that seems aligned with that format – and remember you can repurpose content by leveraging multiple tools if needed.


.png)


