
.png)
You pour your heart into making Reels and YouTube Shorts, but viewers still swipe past within seconds. Sound familiar? Learning how to find the viral hook might be your missing puzzle piece. In today’s scroll-happy world, algorithms reward watch-time and retention, and the first 3 seconds often decide whether someone watches or scrolls. Without a strong hook at the start, even great content gets lost. It’s frustrating watching your hard work get buried because viewers aren’t sticking around.
The struggle is real for solo creators and small teams. You’ve tried what everyone suggests—snappier intros, flashy edits, perhaps even trending sounds. Maybe you’ve downloaded every capcut video editor effect or fiddled with what you thought was good video editing software, yet your engagement still flatlines. Meanwhile, other creators seem to effortlessly hold attention and rack up views. It can feel like they have some secret sauce, leaving you wondering “What am I doing wrong?” On top of that, editing frame-by-frame to find that magic moment is time-consuming. Without help, you risk burning out editing endless versions that never hit the mark.
Don’t give up—get smarter. We’ve spent months testing the latest AI video editor tools that promise to find the “golden nuggets” in your footage. The good news? They work (with a little guidance from you). In this guide, we’ll show you how to find the viral hook using AI highlight tools to boost watch-time. The result: more engaging Reels and Shorts that keep viewers glued to the end. You’ll get sharp, actionable steps backed by our experience (and yes, we’ve got some exclusive discounts for tools we recommend—free for our Creators Kit members). Let’s turn those fleeting glances into full watches and give your content the audience it deserves.
Table of Contents
- Quick Snapshot
- Your Tool Options & Setup Checklist
- Main Steps to Find Your Viral Hook
- 1. Prep Your Content for Highlight Hunting
- 2. Choose an AI-Powered Video Editor
- 3. Upload & Let AI Analyze Your Video
- 4. Review AI-Suggested “Hook” Moments
- 5. Trim the Clip to Its Catchiest Core
- 6. Add Captions, Overlays & Visual Flair
- 7. Enhance Audio or Voiceover if Needed
- 8. Format for Reels, Shorts & Other Platforms
- 9. Post Smartly and Monitor Performance
- Pro-Level Power-Ups
- Avoid These Mistakes
- Time-Saving Automations & Must-Follow Rules
- FAQs
Quick Snapshot
Use AI to pinpoint your video’s most engaging few seconds, trim away the fluff, and dress it up with captions and visuals. Then post and watch your retention soar as the algorithm takes notice.
- Step 1: Prep Your Content (~2 min) – Identify what type of moments in your footage might be “hook” material (surprising, emotional, or insightful) so you know what to hunt for.
- Step 2: Choose an AI-Powered Editor (~3 min) – Pick a best free video editor or AI tool (like CapCut or OpusClip) that can automatically find highlights. This sets the stage for faster editing.
- Step 3: Import & Analyze (~5 min) – Load your video and let the AI scan it. In minutes, it will suggest the most engaging snippets, acting as a smart video trimmer for your content.
- Step 4: Review Hook Suggestions (~5 min) – Watch the AI-recommended clips. Decide which one has the strongest “viral hook” potential (or if you need to tweak settings and scan again).
- Step 5: Trim the Fat (~4 min) – Take your chosen highlight and cut out any slow bits. Use a video trimmer in your editor to ensure the hook grabs attention within the first 3 seconds.
- Step 6: Add Captions & Flair (~5 min) – Overlay captions (text) and graphics. Tools like CapCut’s auto-subtitles or Canva video editor templates make this easy. A bold caption or emoji can reinforce your hook visually.
- Step 7: Boost Audio Appeal (~3 min) – Enhance the sound. You might add a quick voiceover (try AI voices from ElevenLabs), or just ensure volume and music are balanced. Great audio keeps viewers engaged.
- Step 8: Format for Platforms (~3 min) – Adjust aspect ratio and length for Reels, Shorts, etc. Ensure your clip is vertical 9:16 and fits each platform’s limits. Minor tweaks here prevent any cropping or quality issues.
- Step 9: Post & Monitor (~2 min + ongoing) – Upload your new hook-driven video at a time your audience is online. Write a catchy caption. Then check analytics (like retention graphs) to see improved watch-times and refine your next strategy.
(Total initial workflow time: ~25–30 minutes once you have your footage, then faster with practice.)
Your Tool Options & Setup Checklist
To nail your viral hook, you’ll want the right tools on hand. Below is a quick checklist of AI-powered editors and apps that can help find highlights and polish your short videos. From fully free video editing software to premium suites, there’s something for every budget and workflow. Get set up with one or two of these before diving into the steps. (We’ve personally tested each of these best ai video editor options so you don’t have to.)
.png)
For deeper comparisons, see our article on the best AI video editors and content creation tools (2025). Each of these tools can speed up parts of your workflow. Pro tip: Don’t overwhelm yourself by trying all at once. Start with one video editing app for iPhone/Android (CapCut is a great mobile pick) or a web tool like OpusClip, and one AI writing helper (e.g. Jasper or QuillBot). You can always mix and match once you get comfortable.
Next step: upgrade your editing game with the right tool. Read our companion guide — “Video Editing Strategy for Creators in 2025: Clip to Pro.”
• Side-by-side breakdown of the best editing tools
• App vs desktop: what to use and when
• Best picks for every stage of the creator journey
• Exclusive Creators Kit deals to save on top tools
Step-by-Step Guide
Finding that “viral hook” is part art and part science. The art is knowing what grabs your audience’s interest; the science is using AI and data to pinpoint that moment in your video. Below, we break down the process into clear steps. Each step blends creative tips with actionable instructions, so you not only use the tools but also understand why you’re doing it. Follow along, and by the end you’ll transform your footage into an attention-grabbing Reel or Short that retains viewers and pleases the algorithm.
1. Prep Your Content for Highlight Hunting
Before you even open an app, take a moment to consider your video’s content and your audience. What would you find irresistible about this video if you were scrolling? Jot down a couple of moments that might be the most shocking, funny, emotional, or informative. These could be a dramatic reaction, a one-liner insight, or a visually striking scene. Even if you plan to rely on AI, having an idea of your “golden moments” gives you a head start.
For example, if you recorded a tutorial or vlog, think about where the biggest “aha!” moment or surprise happens. That’s likely your natural hook. By identifying these parts up front, you’ll know what to look for once the AI highlight tool does its job. Remember, algorithms reward retention—over 70% of viral videos include a strong hook in the first 3 seconds. So, our goal is to zero in on the snippet of your video that can deliver that impact immediately.
Why this matters: A little planning now means you won’t blindly accept whatever clip the AI suggests. You’ll be able to compare the AI’s picks with your hunches. If they match, great – you’ve likely found the viral hook. If not, you might need to guide the AI (or double-check if a different moment is stronger). Think of it as setting your intention: you’re priming yourself (and the software) to find something specific, not just any random 15 seconds. This mindset ensures you remain the creative director, even as you delegate grunt work to an algorithm.
👉 Need ideas?
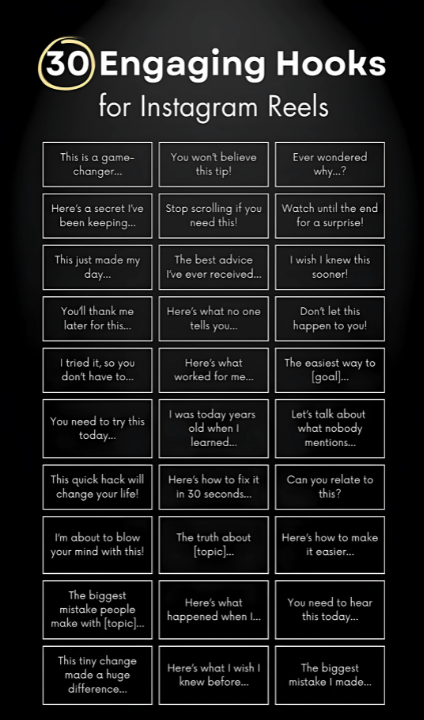
Here are proven hook types that frequently stop the scroll:
- A before/after transformation with instant visual contrast
- A provocative claim or unpopular opinion (“This advice is ruining your videos…”)
- A quick-win tip or result teaser (“This fix boosted my views 10x”)
- A curiosity gap setup (“I made one tiny change… and everything flipped”)
- A relatable fail or struggle (“I was doing this completely wrong…”)
- A jaw-dropping moment (physical reaction, glitch, surprise result)
- A question that demands an answer (“What would you do in this situation?”
- A cut mid-sentence to drive tension (“And then I realized—” cut)
2. Choose an AI-Powered Video Editor
Now that you know what kind of moment you’re after, pick the tool that will help you extract it. The good news: you don’t need expensive gear or a full editing suite to do this. Many of the best free video editing software options have built-in AI now. For instance, CapCut – Video Editor (available on mobile and PC) offers an AutoCut feature that automatically finds highlights in longer videos. Online, OpusClip is purpose-built for creators repurposing long videos; it uses AI to identify compelling segments and even gives an “AI virality score” to each suggested clip. If you prefer a web app with broader editing features, Veed.io and InVideo both have ai video editor capabilities like auto-subtitle generation and scene detection.
Consider your workflow: Are you editing on a phone, or do you prefer a computer? If you’re on the move, a mobile video editing app like CapCut or Picsart might be your go-to. If you’re at a laptop, an online tool (Veed.io, OpusClip, or Capté) can analyze footage without hefty installs. Also think about the source content length. Pro Tip: For very long videos (say a 1-hour webinar or interview), specialized tools like OpusClip can handle them and churn out multiple Shorts in one go. On the other hand, for a 2-minute clip where you just need the best 15 seconds, a quick video trimmer with AI assist (like CapCut’s AutoCut) will do.
Make sure you have the tool set up and your account ready (sign in, and if required, upload any branding like your logo or choose caption styles now). This way, when you import your footage in the next step, you won’t waste time on setup. A bit of prep here—ensuring you’re logged in and familiar with the interface—will help you move swiftly once the creative work begins.
3. Upload & Let AI Analyze Your Video
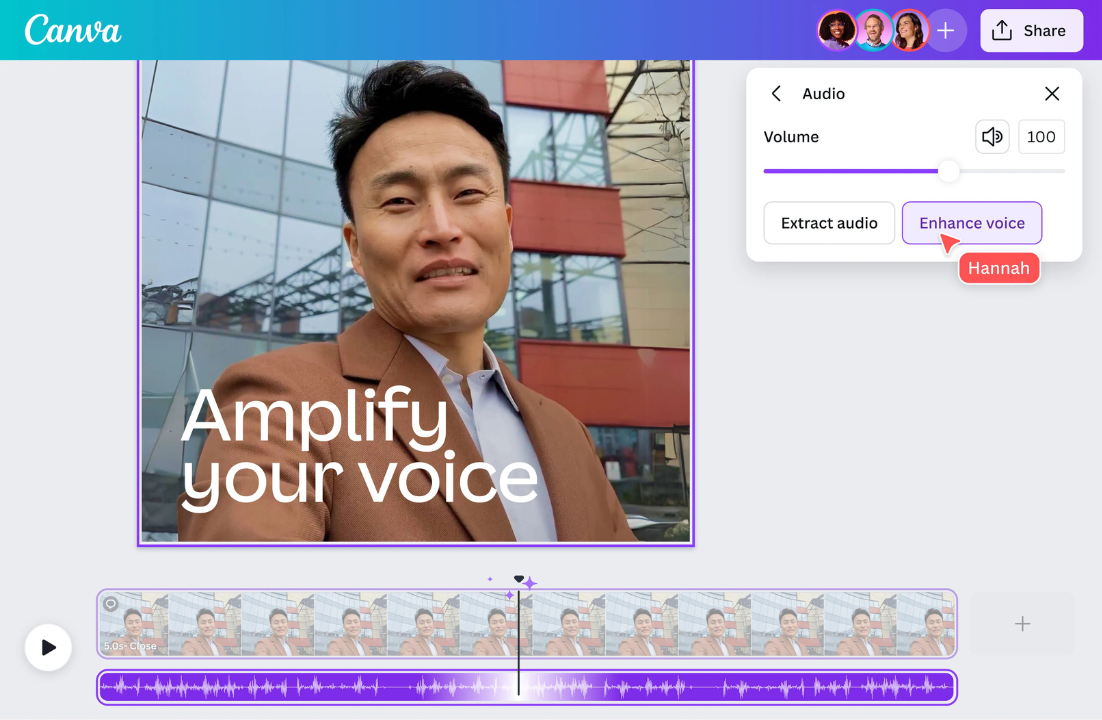
Time to put the AI to work. Import your video into the chosen tool and initiate its highlight analysis. In CapCut, for example, you’d use the “Long video to shorts” or AutoCut function: upload your footage (from your device or cloud), and with one click, let it scan for highlight-worthy bits. Tools like OpusClip or Capté will prompt you to upload a video file or paste a link (for instance, a YouTube video URL) and then automatically start processing it. This analysis typically involves creating a transcript of any speech in the video and detecting things like emotional spikes, interesting keywords, or changes in visuals. Don’t worry, you don’t need to babysit this process. It usually takes a couple of minutes for a longer video (e.g. a 30-minute video might take a few minutes to analyze, while a 2-minute clip may be done almost instantly).
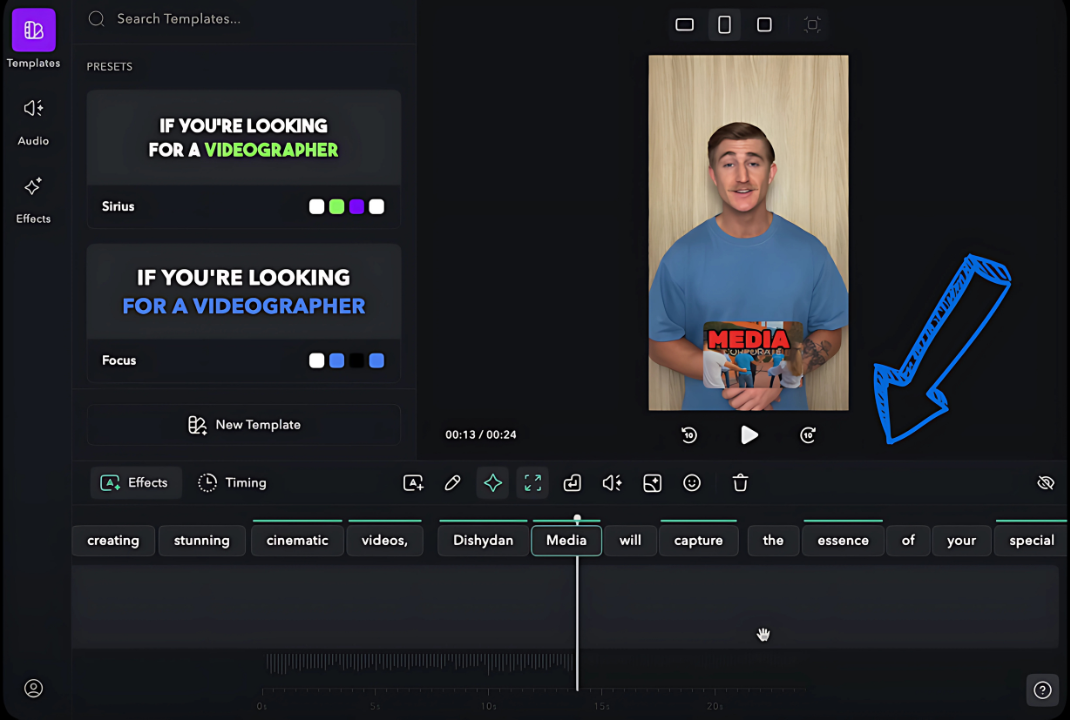
AI highlight tools in action: CapCut’s AutoCut feature analyzed a 39-minute interview and extracted a punchy 54-second highlight clip (right panel) as a potential viral hook. Such AI-driven clipping saves you from manually scrubbing through footage. It automatically detects key moments in speech content, ensuring your video’s most compelling points are not missed.
Once the AI is done, it will present you with one or more suggested clips. This could be in the form of a new timeline with cuts already made (like CapCut producing a short for you), or a list of timestamps and snippets (like OpusClip giving you several clipped videos, each with a predicted score for how engaging it is). Stay patient during the processing – it’s a lot faster than doing it by hand, and grabbing a coffee while the machine finds your golden moments is better than combing through 30 minutes of footage yourself.
4. Review AI-Suggested “Hook” Moments
When the tool has finished its analysis, you’ll have what amounts to a cheat-sheet of your video’s potential hooks. Now, put on your editor’s hat and critically review those AI-suggested clips. Play each highlight. Does it grab your attention in the first second or two? Do you find yourself wanting to watch the full 15-60 second clip that was generated? The best indicator of a viral hook is that even you, the creator (who’s seen this footage a hundred times), feel drawn in.
Pay attention to the content of each suggestion: is the AI picking a moment where something compelling is actually happening? Sometimes it might select a segment just because a certain keyword was said or there was a spike in volume, but the context could be off. For example, an AI might choose a clip where you say “...and that was unbelievable!” but if the viewer hasn’t seen what “that” is, it might confuse them. Use your judgment here. Remember: AI is a helpful assistant, but you understand your story and audience best. In many cases, the suggestions will be pretty spot on in finding excitement or tension. (In fact, OpusClip’s algorithm is specifically trained on thousands of viral videos to identify patterns that keep viewers hooked.)
If you have multiple options, that’s a good thing. It means you can choose the strongest or even plan to make a couple of different Shorts from one video. Look for the one clip that has the most curiosity or impact up front. A great hook often poses a question, teases a surprise, or hits an emotional note (e.g., laughter, shock, “aha” moment). Which clip does that best? Also consider alignment: the hook should make sense and not feel out-of-context once the rest of the short plays. If none of the AI picks feel right, don’t be afraid to run another pass – some tools allow tweaking criteria. For instance, you might set OpusClip’s AI Co-Pilot to prioritize a keyword (if your video has distinct sections), or adjust the sensitivity so it’s either pickier or more generous with clip selection.
Try This: If you’re torn between two hook clips, you can plan to test both (one now, one later) to see which resonates more with your audience. For now, select the clip that you believe has the highest chance of stopping a scroll cold. That’s your viral hook candidate.
5. Trim the Clip to Its Catchiest Core
With a candidate hook in hand (or rather, on timeline), it’s time to refine it. Often, even the best AI-suggested highlight can include a second or two of fluff – maybe a slow lead-in or a trailing bit that isn’t needed. Your job is to trim that clip down to its most intense, intriguing core. Most likely, you want to start the clip at the exact moment the action or interesting phrase begins. If there’s any dead air, filler words (“um, well, so...”) or a long pause at the start, cut it out. The hook should hit immediately. Remember the 3-second rule: you need to hook viewers almost instantly.
Use your video editor’s trimming tool (razor tool, split, or simply dragging the clip edges) to remove anything extraneous. For example, if the clip AI gave you starts with you walking into frame for 2 seconds before you say the shocking line – cut those 2 seconds. Start right on the action or dialogue that matters. Likewise, trim the end to leave the viewer wanting more or to ensure the clip ends on a strong note (for instance, right after you’ve delivered the punchline or key info, you might not need the “...so yeah” that you said afterward).
As you trim, play it back repeatedly. Does the edited clip feel tight and engaging? Does it make sense on its own? For Reels and Shorts, shorter is often better as long as the point comes across. A 20-second super-sharp hooky clip can outperform a meandering 60-second one. That said, don’t cut so much that it becomes confusing. There’s a balance between brevity and clarity.
Many creators find success with hook clips around 15–30 seconds for Shorts/Reels, but it can be up to 60 seconds if it’s truly compelling. If you’re unsure, lean shorter for now. You can always expand a bit if needed. And don’t worry about the formal ending – in short-form, it’s okay if the clip ends a little abruptly, especially if it encourages viewers to watch again (loops can actually boost total watch time as viewers rewatch to process what they saw). In fact, some viral Shorts loop seamlessly; trimming in just the right way can sometimes create a loop effect where viewers don’t even realize they’ve watched it twice. That’s a bonus hack for watch-time if you can manage it.
Pro Tip: While trimming, keep an eye (and ear) on pacing. A quick cut at the beginning is great, but also listen to the audio flow. If cutting out a pause makes the speech too jumpy, consider adding a very short crossfade for audio or a quick cutaway shot if you have one (B-roll). But usually for a single-hook clip, jump cuts are fine – audiences are used to the fast pace.
By the end of this step, you should have a concise, hard-hitting clip that represents your viral hook. It should start with a bang and end before it loses momentum. Great job – the hardest part (finding and isolating the hook) is done. Now, let’s add some finishing touches to really make it shine.
6. Add Captions, Overlays & Visual Flair
In the noisy world of vertical video, visual enhancements can significantly boost engagement. Start by adding captions (subtitles) if your clip has spoken words. Why? A huge chunk of people watch shorts on mute, especially in public. Captions ensure your message still gets across. In fact, viewers are 80% more likely to watch an entire video when captions are present. Most AI editors make this easy: CapCut, Veed.io, and others have an auto-caption feature—usually one tap to generate timed subtitles from your audio. Generate those subtitles and then quickly scan and fix any misheard words (AI transcription is good but not perfect). Style your captions too: bold or highlight key words that are part of the hook, change colors or font to fit your brand, and position them centrally and within safe margins (you don’t want Instagram’s UI cropping them out).
Beyond captions, think overlays and graphics. A well-placed line of bold text at the very start can act as a “headline” for your hook. For example, if your hook is someone saying “I almost gave up after this happened…”, you might overlay text at the top that says “I ALMOST QUIT”. Big, all-caps, and eye-catching. This reinforces the curiosity – people will read that in a split second even if they miss the first words. Tools like the Canva video editor or CapCut allow adding such text in stylish ways (with animations, outlines, etc.). Just don’t go overboard: stick to one or two short lines of text overlay so it doesn’t clutter the screen.
Utilize basic editing polish: a quick zoom-in at the moment of impact can create a pattern interrupt that keeps eyes on the video. Many of the best editing software tools (including free ones) let you keyframe a zoom or use a preset effect for punch-ins. A flash frame or a quick cut to a close-up can also work if it matches your style. If you’re using a video editing app for Android or iPhone like CapCut mobile, you might find built-in effects for “shake” or “flash” that sync to a beat—those can emphasize dramatic moments too.
Pro Tip: Consistency in style can help build your brand. If you have a signature color or font, use it in your captions or graphics. Over time, viewers recognize your style, which can also indirectly boost watch-time (loyal audience knows what to expect from you). But at the same time, ensure it’s platform-friendly: for example, avoid tiny text – remember viewers are on a small screen. Big, bold, and clear is the way to go.
7. Enhance Audio or Voiceover if Needed
A strong hook isn't just visual—sound can make or break viewer engagement. Clean, clear audio keeps people watching. Distracting noise? They swipe away.
Start with the basics:
Most tools today offer automatic audio enhancement features like noise reduction, voice isolation, or volume leveling. CapCut, InVideo, and Veed.io all include one-click cleanup options. Use them—there’s no excuse for muddy or echoey audio in 2025.
Next: music.
If there’s talking, keep background music subtle. But if your video is mostly visual or has voiceover, a well-chosen track can instantly set the tone (tense, upbeat, inspiring). Many editors include built-in royalty-free libraries, or you can add trending sounds later directly from the platform.
Pro Tip: Use native music inside TikTok, Reels, or YouTube Shorts after export. Why?
– Platform-native tracks often boost discoverability
– The algorithm prefers videos using in-app music
– You'll avoid copyright issues or muted playback
Sound effects (SFX) can also help punctuate moments—like a “whoosh” on a zoom, or a “ding” when a caption appears. Don’t overdo it, though. One or two well-placed effects are plenty.
Finally, watch it once with audio on, and once on mute. Does it work both ways? If yes, you’ve nailed it.
8. Format for Reels, Shorts & Other Platforms
You’ve got your viral-ready hook — now make sure it fits the platform.
Stick to 9:16 vertical.
Instagram Reels, TikToks, and YouTube Shorts all require vertical (1080x1920) format. If you filmed horizontally, crop it. All major editors let you switch aspect ratio easily — just make sure the subject stays centered.
Watch your margins:
On Reels and TikTok, buttons and captions will cover the bottom and top of the screen.
Keep your text, faces, and key visuals in the middle third to avoid UI overlap.
Trim to time limits:
- YouTube Shorts: max 60 seconds
- TikTok: 60–90 seconds (but shorter still wins)
- Reels: up to 90 seconds, though 15–30s often performs better
If your clip is just over the mark (like 62s), shave it down now.
Export settings checklist:
- 1080x1920 (Full HD vertical)
- No compression artifacts (avoid low bitrate)
- No watermarks — clean exports only
- CapCut watermark? Remove it in settings
- Never repost a TikTok clip with watermark to Reels/Shorts
Optional but useful: add a thumbnail
For Instagram, upload a custom cover with a bold title or freeze-frame. Canva or Abyssale work great for this. YouTube Shorts don’t need a thumbnail, but strong title text still matters.
Platform-specific tweaks:
- TikTok: on-screen text, trending sounds, fast edits
- Reels: cleaner look, custom cover image, brand-aligned captions
- Shorts: tighter pacing, smart title, possibly no overlays
Use the same video across platforms, but adjust lightly to match the vibe and audience.
Pro Tip: Many editors like Capté show “safe zones” for each platform — use them so nothing important gets cropped. Once this is done, you’ve got a hook-driven, polished clip ready to upload anywhere. No fluff, no guessing — just clean, scroll-stopping content.
9. Post Smartly and Monitor Performance
Your video’s ready — now timing, titles, and follow-through matter. Start by posting when your audience is most active. If you don’t have data, aim for late afternoons on weekdays or midday on weekends. Every platform behaves differently, so test and adjust.
Your caption or title should reinforce the hook. On TikTok or Reels, use a short sentence or question with 3–5 relevant hashtags. For YouTube Shorts, the title plays a big role — make it curiosity-driven. Use tools like Jasper or QuillBot if helpful, but keep it sounding like you.
Once posted, engage quickly. Reply to early comments or like them — this can boost reach during the first hour.
Pay attention to performance metrics. On YouTube, check retention graphs. Are people dropping off after 3–5 seconds? That means your hook didn’t land. On Reels and TikTok, look at average watch time and replays as proxies. Small changes here can lead to big improvement.
Test small variations when possible — different intros, slightly shorter cuts, even posting at different times. One version might dramatically outperform the others.
Finally, track what resonated in comments. Viewers often tell you what hooked them — or what didn’t. Use that to refine your next video. Growth comes from iteration, not luck.
Pro-Level Power-Ups
So you’ve got the basics down and a solid hook in the bag – great! Now, let’s elevate your process from good to pro-level. These power-ups are advanced tactics that can streamline your workflow and maximize your content’s impact. Even if you implement just a couple of these, you’ll be ahead of the game.
Batch-Produce Variations → Multiply Your Reach
Don’t stop at one hook. Batch-produce multiple hook variations from the same video to cover different angles. For example, if your 10-minute video had three highlights, use your AI tool to generate three Shorts (one for each highlight). This multiplies your content output without much extra effort. Benefit: you can post variations over time or on different platforms, increasing the chances that one of them pops off and goes viral.
Leverage Captions on Every Video → Boost Retention
Make captioning a non-negotiable step for all your Shorts. This isn’t just about accessibility – captions boost retention by hooking silent scrollers and emphasizing key points visually. Action: use auto-captions, then stylize them uniformly across your content (brand colors, consistent font). Benefit: higher watch-times as more viewers stick around when they can read along, plus a recognizable style that fans connect with.
Repurpose Across Platforms → Extend Content Lifespan
One hook can live many lives. Repurpose your hook clip for each platform: Instagram Reel, YouTube Short, TikTok, Facebook Reel, even LinkedIn or Twitter if relevant. Tailor the caption or on-screen context slightly for each audience (e.g., more casual on TikTok, a bit more explanatory on LinkedIn). Benefit: you get maximum mileage from one piece of content, reaching different audiences without reinventing the wheel each time.
Use AI Virality Predictions → Prioritize Top Clips
Some AI tools (like OpusClip) provide a “virality score” or predictive analytics for each clip. Pay attention to these scores. If one clip is rated significantly higher, prioritize posting that one first or boosting it. You can even feed your clips into different AI analyzers (there are services that predict TikTok success, for instance). Benefit: focusing your effort on content that has data-backed high potential means better odds of hitting the mark and not wasting time on weaker clips.
Automate the Repetitive Stuff → Free Your Creative Time
Identify parts of your workflow that feel tedious and see if you can automate them. For instance, auto-schedule posts using a social media scheduler once your clips are ready, or use a template in your editor so your captions/graphics style loads up pre-set each time. There are automation recipes (see below) to auto-generate clips when you upload a video, etc. Benefit: by automating repetitive tasks, you save mental energy and time, allowing you to focus on creativity (like brainstorming even better hooks or engaging with your growing audience).
Avoid These Mistakes

Even seasoned creators slip up. Steer clear of these common mistakes that can sabotage your hook’s success – and know how to fix them:
- Burying the Hook → Fix: Don’t start with a slow intro or logo. Cut straight to the action or surprise. The first 1–3 seconds must deliver immediate value, tension, or curiosity — anything else kills retention.
- Misleading Clickbait → Fix: Hook with intrigue, but make sure the video delivers on its promise to keep viewer trust (no bait-and-switch). If the content doesn’t match the setup, viewers bounce and the algorithm penalizes you.
- No Subtitles → Fix: Always include captions or text. A significant portion of viewers watch on mute — captions retain silent scrollers, improve comprehension, and boost total watch time.
- Overloading Visuals → Fix: Avoid too many stickers or flashy effects at once. One or two visual enhancements is enough — too much distracts from the message and makes your video look cluttered and amateur.
- Too Long to Get to Point → Fix: Trim ruthlessly. If your hook clip takes more than 3–5 seconds to deliver the “why watch this,” it’s too slow. Cut anything that doesn’t add immediate tension or payoff.
- Ignoring Data → Fix: Check your analytics. If retention drops early or certain hooks flop, learn from it and adjust your next clip. Rewatch spikes, high average view durations, or replays mean something worked — double down on that.
Time-Saving Automations & Must-Follow Rules
Let’s work smarter by automating some steps and sticking to a few golden rules that keep your content creation on track. Below are automation recipes to handle repetitive tasks, followed by essential guidelines every creator should abide by when chasing that viral hook.
- Trigger: New Video Upload → Action: Auto-Generate Shorts. Set up an integration (using a tool like Zapier or Make) so that whenever you upload a long video (e.g., to Dropbox or YouTube unlisted), an AI clipping service like OpusClip automatically creates a couple of Shorts. Benefit: You get instant highlight clips without lifting a finger, so you can focus on reviewing and posting rather than manual editing.
- Trigger: Keyword Mentioned in Video → Action: Flag Clip for Review. Use a transcription tool to monitor for specific “hook” keywords (like “surprised” or “the biggest lesson”). When found, auto-mark those timestamp ranges in your editing software. Benefit: You won’t miss crucial hook moments because the system alerts you to parts of the footage likely to be interesting, speeding up your highlight selection.
- Trigger: Export Completed → Action: Format & Distribute. Once you export a video, use an automation to do the tedious work: cloud storage saves the file, video resizer apps convert it to different aspect ratios if needed, and scheduling tools prepare posts on each platform. Benefit: In one go, your finished hook video is backed up, resized for say 1:1 or 4:5 if you plan multi-platform, and even queued up on social media – all automatically, reducing the chance of forgetting a step.
Now, no matter how fancy your tools or automations, some fundamental rules should always guide your process:
- 3-Second Rule: Grab attention within the first 3 seconds, every time, no exceptions.
- Always Be Captioning: Every short video must have captions or at least a readable text element (viewers are often silent, so this is non-negotiable).
- Vertical Video Only: Stick to 9:16 vertical for Reels and Shorts and fill the frame (no black bars) for a professional look.
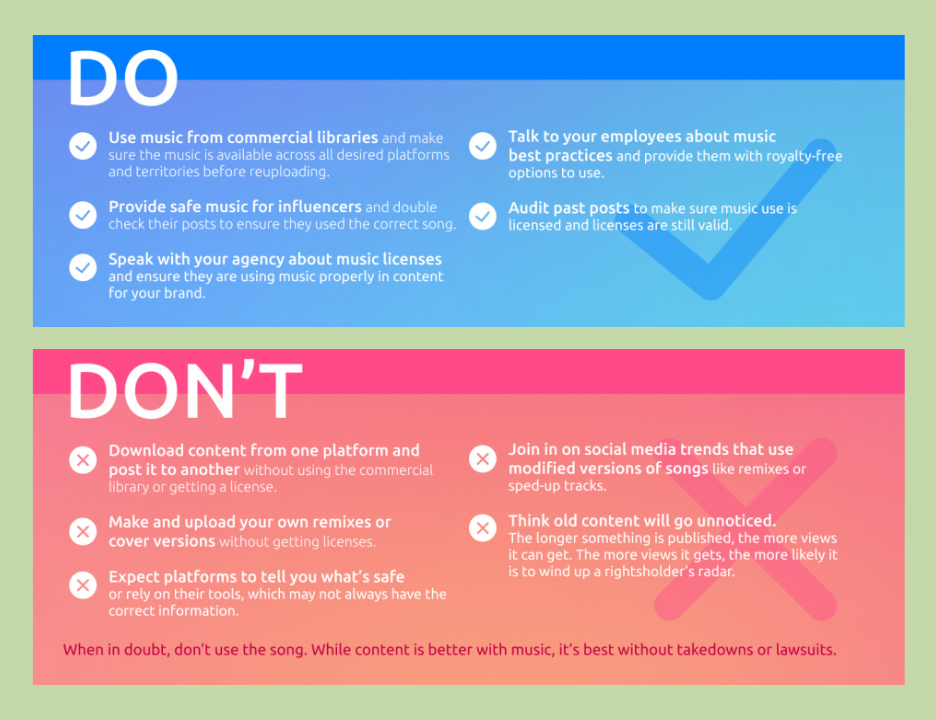
- Respect Copyright: Use only content (video clips, music) you have rights to. A viral hit isn’t worth a takedown or legal trouble.
- Consistency Wins: Develop a consistent style or format for your hooks (fonts, colors, tone) – it builds your brand and viewer expectations.
- Deliver Value: Make sure the rest of your video follows through on the hook’s promise. A hook isn’t just clickbait; it’s a truthful preview.
By automating smartly and following these rules, you’ll maintain quality and integrity in your content while reducing workload. It’s the best of both worlds: efficiency and effectiveness.
FAQs
Yes, and it’s a trick many creators are starting to use! AI writing tools like Jasper or even free ones like ChatGPT can help brainstorm or refine a hook. For instance, you can tell the AI the main point of your video and ask, “Give me a catchy one-liner to open a video about [your topic].” It often comes back with something punchy or a few variations. QuillBot is great if you have an intro line but it feels bland – you paste your sentence and QuillBot will rephrase it in a spicier way. The key is to guide the AI: provide context or even examples of the tone you want (“funny”, “dramatic”, “urgent”). Another approach is using AI to script an intro if your video didn’t have one. For example, if you have a montage of clips, you might get AI to generate a single sentence voiceover that hooks viewers, which you can then record or use an AI voice for. Keep in mind, you should review and tweak whatever AI writes to make sure it fits your style and is accurate. These tools are like having a copywriting assistant. Many creators use them to overcome “blank page syndrome” – you get a starting point for your hook script or caption, then you customize. So yes, AI can definitely help make your intros catchier, but the magic touch will be yours in choosing the best suggestion and aligning it with your authentic voice.
AI video editors can save you tons of time by analyzing your footage and suggesting highlight clips. First, choose an AI-equipped tool (for example, OpusClip for long videos or CapCut’s AutoCut for shorter ones). Import your full video, then let the AI scan it. It will usually create a transcript and look for spikes in excitement, interesting keywords, or changes in tone. The tool will come back with one or more short clips it thinks could be hooks (often around 15–60 seconds each). Review those suggestions to see which snippet is most compelling. Essentially, the AI acts like a smart video trimmer, identifying the parts of your video that are likely to make viewers say “Whoa, I need to see this!” All you do is pick the best suggestion and refine it a bit. It’s like having a virtual assistant editor who highlights the gold for you.
The fastest way is to use tools that support automatic captioning. Many modern editors include this: for example, in CapCut or Veed, you just click “Auto Subtitle” and it will transcribe and place text on your video timeline. This usually takes under a minute for short clips. Once the captions are generated, you can style them – change font, color, add background – all within the app. If you want more creative text overlays (like big bold titles or animated text), consider using Canva video editor. Canva has pre-made text animation templates: you can literally drag and drop a dynamic text like “Don’t Miss This 👉” onto your video and customize it. Another specialized tool is Capté, which is designed for creators to get subtitles and cool subtitle styles quickly; it even adds emojis and can auto-resize text for different formats. On mobile, apps like Instagram itself allow you to add “Captions” stickers in Stories/Reels (which auto-transcribe speech). For manual but fine-tuned control, you can always type your own text in any editor and use keyframes to animate it, but leveraging AI video editor features is the speediest route. In short: use auto-caption first (to save typing), then adjust the look. This ensures even a viewer who’s not listening with sound can follow along – a big win for engagement.
Absolutely – CapCut is a popular and good video editing software choice for short-form content, and it’s especially friendly for solo creators. It’s free and loaded with features that help with viral-style videos: auto-captions (so you can quickly add subtitles), a huge library of effects and filters, and most notably the CapCut AutoCut feature that can automatically find highlights in a longer video. Many TikTokers and Reels creators use CapCut because it’s available on mobile (both iPhone and Android) and desktop, making it easy to edit anywhere. Its interface is beginner-friendly, but also offers advanced options like keyframe animations if you need them. For creating viral Shorts, CapCut shines in helping you do quick cuts, add engaging text overlays, and even sync your cuts to music beats. Plus, since it’s made by the same company behind TikTok, it’s very attuned to the short-video style. So if you’re looking for a mobile video editing app to churn out hooky, trend-ready videos, CapCut – Video Editor is a top contender.
When it comes to boosting watch-time, you want editors that make it easy to create engaging content without costing an arm and a leg. Some of the best free video editing software options for this include: CapCut (free with powerful features as mentioned), DaVinci Resolve (a free PC/Mac editor known as DaVinci video editor – very advanced, great for precise edits and color grading if you’re more technical), and HitFilm Express (another free editor with lots of effects). There’s also Veed.io which has a free tier – it’s online and has handy tools like auto-subtitles and templates geared towards social media. Canva’s video editor is free for basic use and fantastic for adding graphics or for projects that are more template-based. All these allow you to do the key things that impact watch-time: sharp cuts, adding subtitles, and inserting engaging visuals. Ultimately, the “best” free editor is one you find comfortable. Even mobile apps like InShot or Picsart Video (free versions) can do the trick for basic editing on the go. Each of these being free means you can experiment and see which helps you produce content that retains viewers best, without any upfront investment.
A “viral hook” is the attention-grabbing intro of your video – the first few seconds that hook the viewer into watching the rest. In Reels, TikToks, or YouTube Shorts, it might be a bold statement, a surprising action, or an intriguing question at the start. It matters because short-form content is super competitive; viewers decide almost immediately whether to keep watching or swipe away. A strong viral hook increases your watch-time and signals to the algorithm that your video is worth promoting (since people stick around). In fact, creators now see the hook as their make-or-break moment – without it, even great content might never get seen.
If you’ve implemented a hook but your watch-time isn’t improving, there could be a few things at play. First, evaluate your hook itself: is it truly engaging to someone who isn’t you? Sometimes we think something is a hook, but to a fresh viewer it might not be clear or exciting enough. You might need to refine it – for example, maybe the first two seconds are visually dull even if the idea is good, so viewers still scroll. Second, ensure that the rest of the video delivers on the hook. If people feel bait-and-switched (hook promises something and the video veers off), they’ll drop off. The hook gets them in, but the content retains them. Check if there’s a specific point where viewers leave – YouTube’s retention graph can show this. It might be that after the hook, you had a lapse (maybe too much of an intro or a slow section). Trim or tighten that area. Third, consider presentation: are you using captions, clear audio, etc.? A good hook said in mumbled audio or shown in a dark, hard-to-see clip can fail to hold attention.
Quality matters. Also, analyze your topics and audience targeting – even a well-edited, hooky video won’t get high watch-time if it’s not reaching the right audience. Sometimes the issue is with how the algorithm is (or isn’t) showing it; you might need to tweak hashtags, titles, or the opening frame (cover image) to attract the right viewers initially. Lastly, keep experimenting. It’s possible your hook just needs a different style – maybe try a question hook if a statement hook didn’t work, or vice versa. The fact that you’re focusing on watch-time is good; with each iteration, you’ll discover more about what your audience finds compelling. Stay persistent, adjust based on feedback and data, and you’ll crack the code. Even viral creators had to tweak and test before they found what consistently works. Good luck – you got this!
Yes – there’s plenty of evidence that captions boost video performance. Viewers are more likely to watch your video to completion if captions are available, especially on mobile where people often watch muted. Studies have shown that captioned videos can see a notable increase in watch time (some reports say around 12% longer on Facebook, and up to 40% more in certain contexts). More watch time and lower drop-off means algorithms are more likely to recommend your content, leading to more views. Captions also help with engagement: they make your content accessible to people with hearing impairments, non-native speakers, or anyone in a no-sound environment – all those folks can stick around and interact (like, comment, share) because they understand your video. Additionally, captions can improve SEO, since platforms like YouTube can index caption text. This means people might find your video via search because of words that appear in your captions. All told, captions remove barriers to entry and keep viewers hooked, directly contributing to better engagement metrics and view counts.
If we’re talking specifically about creating short vertical videos for TikTok, Instagram Reels, or YouTube Shorts, tools that automatically find and format highlights are the most helpful. Opus Clip is one of the best for this – it detects compelling moments in a longer video and outputs ready-to-post vertical clips with captions. Klap is another strong choice, very similar in function. Both of these save tons of time compared to manual editing. If you prefer doing some editing yourself but want AI assistance, CapCut (mobile app) offers auto-captions and some smart editing templates, and Veed (web app) provides easy editing with features like auto subtitles and filters. So the “best” might be Opus Clip for full automation, but if you need a free solution, CapCut is a great mobile-friendly alternative. It also depends on your content – try a couple and see which output you like more.
For most beginners, an easy-to-use editor like CapCut or Canva is a great start. These tools have intuitive drag-and-drop interfaces and plenty of templates, so you won’t be overwhelmed. CapCut, for example, is free and very beginner-friendly – you can trim clips, add music, and apply effects with almost no learning curve. Starting with a simple tool lets you focus on content rather than complex settings. As you gain confidence, you can stick with it or move to more advanced software if needed, but many creators find that beginner-oriented apps already do everything they require for social media and basic YouTube videos.


.png)


