
In the fast-paced creator economy, integration and automation have become the secret weapons for scaling up. As a content creator or solo business owner, you juggle content creation, marketing, sales, and community engagement—often single-handedly. Imagine offloading the repetitive busywork to an automated system that works 24/7, so you can focus on delighting your audience. It’s not a fantasy: today’s no-code workflow automation tools make it possible to run an entire digital business on autopilot. In fact, studies show the average entrepreneur spends up to 16 hours a week on routine tasks—two full workdays that could be saved with smart automation.
This comprehensive blueprint will show you how to go from your first simple automation to achieving 1,000+ sales, by leveraging what we call the Creator Automation Flywheel. We’ll break down each stage of growth—from lead capture, to DM nurturing, to checkout, to community engagement, to analytics—and highlight how top no-code tools like Zapier, Make (formerly Integromat), n8n, IFTTT, ManyChat, and Pabbly Connect can streamline every step. You’ll also discover honest pros and cons of popular lead-generation platforms (Typeform, Outgrow, Jotform, Paperform, MakeForms) and get real examples, quick-win tips, and mini case studies along the way. By the end, you’ll have a clear game plan to build your own creator automation stack, even if you’re not “techy.” Let’s dive in!
Table of Contents
- Introduction: What is the Creator Automation Flywheel?
- Stage 1 – Lead Capture Automation
- Stage 2 – DM Nurturing and Engagement
- Stage 3 – Checkout & Sales Automation
- Stage 4 – Community Engagement & Growth Automation
- Stage 5 – Analytics and Optimization
- FAQs
What is the Creator Automation Flywheel?
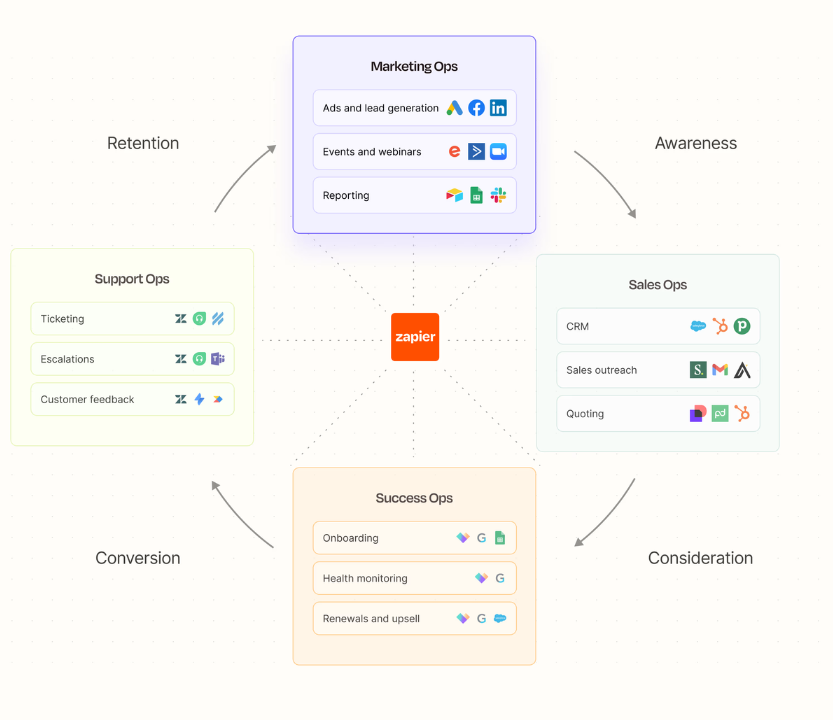
The Creator Automation Flywheel is a growth framework that loops your audience through a continuous journey, using automation at each step to build momentum. Unlike a one-way marketing funnel that ends at a sale, a flywheel is circular: each stage feeds into the next, creating compounding results. For creators, the flywheel typically has five core stages:
- Lead Capture → Attracting and capturing new audience leads (emails, followers, sign-ups).
- DM Nurturing → Nurturing those leads through personalized messages and content (via email or direct messages) to build trust.
- Checkout & Sales → Converting engaged fans into paying customers with seamless, automated purchase experiences.
- Community Engagement → Onboarding customers into a community and keeping your broader audience engaged, so they become repeat buyers and evangelists.
- Analytics & Optimization → Tracking performance across all stages and using data to improve and tweak the process, which in turn helps you capture more (and better) leads.
Each stage benefits from integration and automation tools. Think of these tools as the “connective tissue” of your business: they link your apps and processes so that actions in one stage automatically trigger actions in the next. For example, an email sign-up (lead capture) can automatically kick off a welcome sequence (nurturing), which then highlights a product and directs the person to a checkout. After purchase, an automation invites them to your community and logs the sale in a spreadsheet (engagement and analytics). With the flywheel, growth becomes iterative—the insights from analytics loop back to refine your lead magnets and messaging, making the wheel spin faster over time.
Crucially, no-code integration platforms like Zapier, Make, or Pabbly Connect empower even non-technical creators to set up these interconnected workflows. You don’t need to hire a developer to connect your Instagram to your email list or to your e-commerce platform; you can drag-and-drop your way to a customized automation system. Next, let’s break down each stage of the flywheel in detail and explore the tools and techniques that will get you from that first automation all the way to 1,000 sales and beyond.
Stage 1 – Lead Capture Automation
Every creator’s growth journey starts with capturing leads. Whether you define a “lead” as an email subscriber, a follower, or a prospect who expressed interest, the goal is the same: get permission to continue the conversation. Automation at this stage ensures you don’t miss opportunities and that each new lead is instantly followed up with.
Automate your first impression:
Instead of manually collecting emails from a contact form or copying names from DMs, use lead capture tools that integrate directly with your other systems. Here are some popular no-code lead-gen tools and their pros and cons for creators:
- Typeform – A visually engaging, one-question-at-a-time form builder that makes surveys and sign-up forms feel like conversations. Pros: Fantastic user experience and high completion rates due to its interactive format. Cons: Very limited free plan; it can get pricey as your responses increase, so costs add up for larger campaigns.
- Outgrow – An interactive content builder for creating quizzes, calculators, and polls that double as lead forms. Pros: Clean, user-friendly builder with a library of pre-made templates (great for quickly launching a quiz or survey). It offers excellent analytics on engagement and conversion, so you can see what content grabs leads. Cons: Feature limits on lower plans (like caps on content pieces) – truly unlimited campaigns require higher-tier plans. Also, pricing jumps at the business level, which might be steep for some solo creators.
- Jotform – A versatile online form builder with thousands of templates and advanced customization. Pros: Plenty of question types and widgets (you can even collect signatures or payments in-form), and you have options to deeply customize design or inject custom code if needed. Cons: The free plan is quite limited (caps on the number of forms, submissions, and storage), so you’ll likely need a paid plan as you grow.
- Paperform – A form builder that feels more like editing a doc or landing page – great for embedding signup forms that match your brand. Pros: Great design out-of-the-box; Paperform forms are sleek and can handle things like order payments elegantly. Cons: The interface has a slight learning curve – it’s powerful, but you might need a bit of time to get used to the workflow and settings.
- MakeForms – A newer Typeform alternative focusing on enterprise-grade features. Pros: Highly customizable and security-focused (offers encryption, GDPR compliance, data residency options) – a big plus for EU creators worried about privacy. It also boasts very intuitive drag-and-drop building and generous response limits, making it cost-effective as you scale. Cons: As a relatively new platform, it’s less well-known; it may have fewer third-party direct integrations or community plugins compared to veteran tools, and some very advanced features may still be evolving.
Pro Tip: Use a conversational opt-in to boost engagement. Instead of a bland “sign up for my newsletter” box, try an interactive quiz or chat-based opt-in. For example, create a short quiz with Outgrow or an engaging Typeform that helps the visitor discover something (and then offers your newsletter at the end). This approach often doubles your sign-up rate because people get value upfront and feel invested by the time they give you their email.
Integration in action:
All the above form tools can seamlessly connect to your other apps. For instance, when someone fills out your Typeform, you can have an automation send their data straight to your email marketing platform, CRM, or a Google Sheet without you lifting a finger. Zapier and Make are the go-to integration hubs here: you might create a Zap like “New Typeform entry → Add subscriber to Mailchimp and Slack-notify me” or a Make scenario that sends Outgrow quiz results into Airtable for easy viewing. This ensures every lead is captured, stored, and acted on instantly. No more copying and pasting emails at midnight or losing track of people who showed interest.
Instant lead magnet delivery:
If your lead capture involves offering a freebie (e.g. a PDF guide, a template, or an exclusive video) in exchange for sign-up, automation shines here too. You can set up a workflow such that the moment a lead submits the form, an email or DM goes out with their download link or access code. For example, a Paperform submission can trigger Gmail (via Zapier) to send a personalized thank-you email with the promised content attached. This instantaneous response not only impresses your new lead with professionalism, it also keeps them engaged while their interest is highest. You’ve captured them and nurtured them a tiny bit, all in one go!
Mini-Experiment:
One creator replaced a static signup form on her homepage with a fun 5-question quiz built in Outgrow: “What’s Your Ideal Content Strategy?” Each quiz taker got a personalized result and a prompt to enter their email to get a detailed report. The result? Sign-ups jumped 40% compared to the old form. The interactive content not only captured leads more effectively, it also segmented them by interest (since the quiz answers were tied to their email via the integration). This meant she could send highly targeted follow-up messages in the next stage, dramatically increasing engagement. The lesson: an automated, interactive lead magnet can pull in more qualified leads than a generic form, all while running hands-free in the background.
Stage 2 – DM Nurturing and Engagement
Once you’ve captured a lead, the next challenge is nurturing that relationship until they’re ready to take action (like buying your product or joining your membership). Marketing automation tools traditionally handle this through email sequences – and email is still a workhorse – but now many creators are supercharging their nurturing with direct message (DM) and chat automations. Why? Because people are often more responsive to a friendly ping in their Messenger or Instagram inbox than a crowded email folder. At this stage, we’ll blend the best of both worlds: automated email campaigns and chat-based engagement.
Email drip campaigns:
If someone gave you their email in Stage 1, they expect to hear from you. Rather than manually sending individual emails, you can set up a drip sequence – a pre-written series of emails that go out automatically over the next days or weeks. No-code platforms like ConvertKit, MailerLite, or HubSpot let you design these automated campaigns with triggers (“send Email #2 two days after Email #1 if the user hasn’t purchased”, etc.). For example, after a new lead signs up, you might automate: Day 1 – welcome email with your top content; Day 3 – story email about your journey; Day 5 – a soft pitch of your product. Once you write these emails once, the system sends them in order for every new subscriber, personalized with their name and any info they provided. Every new lead gets a warm, consistent welcome, without you writing emails at 2 AM.
DM and chatbot nurturing:
Email is effective, but open rates and engagement on chat can be even higher. Enter ManyChat and similar tools, which allow you to automate conversations on platforms like Facebook Messenger, Instagram DMs, WhatsApp, and even SMS. ManyChat is hugely popular among creators for one simple reason: it turns DMs into an automated marketing channel with open rates often around 80–90% (versus the ~20% typical email open rate). With ManyChat, you can set up a chatbot that greets new contacts, responds to keywords, and leads people through scripted conversations as if you were personally texting them.
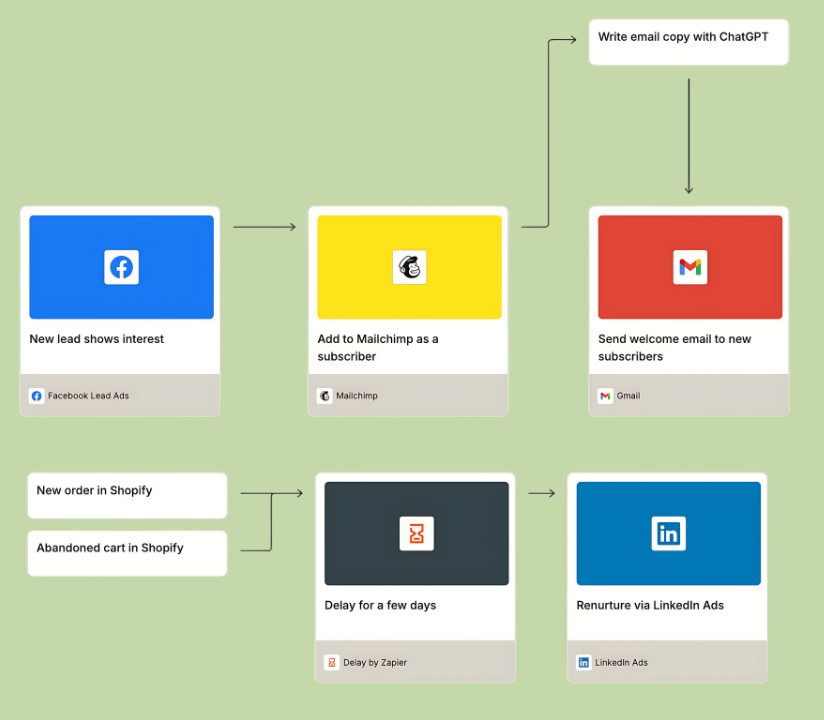
- Example: On Instagram, you can encourage followers to DM a keyword (like “GUIDE”) to receive a free resource. Your ManyChat automation detects that keyword and instantly replies with a friendly message: “Hey! I’m excited you’re interested in the guide. What email should I send it to?” When they reply with an email, the bot can auto-send your guide link and even add that email to your mailing list via an integration. This kind of chat funnel feels personal and immediate – the user is having an interactive experience rather than filling out a form. Plus, now they’re connected with you on two channels (DM and email).
- Another example: If someone comments “info” on your Facebook post or ad, a Messenger bot (ManyChat) can automatically send them more info in a private message. It’s like automating the first step of a conversation, so you can scale 1-on-1 engagement to thousands of people. ManyChat even allows broadcast sequences, so you can drip out content via DM similar to an email sequence (with the caveat that you follow each platform’s messaging rules to avoid spam).
Pro Tip: Leverage “two-way” engagement in your automations. Instead of just blasting messages, configure your chatbot or emails to ask questions that segment your audience. For example, an automated Messenger sequence might ask “What are you working on right now? 1) Growing on YouTube, 2) Selling an online course, 3) Both.” When the user responds with a number, tag them accordingly. Now your automation can fork: show them content relevant to that choice. This way, your lead feels heard and you deliver tailored value, which massively boosts conversion later. ManyChat and email tools support these branching logic flows without any coding – a few drag-and-drop rules and you’ve built an interactive choose-your-own-adventure for your leads.
Bridging chat and email:
You don’t have to choose between email and DMs – they work powerfully in tandem. A good integration setup ensures your different channels “talk” to each other. For instance, if someone interacts with your chatbot and gives their email, you can have an automation rule that tags them in your email system as coming from that source (so you know their context). Conversely, if an email subscriber clicks a certain link (“Yes, I’d like SMS updates”), you can push that info to a service like Twilio or ManyChat to start messaging them on text or Messenger. The key is meeting your audience where they’re most responsive. Some people respond better on email, others on Instagram – an integrated nurturing approach covers all bases automatically.
Personalization at scale: Automation doesn’t mean your messages have to feel robotic. In fact, you can use the data from Stage 1 to personalize Stage 2. If your lead capture form asked “What are you most interested in?” or collected their name and city, those details can merge into your emails and DMs. It’s a great feeling for a subscriber to get a message that says, “Hi Alex, saw you’re from Toronto – hope you’re staying warm! Based on your interest in YouTube automation software, here’s a quick tip about optimizing your video workflow...” This kind of dynamic content is easy to set up: your integration tool can pass custom attributes (like interest = “YouTube automation”) into your messaging platform, and you simply use placeholders to drop them into your copy. So even though the system is running on autopilot, it can deliver human-level personalization to hundreds or thousands of people at once.
Mini-Experiment:
A solo fitness coach wanted to improve conversion of her leads into a $199 coaching program. She set up two parallel nurturing funnels for new leads: one via traditional email, and one via automated DMs using ManyChat (subscribers had the option to choose their preferred channel). Both funnels delivered the same content over a two-week period – workout tips, client success stories, and a final offer to join the program. The results were telling: the DM funnel achieved an 80% open rate and 8% click-through rate, while the email funnel saw roughly 25% opens and 3% clicks. By the end, 15% of leads in the DM group purchased the coaching program, compared to 7% of the email-only group. The conversational, immediate nature of chat had kept people more engaged and responsive. The takeaway isn’t to abandon email (many people still converted there) but rather that incorporating chat automation can significantly boost your nurturing effectiveness. The best part? Both the email and DM sequences were entirely automated after the initial setup – the coach was interacting with hundreds of leads as if 1-on-1, while she slept.
Stage 3 – Checkout & Sales Automation
Now we arrive at the moment of truth: turning an interested fan into a paying customer. Checkout automation ensures that this critical stage is smooth, personalized, and error-free. As a creator, you might be selling digital products (ebooks, courses, presets), physical merchandise, services like coaching, or even subscriptions. No matter the offering, you want the purchase process to require as little manual intervention as possible from you, while giving the customer a seamless experience. A well-automated checkout workflow can handle everything from payment to delivery to confirmation, and even follow-up, instantly and reliably.
Integrate your payment platforms:
Start by connecting your payment or e-commerce tools to the rest of your systems. If you use Stripe, PayPal, Shopify, Gumroad, or any online checkout, there will be triggers available for events like “New Payment” or “New Order.” With an integration platform, you can catch those events and then fan out a bunch of actions automatically. For example, let’s say you sell an online course through Stripe payments:
- The moment a payment is completed on Stripe, a Zapier workflow (or Make scenario) triggers.
- Action 1: Add the customer’s email and name to your customer list in ConvertKit (and perhaps tag them as “Course Buyer – Photography 101” for future segmentation).
- Action 2: Enroll the user into the course content platform or membership site. If you’re using something like Teachable, Thinkific, or Kajabi, those often integrate directly or you can use a webhook/API to create the new user account and grant access without you doing a thing. Alternatively, if it’s a simple product like an ebook, Action 2 could be to email them a unique download link (or use Dropbox/Google Drive integration to send a secure file link).
- Action 3: Send a purchase confirmation email or DM. Even if the payment processor sends a receipt, a personal touch email from you (“Hey, thank you for buying! Here’s what to expect next...”) can be automated here. This reduces support queries and buyer’s remorse because they immediately feel taken care of.
- Action 4: Notify you or your team of the sale. It’s motivating to get a ping (“Cha-ching! You sold Product X to Jane Doe.”). This can be a Slack message, a mobile notification, or even just logging the sale in a spreadsheet for your records. It saves you from constantly checking your payment dashboard.
- Action 5: (Optional but powerful) Trigger a downstream action like adding the buyer to your community platform, which we’ll cover in Stage 4. For instance, if you have a private Discord server for customers, the automation can send them an invite or give them a special role. Or it could add them to a Facebook Group by sending their email to your admin tool. We’re basically linking Stage 3 to Stage 4 automatically.
All these steps happen in seconds. The buyer immediately gets what they need, you fulfill your product without lifting a finger, and the relationship smoothly transitions toward the next stage (community/retention) without any drop-off.
Pro Tip: Delight customers with a personal touch, automatically. One advanced yet impactful idea: record a generic “Thank you, [first name]!” video that is warm and non-specific, and use an automation tool to send it to each new customer right after purchase. There are services that can insert the person’s name into a video or you can simply not say the name in the video but keep it general. For instance, a Zapier workflow could trigger a tool like Bonjoro or use a cloud video service to generate a quick thank-you clip for the new buyer, delivered by email. It feels like you took the time to send a personal thank you, but it’s actually happening on autopilot. This surprise-and-delight moment can increase customer happiness and reduce refund rates, and all it took was a one-time setup.
Abandoned cart and follow-ups:
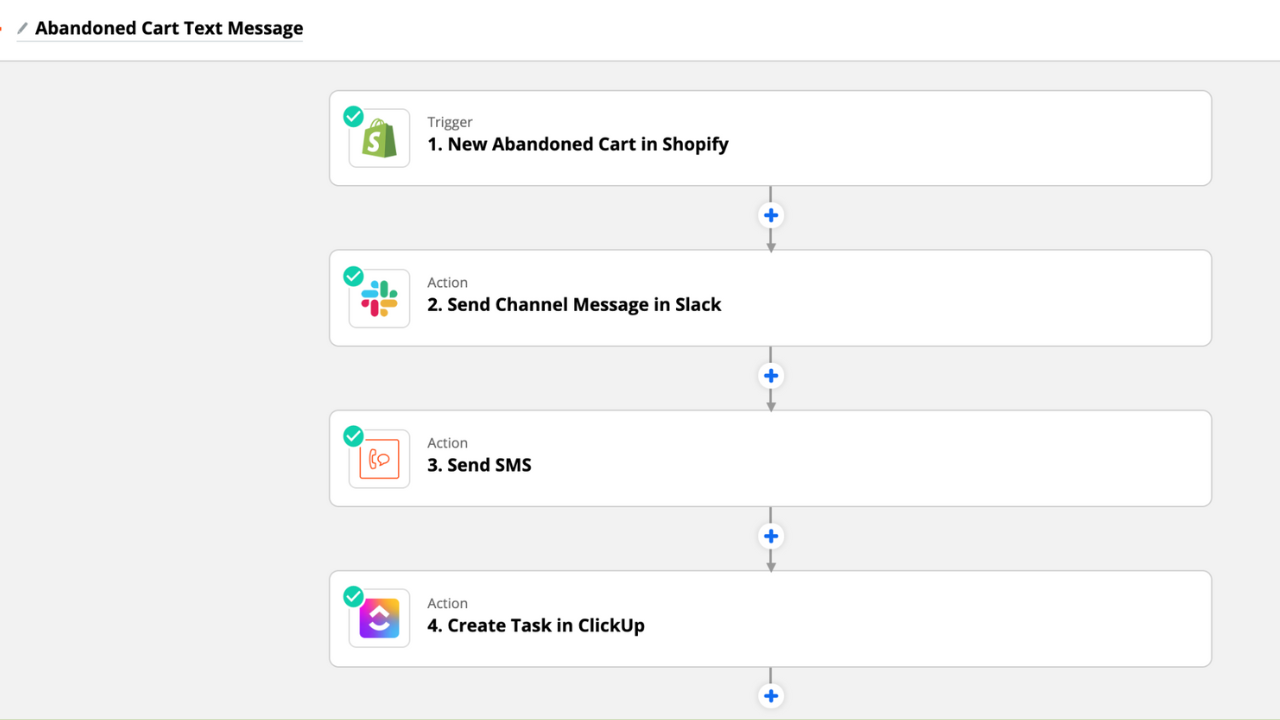
Automation isn’t just for successful purchases; it’s also a safety net for failed or abandoned checkouts. If someone initiates a purchase but doesn’t complete it (for example, they enter an email on your sales page but don’t pay), you can set up a workflow to gently nudge them. Many e-commerce platforms have built-in abandoned cart emails, but if not, Zapier can detect a “checkout started” event without a corresponding “payment” event and trigger your follow-up sequence. A friendly email a few hours later saying “Hey, I noticed you didn’t finish signing up – here’s the link if you have any questions or need help” can recover a lot of otherwise lost sales, and it’s fully automated. Similarly, if a subscription payment fails, you can have an automation send the customer a reminder to update their card details, pause their access automatically, and alert you so you can intervene if needed. These “fail-safe” chains protect your revenue and save you from tedious manual tracking.
Transparency in pricing and costs:
It’s worth noting the cost side of automation tools here, since as a creator you’re probably minding a budget. Platforms like Zapier charge based on task volume; if you have a high volume of sales or emails, Zapier can become one of your bigger monthly expenses. That’s why some creators opt for Make (which often offers more operations for the price) or Pabbly Connect, which has a flat lifetime deal or affordable fixed plans for large task counts. The good news is that checkout-related automations typically aren’t as high-frequency as, say, email sends – unless you’re making thousands of sales a day (in which case, congratulations!). Still, always keep an eye on how many automation “tasks” you’re using and optimize your workflows to avoid unnecessary steps. Many tools provide real-time usage stats so you have cost transparency and no surprises on your bill. For instance, Pabbly’s one-time payment for a set number of tasks can be very cost-effective for growing creators, and n8n is even an option to self-host your automation workflows and essentially eliminate ongoing costs (though it requires some technical setup). The takeaway: as you automate your sales, you also have automation solutions at various price points – choose one that scales comfortably with your sales volume.
Handling taxes, receipts, and admin:
Selling products globally can introduce pesky administrative tasks like generating invoices with VAT/GST, updating bookkeeping, or sending purchase confirmations that meet certain compliance rules. Automation can rescue you here as well. You can integrate with accounting tools like QuickBooks or Xero to automatically log each sale as an invoice or revenue entry. If you need to email a tax invoice to customers, set up a template and have an automation email it out (some payment gateways like Stripe can produce invoices, but for those that don’t, this is a lifesaver). For VAT/sales tax compliance, consider using specialized services or at least ensure your workflow captures the buyer’s country so you can apply the correct tax rules. Some creators even build a mini “creator compliance kit” using no-code tools: for example, whenever a sale happens, a Zap adds the sale details to a spreadsheet that calculates how much tax was collected, logs the transaction ID, and stores a receipt PDF link – creating a tidy record for tax time. This kind of back-office automation might not be glamorous, but it means when quarterly taxes or annual accounting come around, you’re not sifting through thousands of emails and Stripe exports. Everything is organized automatically.
Use-Case Story:
Ana is a digital illustrator who sells $15 printable art packs on her own website. Initially, she’d receive an order notification, then manually email the files to each buyer, sometimes hours later (since she wasn’t always online), and then she’d update a spreadsheet of sales at night. It was workable when sales were slow, but as she started getting dozens of orders a week from her growing YouTube audience, it became a time-suck and some customers grew impatient waiting for their files. Ana decided to automate: using Zapier, she connected her WooCommerce store to Google Drive and Gmail. Now, whenever an order comes in, Zapier instantly uploads the purchased art files from her Drive to a unique folder, creates a share link, and emails that link to the buyer with a nice message. It also logs the sale in a Google Sheet (with the item, amount, buyer’s email, and region). The entire fulfillment process is done in seconds, not hours. Ana wakes up to sales that have already been delivered, and her spreadsheet is always up-to-date for tracking income. The payoff? Not only did it free up several hours per week, but customer satisfaction went up—she started receiving thank-you replies about how “fast and smooth” the delivery was. By automating checkout and fulfillment, this creator scaled to hundreds of sales a month without hiring an assistant or burning out. That’s the power of a no-code sales workflow in action.
Stage 4 – Community Engagement & Growth Automation
Making a sale isn’t the end of the journey – it’s the beginning of a new relationship. Community engagement is about nurturing your existing audience and customers so they stay involved, get more value from your offerings, and ultimately become raving fans who bring in others. This stage of the flywheel turns one-time buyers into repeat customers and referral engines. But managing a community or consistently engaging followers can be hugely time-consuming if done 100% manually. The solution: strategically automate parts of your community management and social media outreach, so no one feels neglected and your presence stays vibrant even when you’re busy creating.
Automate community onboarding:
If you host a community for your audience – be it a private Facebook Group, a Discord or Slack workspace, a Patreon page, or a membership site – consider automating the onboarding process for new members. Earlier, we touched on inviting buyers to a community via an automated email or link. Take it a step further: once they join, use automation to deliver a warm welcome and guide them through initial steps. For example:
- In a Facebook Group, new members often answer entry questions (like “What’s your email?” or “What are you hoping to learn here?”). You can use a tool like GroupFunnels or Zapier’s Facebook integration to grab those responses and automatically send a welcome email or tag that person in a welcome post. Imagine joining a group and immediately getting a personalized email saying “Hi and welcome to our creator family! Since you mentioned you’re interested in YouTube growth, here’s a quick start guide we have on that.” That level of attentiveness can be automated by linking Facebook to your email platform and content database.
- In Discord, you might set up a welcome bot that automatically DMs newcomers with a “start-here” guide and uses their info from purchase to assign roles. (Many Discord bots exist that integrate with Stripe, Patreon, etc., or you can use n8n/Make to connect these via webhooks). This ensures everyone gets the important info up front without you manually pinging each person.
- If you run a course or membership site, automation can enroll the user in an onboarding email sequence (like “Day 1: How to get the most out of the community, Day 3: Tips for success,” etc.). These little touches keep people engaged during those critical first days after joining.
Ongoing engagement on autopilot:
Once members or followers are in your world, consistency is key to engagement. But you can’t be everywhere all the time – that’s where social media automation tools and content scheduling come in.
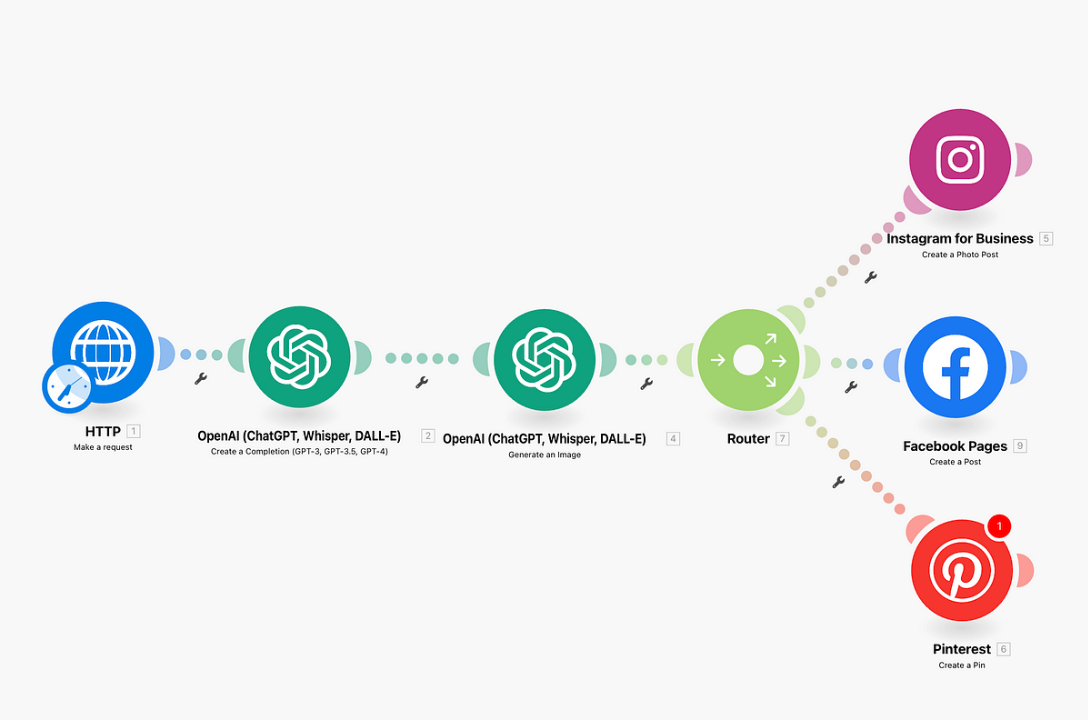
- Use schedulers like Buffer, Hootsuite, or Later to plan out your social media posts in batches. For instance, spend one afternoon scheduling your next two weeks of Instagram posts, YouTube community tab posts, tweets, etc. The scheduler will automatically post them at the set times while you’re free to do other things. This is a basic form of automation, but it’s a lifesaver for solo creators maintaining a presence on multiple platforms. No-code integration can enhance it: e.g., if you schedule a YouTube video, a Zap can auto-share that video’s link to Twitter and LinkedIn when it goes live, functioning as your social media automation assistant.
- Repurpose content automatically: If you publish a new blog post or video, you can have it automatically disseminate across platforms. An IFTTT applet or Zapier template can do things like “When I publish a new YouTube video, share a snippet to Facebook and an image to Instagram.” Some creators set up an RSS feed of their content to pipe into various socials. This ensures every piece of content reaches all corners of your audience without manual copy-pasting.
- Community content and prompts: To keep a community active, you might want regular prompts or discussions. Automate a “Question of the Week” or “Fan Spotlight” post. For example, maintain a Google Sheet with 52 community discussion questions. A Make scenario can be scheduled to every Monday pick the next question from the sheet and post it to your Facebook group (via the Facebook API) or Slack channel. It could tag a random member or use data to highlight someone (“@Alice, you achieved 100 YouTube subscribers this week – congrats! Everyone, share one win from your week too.”). These kinds of periodic, automated posts can keep the community lively even during times you’re personally less active.
- Responding at scale: While personal replies are ideal, some interactions can be automated. ManyChat can monitor your social inboxes and send instant answers to FAQs. Suppose you frequently get asked “When’s the next podcast episode?” – you can have a prepared answer that the bot sends whenever it detects that question. Similarly, a Twitter automation could automatically thank people for retweeting you or send a welcome DM to new followers with useful links (just be cautious to follow platform rules and not spam). The trick is to handle routine touches automatically, so you free up time to jump into the really meaningful conversations personally.
Leveraging API-first tools for viral loops:
Modern community platforms and social networks often provide APIs or integrations that you can use creatively. This is where the “integration” aspect can spark growth. Example scenario: let’s say you want to encourage referrals. You could set up a referral program where if a current subscriber gets a friend to sign up, both get a bonus. Without code, you might use a tool like SparkLoop or just hack it together: e.g., use a Google Form for referrals, then an automation checks if the referred person signed up (by seeing them added to your list) and then automatically sends reward emails to both. Or imagine a viral giveaway: use a tool like Gleam or KingSumo (which have no-code viral contest features) and integrate the entrants’ data with your CRM via webhook, so entrants immediately get a “Thanks for entering, here’s something for you” email. These micro-automations can make your community growth self-sustaining, as members are incentivized and rewarded automatically for bringing in more people.
Another example: micro-SaaS automation packs are popping up that address very specific creator needs, like a bot that automatically reposts your Instagram content to TikTok (bypassing watermarks) or a script that compiles your weekly newsletter highlights into a blog post. Many of these micro-tools are built by fellow creators or indie developers, and they often integrate via APIs or webhooks. Keep an eye out – adding a few of these to your stack can give you unique capabilities that set you apart. The beauty is they usually plug into Zapier/Make or come with simple instructions to connect with your existing platforms.
Pro Tip: Maintain a “heartbeat” of engagement with minimal effort. Set up a recurring automation that ensures there’s always a touchpoint going out. For instance, schedule a monthly recap email to your community highlighting top posts or user contributions – and automate its creation by pulling data from your platforms. If you have a forum or Facebook Group, some tools can extract top discussions (or you could manually select a few each month). Then use a template to compile these into an email or social post. The automation could be: On the last day of the month, gather most-liked post titles from the community (via API or even a manual step if needed) and plug them into an email that goes to all members like “In case you missed it, here are the hottest topics from March…”. With a bit of upfront work, this becomes a hands-off way to re-engage lurkers and remind everyone of the value in the group regularly.
Stage 5 – Analytics and Optimization
By this stage, you have a lot of moving parts: forms feeding leads, DMs and emails nurturing them, sales flowing in, and community conversations buzzing. Analytics and optimization is about keeping an eye on all these processes and continuously improving them. Fortunately, the same no-code ethos applies here – you can automate your data collection and analysis to a large extent, giving you clear insights with minimal manual tracking. This final stage of the flywheel ensures that your system not only runs, but learns and gets better over time, effectively feeding back into Stage 1 by informing smarter decisions and tweaks.
Unified data tracking:
The first step is to aggregate key data from each stage into one place or dashboard. As a creator, you might want to track metrics like: daily new leads, email open rates, DM response rates, daily/weekly sales, conversion rates (lead-to-sale), community growth (new members per week), and engagement stats (like % of active members or social media reach). Manually logging into five different apps to pull these numbers is a chore – so let’s automate it:
- Spreadsheets/Dashboards: A popular no-code approach is to use Google Sheets or Airtable as a central repository for metrics. For example, use Zapier to send every new form submission, sale, etc., as a new row to Google Sheets. Or have a nightly Make scenario that counts how many new leads came in that day and updates a cell. Over time you build a sheet with daily stats. From there, you can plug Google Sheets into a free dashboard tool like Google Data Studio (now called Looker Studio) to visualize trends, or just use built-in charts. If spreadsheets aren’t your style, tools like Geckoboard or Databox allow direct integration with many apps to create a drag-and-drop dashboard of your KPIs. The key is that once set up, these dashboards update themselves. Monday morning, you could open a link and instantly see last week’s performance across all your key metrics, without spending Sunday night compiling reports.
- Automated reports: Some creators set up automated email reports that get sent to them (and their team, if they have one). For instance, an automation can run every Friday to gather “This week: X new subscribers, Y new customers, Z posts published” and email it to you. It might sound unnecessary if you can check a dashboard, but having the discipline of a weekly report arriving in your inbox can be a good trigger to review and reflect on your metrics regularly. And it’s all automatic – your analytics assistant that never forgets to send the update.
- Attribution and source tracking: Integrations help you track where leads and sales come from. If you attach UTM parameters to your links (which you should for marketing campaigns), you can have those feed through your forms into your database. Say someone came via your Instagram bio link – their sign-up form might carry “source=Instagram”. Your automation can log that. Over time, you’ll see “50% of paying customers came from YouTube, 30% from Instagram, 20% from blog.” That insight is gold for doubling down on what works. There are no-code attribution tools like Funnelytics or Google Analytics (with some setup) that can help, but even a simple spreadsheet tally via automation gives you a starting point.
Continuous improvement (the optimize loop): With data flowing in, you can close the loop and refine each stage:
- If analytics show your lead capture conversion is low (e.g., 1% of visitors sign up), you might experiment with a different lead magnet or form style. Thanks to analytics, you’ll know if the change (like switching from a standard form to an Outgrow quiz) improved the rate because you’ll see an uptick in daily leads.
- If you see that nurtured leads open the first email but stop engaging by the third email, perhaps your sequence needs tweaking around that point. Or maybe you discover via click data that leads who go through your ManyChat sequence convert 2x higher than those who only get emails – a sign to drive more people to opt into chat or to replicate what’s working in chat over email.
- A/B testing can be done in no-code fashion too. Many email platforms allow splitting automations into two paths to test different content. You can also use Google Optimize (a no-code A/B testing tool for websites) to test two versions of a landing page – and it will feed results to Google Analytics. If you’re testing two different workflows (like two different onboarding sequences), you might need a bit of creativity: e.g., randomly assign new sign-ups a tag of “Group A” or “Group B” via an automation, then have slightly different nurturing flows for each tag. Over a month, compare purchase rates of Group A vs B from your data – boom, you’ve run a randomized controlled experiment on your audience, all within your no-code stack.
- Don’t forget to also optimize internally: if an automation occasionally errors out or a task is still manual, can you refine it? For example, if you notice your Google Sheet of leads has some duplicates or messy data coming in, maybe add a step in Zapier to clean or filter data (they have formatter utilities) before logging it. Or if your error log shows that sometimes a ManyChat webhook fails at midnight (maybe the API rate limit), you could schedule that step to happen at a different time or add a retry. The result is a more robust system that you don’t have to babysit.
Data privacy and compliance considerations:
As you gather and integrate all this data, keep privacy in mind—especially if you have users from the EU or other regions with strict laws. Ensure you have consent for tracking (for instance, if your forms feed into analytics, disclose what you track in your privacy policy). Use tools that offer compliance features: many no-code platforms let you disable storing personally identifiable info if not needed, or to choose EU-based servers for data storage. GDPR compliance in automation might mean signing a Data Processing Agreement with tools like Zapier (they offer this for paid accounts) and offering easy opt-outs. The last thing you want is to alienate your audience by over-automating in a creepy way or mishandling data. As a rule of thumb, automate in service of user experience and your convenience, not to spam or excessively surveil. If someone opts out of emails, your automation should catch that and not continue messaging them elsewhere without permission. Luckily, these platforms make it possible to manage such rules—you can, for example, have an automation trigger remove a user’s data from other systems if they delete their account or unsubscribe (ensuring you clean up across the board).
Ensure reliability: With dozens of workflows running, how do you know they’re all working properly? Build in some monitoring for your automations themselves. Many tools send notifications if a zap or scenario fails. Make sure those are on, and use an email or Slack channel you actually monitor for these alerts. It’s wise to do a quarterly “automation audit”: spend an hour to review if each major workflow is still doing what it should, especially after any tools update their APIs. For mission-critical processes, consider a backup. For instance, if your primary sales automation fails to deliver a product file (maybe the API is down), have a secondary step that catches that scenario (like “if file delivery fails, send an alert to me or try a different method”). These precautions keep your flywheel running smoothly even as you rely on a tech stack.
Pro Tip: Calculate the ROI of your automation – it’s probably higher than you think. Keep a simple tally: how many hours per week are you saving by automating tasks X, Y, Z? And what is that time worth to you (either in dollars or in creative output)? For instance, if automations save you 10 hours a week and you value your time at $50/hour, that’s $500/week of value, or $26k a year. Or maybe more meaningfully, that’s 10 extra hours you can spend making videos, writing, or resting (preventing burnout). Spell this out for yourself. One creator built a “time saved” calculator in Airtable – every time an automation runs, it adds a predefined number of minutes that task would have taken manually. It’s immensely satisfying to watch that accumulate. Plus, if you ever wonder “Is my $30/month Zapier plan worth it?”, you’ll have a clear answer. Typically, the answer is a resounding yes when you see that you’ve saved dozens or hundreds of hours. This data can also help you decide where to automate next: if you see you’re still spending 5 hours a week on a task that could be automated with a bit of effort, that’s your cue.
At this point, you’ve seen how each piece of the Creator Automation Flywheel works and feeds into the next. Your lead capture machine brings people in efficiently, your nurturing system warms them up personally at scale, your checkout process turns them into customers with ease, your community automations keep them engaged and bringing in others, and your analytics loop helps you fine-tune it all for continuous growth.
Case Study:
Marisol is a content creator who sells a membership and also earns via YouTube ad revenue and sponsorships. She integrated data from various sources to get a full picture of her business health. Using Make, she set up a daily routine where: her YouTube stats (new subscribers, views) are fetched via YouTube’s API, email list count comes from ConvertKit’s API, membership sales numbers come from Stripe, and website traffic from Google Analytics – all these get compiled into a single Google Sheet row each day. She also tracks softer metrics like community engagement: her Discord bot reports how many messages were posted each day and how many active users there were. With all this in her sheet, she created a dashboard that shows her a live “Creator Scorecard.” One week, Marisol noticed her new subscribers were spiking (a video had gone viral) but her membership sales didn’t increase correspondingly. Her dashboard highlighted this disconnect. Investigating, she realized many of these new followers didn’t know about her membership. So, she quickly adjusted: she added an extra automated email in her welcome series specifically tailored to YouTube newcomers, inviting them to check out the membership with a special discount. She also posted a short promo on her community. The following week, sales ticked up. Without her integrated analytics setup, Marisol might have simply celebrated the subscriber boost and missed the missed revenue opportunity, or caught on much later. By having a finger on the pulse of all parts of her flywheel, she could respond in near-real-time and optimize the system. This is the power of Stage 5: automation not just doing the work, but informing you so you can do the right work.
From First Automation to 1,000 Sales – Mission Accomplished
Building this may sound like a lot, but remember, you can start small and layer on as you grow. Maybe your first step is just automating your email sign-ups and welcome message. Then you add a simple checkout zap. Then you experiment with a chatbot, and so on. Each automation is like hiring a reliable assistant that works for free. Over time, you’ve got a whole team of “auto-assistants” running your business alongside you. Hitting 1,000 sales (or 100,000 subscribers, or whatever your goal) becomes far more achievable when you’re not bogged down by minutiae. Instead, you’ll spend your time creating content, developing products, and interacting in meaningful ways that only you can do – while the robots handle the rest.
As no-code tools continue to advance, with trends like AI integration (imagine your automation optimizing itself using AI insights!) and more creator-focused platforms emerging, the possibilities are only expanding. The earlier you embrace automation, the more compound growth you’ll gain. You’ve now got a blueprint of what’s possible. The next step is to put it into action and customize it to your unique workflow.
Here’s to working smarter, delighting your audience, and reclaiming your creative time. Welcome to the era of the empowered creator, where a one-person business can operate with the efficiency and sophistication of a small company – all through the magic of integration and automation. Happy automating, and see you on the other side of your first 1,000 sales!
FAQs
Start with the low-hanging fruits of marketing automation. Use an email service to set up an automated welcome email series for new subscribers – that keeps your outreach consistent. Schedule your social media posts in advance using tools like Buffer or Later, so your content goes out on a regular cadence without daily effort. Implement a chatbot (via ManyChat or similar) on platforms like Instagram to handle FAQs or deliver lead magnets instantly to interested viewers – this essentially gives you a 24/7 marketing assistant. Also, connect your platforms: for example, have your blog automatically share to Twitter and Facebook when you hit publish (Zapier and IFTTT can do this). If you produce YouTube videos, automate a push of that content to your email list or blog. Even simple steps like these free up hours. Over time, as you saw in the Automation Flywheel, you can integrate multiple touchpoints (email, DMs, ads retargeting, etc.) to create a continuous, multi-channel marketing engine that runs largely on its own. The key is to gradually delegate repetitive marketing tasks to software – from posting to initial DM responses – so you remain focused on strategy and creation.
The key is to respect your audience’s boundaries and data just as you would if you were doing everything manually. A few guidelines:
- Always get consent for communications. For example, if someone gives you their email for a free download, it’s fine to send that and follow-ups related to it, but don’t automatically add them to every marketing list unless they opted in. ManyChat bots, by platform rules, require certain user actions to opt-in – adhere to those rules and provide clear ways to stop messages (like replying “STOP” for SMS or using the unsubscribe link in emails).
- Match the tone to the channel. Just because it’s automated doesn’t mean it should sound robotic. Make sure your automated emails or DMs sound like you and provide value, not just sales pitches. An annoyed user will unsubscribe or block, which the automation will duly execute – but better to keep them engaged by being helpful and personable.
- Include fail-safes. If someone messages your chatbot with something the bot doesn’t understand, have a default reply that says a human will get back to them (and route that message to yourself). That way no one feels ignored or stuck in an AI loop.
- Privacy and data safety: Use reputable tools that are GDPR-compliant if you serve EU users – this often means they’ll sign a Data Processing Agreement and give options like data deletion, etc. Only collect data you actually need. Secure it – for instance, if your automation sends form data to Google Sheets, ensure the sheet isn’t publicly viewable.
Frequency: Don’t over-automate outreach to the point of spamming. Just because you can send daily emails on auto doesn’t mean you should. Quality over quantity – set your automations to contact people at a reasonable pace that you’d be comfortable with if you were on the receiving end. By periodically reviewing your automated messages and logs, you can catch any weird behavior (like an email that’s firing too often). Treat automation as an extension of your brand’s service: it should make the user experience faster and smoother, never compromising trust. When done right, your audience will feel like you’re incredibly attentive – all while their data is handled responsibly.
There isn’t one software that automates YouTube growth magically (beware of scams that suggest otherwise), but there are tools to automate parts of a YouTuber’s workflow. YouTube’s own features allow scheduling uploads and using defaults to save time on descriptions and tags. For promotion, you can use Zapier to automatically share new videos to Twitter, Facebook, or your email list the moment they go live – that’s a simple but effective automation. If you run multiple channels or want to batch tasks, TubeBuddy offers bulk actions like copying cards and end screens across videos, or updating hundreds of video descriptions in one go – that’s automation within YouTube’s ecosystem. Analytics tools can alert you when certain thresholds are hit (e.g., a video reaches 100K views and then trigger a tweet celebrating it via IFTTT). Some creators set up IFTTT applets for fun things like “If I get a new YouTube subscriber, add a row to Google Sheets” – useful for tracking or triggering a celebration when you hit a milestone. In short, while you still have to create the content, you can automate distribution, optimization, and some engagement aspects of YouTube. These “YouTube automation” techniques won’t violate any of YouTube’s rules since they use official APIs and integrations – they’re just helping you streamline the process around your content.
There are several great no-code platforms. Zapier is the most popular for its ease of use and huge app library (great for beginners). Make (Integromat) offers a more visual builder and often better value on higher volumes. n8n is a powerful open-source option if you’re technically inclined or want to self-host for free. For chat-based automation, ManyChat is a top choice (especially for Instagram and Facebook messaging). Pabbly Connect is a budget-friendly alternative that provides many of the same integrations often at a fixed cost. Finally, IFTTT is useful for simple social media or smart home applets. The “best” tool depends on your needs – many creators actually use a combination (e.g. Zapier for critical business zaps and IFTTT for little social tricks). The good news: most have free plans or trials, so you can test which fits your workflow.
A good starting point is to automate any task you find yourself doing repeatedly on a schedule. Common first automations include:
- Email responses – Set up auto-responders for frequently asked questions or a welcome email for new subscribers so everyone gets timely info without manual effort.
- Content publishing flow – Automate sharing your new content to all platforms (post once, promote everywhere).
- Lead capture follow-up – If you’re collecting emails via a form, automate the delivery of the lead magnet or thank-you message immediately.
- Social media posting – Schedule regular posts or use triggers like “new blog -> create social post” to stay consistent.
- Data backups – Save copies of your work (videos, posts, contact lists) automatically to cloud storage; it’s not glamorous but will save headaches.
Routine reports – For instance, get a weekly summary of your stats emailed to you (so you don’t forget to check analytics). Think about tasks that don’t require your personal touch and happen often – those are prime for automation. Even automating something that takes 5 minutes a day adds up to significant time saved over months. Start small, get comfortable with one or two simple zaps or workflows, then expand as you identify more drudgery in your day that could run on autopilot.
For content scheduling and posting, Buffer and Hootsuite are popular choices – they let you queue up posts across multiple social accounts and analyze engagement. Later and Planoly are excellent if you’re heavy on Instagram and Pinterest, providing drag-and-drop visual planners. For automation between apps, IFTTT (If This Then That) offers simple “if X then Y” applets – for example, “If I post a new YouTube video, then share a snippet on Twitter.” Zapier and Make can also handle social triggers at a more advanced level (like automating a Tweet when you publish a blog, or saving all your tweet mentions to a database). If your focus is community engagement, consider ManyChat or Chatfuel for automating interactions on Messenger, Instagram, or Telegram – e.g., greeting new followers or sending broadcast updates. Creators on YouTube might use TubeBuddy or vidIQ – not traditional automation in posting, but they automate a lot of optimization tasks (like bulk editing descriptions or suggesting keywords). Lastly, for curating and sharing content, tools like Pocket or Feedly can automate content discovery, and then you can automatically share articles you tag via an integration. The right tools depend on where your audience lives, but leveraging even a couple of these can significantly streamline your social media presence.
No-code workflow automation means using tools to connect apps and perform tasks for you – all without writing any code. Instead of programming, you use visual interfaces: you click, drag, and configure. For example, you can tell a no-code tool, “Whenever I get a new email subscriber, add their name to a spreadsheet and send them a welcome message.” The tool then takes care of it every time, automatically. It’s about creating “workflows” – sequences of actions – that normally you’d do manually (or would require a developer to script), and doing it through an intuitive dashboard. This could be as simple as automatically backing up your Instagram photos to Google Drive, or as complex as a multi-step sales funnel with branching logic. No-code platforms come with dozens or hundreds of pre-built integrations (for apps like Gmail, Facebook, Stripe, etc.), so you just pick what you want to connect and define the rules. In short, it empowers anyone – even non-technical folks – to build mini software-like processes that save time and reduce errors in daily work.


.png)


