
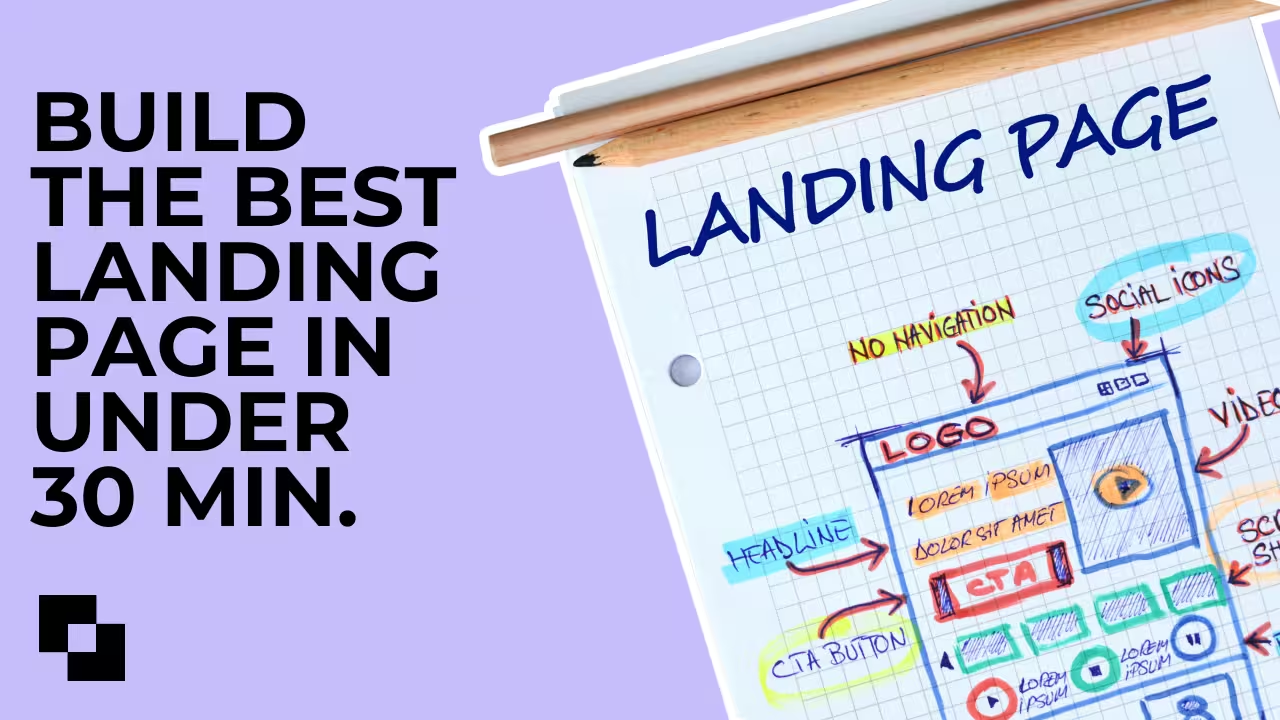
Learn how to craft a stunning AI-powered landing page in 30 minutes. This guide shows you how to use AI for copy, images, and CTAs so you can build a website faster and smarter.
You’re a solo creator or small business owner with no time to spare. Building a website is on your to-do list, but it feels daunting and time-consuming, right? You’ve likely wondered how to craft a stunning AI-powered landing page in 30 minutes when you barely have an hour free in your day. We get it—designing, writing copy, and choosing images can easily turn into a week-long project if you’re doing it all manually.
Meanwhile, every minute you delay, potential clients are bouncing to competitors who have slick sites already live. Maybe you’ve tried those “easy” website builder tools before, only to feel overwhelmed by endless templates and blank text boxes. It’s frustrating watching hours slip away tweaking a page that still looks amateur, especially when you need results yesterday.
But here’s the good news: in 2025, AI is your secret weapon. The latest website builders come with smart AI assistants that handle the heavy lifting—think instant layouts, on-point images, and persuasive copy generated on the fly. We’ve spent late nights hands-on testing these AI tools (and even scored some exclusive discounts for you). This guide will show you step-by-step how to build a website faster and smarter, so you can launch a polished landing page in just 30 minutes. Let’s dive in and get your site from idea to live, with AI doing the hard parts.
Table of Contents
- Quick Snapshot (TL;DR)
- Your Tool Options & Setup Checklist
- Step-by-Step Walkthrough
- Step 1: Define Your Landing Page’s Goal and Audience
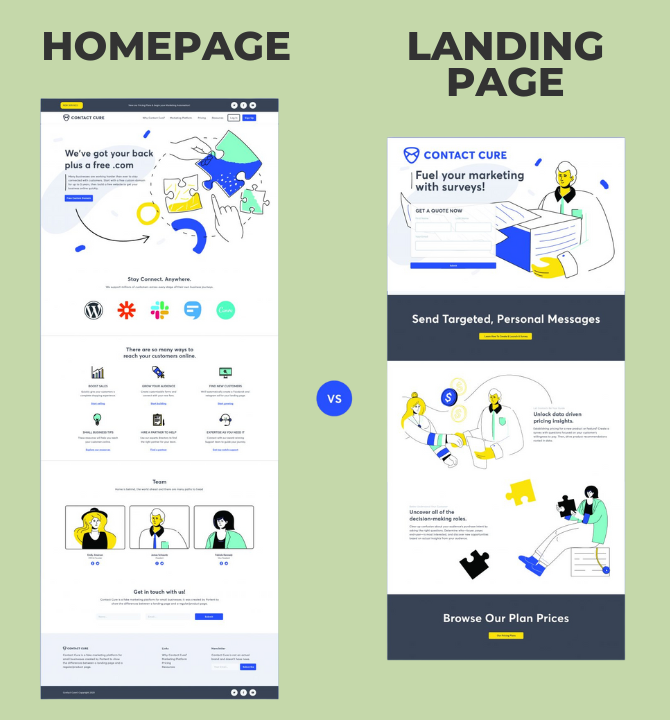
- Step 2: Choose an AI-Powered Website Builder and Template
- Step 3: Generate the Core Layout with AI Assistance
- Step 4: Craft a Compelling Headline and Value Proposition
- Step 5: Expand Your Page with Benefits, Images, and Social Proof
- Step 6: Fine-Tune the Visual Design and Branding
- Step 7: Set Up Your Call-to-Action (CTA) and Form
- Step 8: Publish, Test, and Keep Improving
- Pro-Level Power-Ups
- Avoid These Mistakes
- Time-Saving Automations & Must-Follow Rules
- FAQs
Quick Snapshot (TL;DR)
- Pick your platform and sign up (~2 min) – Choose a website builder with baked-in AI (e.g., Wix, WordPress.com, Dorik AI) and create your account.
- Map your page goals (~3 min) – Sketch an outline of sections and jot prompts for AI-generated headlines, benefits, and CTAs.
- Generate a design draft (~3 min) – Let the builder’s AI create a tailored layout and color palette as your starting point.
- Auto-write your copy (~4 min) – Use the integrated AI writer (or ChatGPT) to craft headlines, body text, and persuasive calls-to-action.
- Create on-brand visuals (~3 min) – Produce custom hero images or icons with AI tools (e.g., Midjourney) and drop them into place.
- Insert forms & buttons (~2 min) – Add sign-up forms or “Book Now” buttons, linking them to your email platform or booking app.
- Polish styles & mobile view (~2 min) – Fine-tune fonts, spacing, and responsiveness for a sleek look on every device.
- Connect your domain and publish (~2 min) – Point your custom URL, hit “Publish,” and share your new landing page with the world.
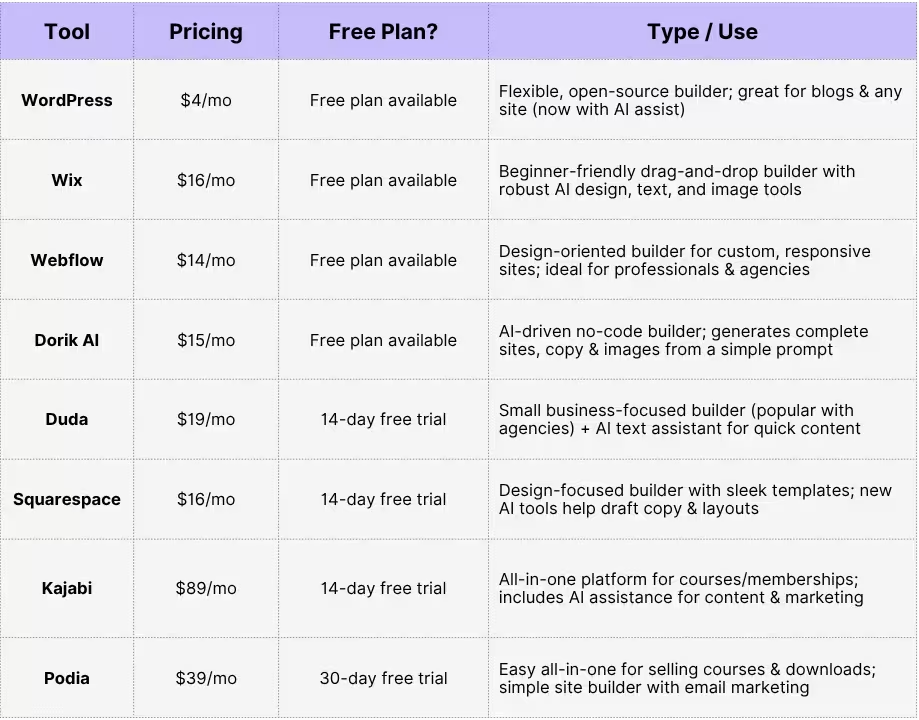
Your Tool Options & Setup Checklist
Before you dive into building your page, take a moment to gather your tools. Below is a quick rundown of top AI-ready website builders and companion tools to kickstart your landing page. These platforms can help you generate layouts, write copy, and design visuals in minutes—no coding needed.
Next step: match your workflow to the perfect builder. Read our companion guide — “Best Website Builders for Content Creators (2025).”
• Side-by-side feature matrix for the top platforms
• Pricing breakdown + exclusive Creators Kit deals
• Use-case scenarios for bloggers, podcasters, designers, and more
• 3-minute Loom walkthrough if you’re pressed for time
Step-by-Step Walkthrough
1. Define Your Landing Page’s Goal and Audience
A high-converting landing page starts with ruthless focus.
1. Lock a single conversion goal.
Pick the action that drives revenue fastest—email capture, call booking, or direct sale—and attach a metric and deadline (e.g., “150 qualified email leads in 30 days”). Anything that doesn’t move that needle is noise.
2. Calculate the traffic you actually need.
Divide your target conversions by a realistic conversion rate. If you need 150 sign-ups and expect a 20 % CVR, you only need 750 visitors—helpful for ad budgets and SEO priorities.
3. Sketch a 60-second persona.
Write one sentence each for: role, urgent pain, current workaround, desired outcome, biggest objection, trusted info source (YouTube, Discord, Reddit, etc.). Use SparkToro, subreddit threads, and Amazon book reviews to capture real phrases your audience already uses. Run these notes through ChatGPT or Perplexity to tighten language and surface hidden objections.
4. Craft a value-prop line that snaps.
Format: [Audience] gets [Outcome] without [Big Hassle]. Example: “Solo course creators launch a polished sales page tonight—no code, no designer.” Iterate until it’s clear enough to pass the 5-second test.
5. Quick validation.
Send your headline and CTA to one real prospect or peer; ask, “Would you click?” A hesitant answer means you need a sharper contrast between pain and outcome.
Pin these three anchors—Goal, Persona, Value Prop—at the top of your doc. Every headline, image, and button in Steps 2–8 must reinforce them; ignore everything else.
Pro Tip: Jot down one sentence that sums up your offer and one sentence that describes your audience (e.g. “Offering affordable web design for local restaurants”). Keep this note handy – it will guide your writing and ensure your landing page speaks to the right people.
2. Choose an AI-Powered Website Builder and Template

A 20-minute build demands a platform that either generates a full draft for you or lets you paste AI-written sections with zero friction. Choose whichever option fits your tool stack and budget:
Option A: Instant AI landing-page generators
- Dorik AI, Durable, Framer AI – answer a short prompt, get a ready-to-edit page with sections, color palette, and placeholder copy. Fastest path when you need a single page live tonight.
- Best for: creators validating a new idea, service providers who just need a clean “book now” funnel.
Option B: Design-flex builders with built-in AI
- Wix ADI, Squarespace's Fluid Engine + AI, WordPress.com AI – more widgets, deeper design control, and automatic copy/image suggestions.
- Best for: brands that want on-page blogs, multiple pages, or future e-commerce without switching platforms.
Option C: Course & membership platforms with AI helpers
- Kajabi, Podia, Teachable – no native site AI yet, but you can drop ChatGPT-generated copy, headlines, and thumbnail images straight into their page editors.
- Best for: creators selling digital products who want marketing and delivery in one place.
Option D: Visual front-ends that pair with ChatGPT
- Webflow + Relume AI Components, Elementor AI for WordPress, Softr AI blocks – generate sections or entire pages with AI, then fine-tune in a familiar visual editor.
- Best for: teams already comfortable with Webflow or WordPress who refuse to sacrifice pixel-perfect control.
How to decide in 60 seconds
- Speed vs. flexibility: need it live fast? Choose Option A. Want design freedom? Option B or D.
- Future content plans: blogging or products coming soon → avoid dead-end builders.
- Stack compatibility: confirm your payment provider, email service, or course can embed smoothly.
GPT shortcut for any platform
Paste this in ChatGPT before you open the builder:
“Act as a conversion copywriter. I target [audience] who struggle with [pain]. My offer is [offer]. Write a hero headline, sub-headline, three benefit bullets, and a primary CTA for a landing page.” Copy the output into Dorik, Wix, Kajabi—wherever you’re building. Instant on-brand copy without staring at blank fields.
Pro Tip: Even if your builder claims “AI inside,” run every headline and CTA through ChatGPT for three tighter rewrites. Native AI tools often default to bland phrasing—your copy should sound like you, not a template.
3. Generate the Core Layout with AI Assistance
Time to let your builder’s AI give you a ready-to-edit skeleton in under a minute.
1. Fire up the generator
Open the AI tool inside Dorik AI, Durable, Framer AI, Wix ADI, or Relume Components. When it asks what you need, type a one-liner such as: “One-page site for a fitness coach, bold hero image, social-proof strip, pricing section, bright pastel style.” Hit Generate.
2. Review the first draft
You’ll get a hero, a few text blocks, an image placeholder, and a CTA. Think of this as version 0.1—good bones, not final art. Scan the section order (hero → benefits → social proof → CTA) and make sure it matches your goal from Step 1.
3. Rapid-fire iterate
Most builders let you regenerate. Change one variable each time:
- Swap “affordable” to “premium” to adjust tone.
- Add a design cue (“modern serif fonts”) or color cue (“deep indigo + gold accents”).
- Shorten or lengthen: “keep it under 5 scrolls” vs. “include FAQ and pricing grid.”
Pick the version that feels 80 % right.
4. Layer in extra blocks
Need a testimonial slider, FAQ accordion, or Loom embed? Click Add Section → AI Suggest. The tool drops a matching block pre-styled to your palette. Zero code required.
5. Brand-sync in one click
Paste your hex color or upload a logo—AI recalculates complementary shades and swaps them site-wide. Instant on-brand visuals without a style guide.
6. Mobile sanity check
Tap the phone icon: images should resize, buttons stay thumb-friendly, and no text spills off screen. If something’s off, drag-and-drop to fix or tell the AI “make mobile hero text 28 px.”
7. Save this version as ‘v1-layout’
Duplicating now lets you experiment later without losing the solid base.
Try This Experiment: Quick experiment for creators: Generate three drafts—minimalist, bold color, and dark mode—then ask a friend which one matches your value-prop sentence. You’ll pick a winner in minutes, not hours. With a solid AI-built chassis in place, you’re ready to polish copy, visuals, and micro-interactions in the next steps.
4. Craft a Compelling Headline and Value Proposition
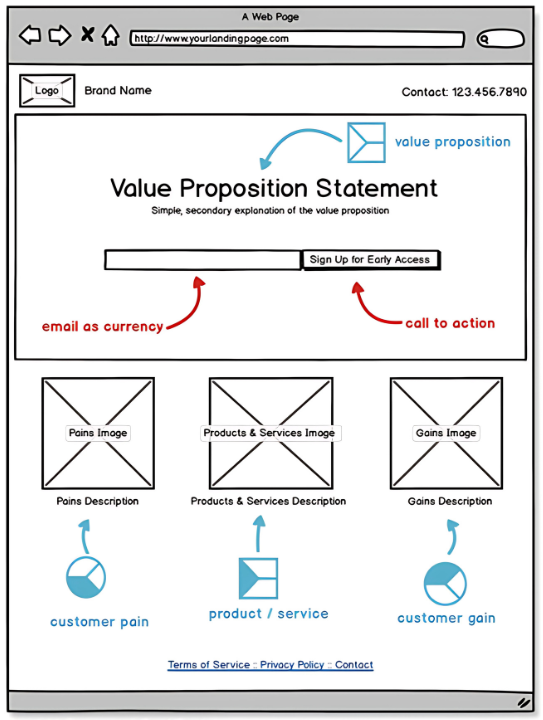
With the basic layout in place, focus on the very top of your landing page – the headline section. This is usually the first thing visitors see, so make it count. Click on the headline text that the AI or template provided and edit it to clearly state your value proposition. A great headline is concise and speaks to the visitor’s need. For example, instead of a generic “Welcome to My Page,” say something specific like “Get Stunning Websites on a Budget – Freelance Design for Local Restaurants.” In one short line, you’ve told the visitor what you do and hinted at the benefit (stunning websites on a budget).
Below the main headline, there’s often a subheadline or a few sentences of supporting text. Use that space to expand on your offer or promise. Continuing our example, the subheadline could be “I help neighborhood eateries go online with beautiful, easy-to-update websites in just 2 weeks.” This adds clarity and a little bit of a time-based promise. Make sure the tone of your text matches your audience – friendly and simple if you’re targeting non-tech small business owners, or maybe more energetic and bold if targeting tech startups. The key is to immediately answer the visitor’s question: “What’s in it for me?” in an appealing way. If you get stuck, consider using an AI writing assistant (some builders have them built-in) to brainstorm headline options. Just remember to keep it aligned with your goal and audience defined in Step 1.
Pro Tip: Test your headline on a friend (or as a quick social post) to see if it grabs attention. Ask them, “Would you be interested in this service from just reading this headline?” If they look confused or uninterested, refine it. Sometimes swapping in more specific words or highlighting a big benefit (e.g. “...in 2 weeks” or “...without hiring a full agency”) can dramatically increase the headline’s appeal.
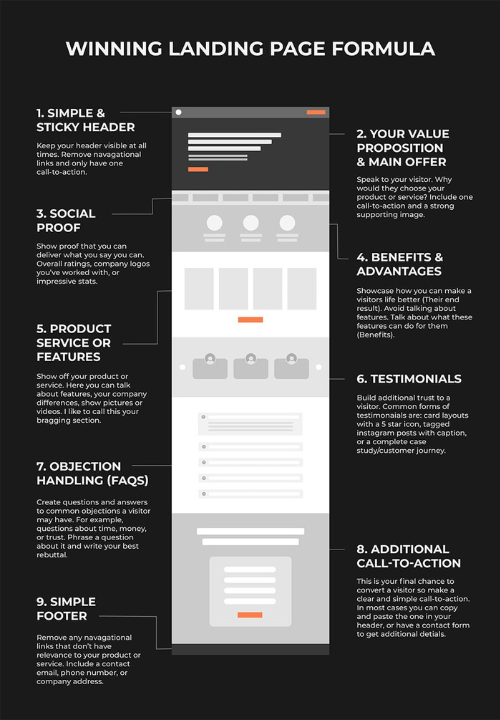
Expand Your Page with Benefits, Images, and Social Proof
The hero section sparks interest; the middle sells. Fill it with proof, clarity, and emotion, so visitors nod “Yes, this is exactly for me.”
Turn Features into Irresistible Benefits
- Start with the raw list of what your product does.
- Run it through ChatGPT:
Prompt: “Rewrite each feature as a benefit, ≤12 words, second-person (‘you’). Add an outcome or metric when possible.” - Layer power verbs (“accelerates,” “automates,” “cuts”) and specifics (“cuts editing time by 70 %”).
- Group related wins under micro-headings: Speed, Savings, Simplicity. This chunks info for skimmers.
Tool boosts
- Copy.ai “Product Benefits” template — generate five angles per feature.
- Grammarly — keep voice consistent with your persona.
- Hemingway — trim fluff, score readability at Grade 6-8.
Pro move: Bold the payoff in each bullet—“Launch in one evening without code.”
Visuals That Prove the Promise
- Ditch generic stock. Use Midjourney, DALL·E 3, or Adobe Firefly to create a hero image that literally depicts the transformation (e.g., messy desk → sleek dashboard).
- Screenshot storytelling: Record a 15-sec CleanShot gif showing the “aha” moment—drag-and-drop, instant publish, etc. Drop it beneath the hero for motion-based proof.
- Context beats aesthetics. If you’re selling a Notion template, show the live workspace; if you offer coaching, show a Zoom screenshot with happy faces.
- Optimize everything: run through TinyPNG, set
.webp, add descriptive alt text (“fitness-coach-sales-funnel-mobile-view”) for SEO and accessibility.
Optional flair: overlay a tiny annotation (“2-second load”) to signal speed without extra copy.
Social Proof That Does the Heavy Lifting
Testimonials:
- Pull one punchy quote above the fold (“Doubled my course sales in 14 days”).
- Place a carousel or masonry grid mid-page with fuller stories—name, role, small headshot.
- Use Senja or Testimonial.to to auto-pull fresh reviews and keep the page dynamic.
Credibility badging:
- Display brand logos of past clients (“Seen in Product Hunt, AppSumo, Indie Hackers”).
- Add hard numbers: “Trusted by 1,342 creators” or “Handled $1.1 M in checkout volume.”
- If you’ve been featured anywhere, embed a tiny press strip—makes visitors instantly trust.
Case-snippet:
For B2B or high-ticket, include a micro-case block: pain, action, result—three sentences max. Drop a “Read full case study →” link for those who need more depth.
Video proof:
- Record a raw 30-second Loom from a real user; authenticity beats cinematic polish.
- Autoplay muted, captions on. Works miracles for skeptics.
Formatting Rules That Convert
- One idea per paragraph, two sentences max. Readers inhale, not study.
- Sub-head every 200 words so they can scroll-stop anywhere.
- White space = luxury. Margin and padding make your content feel premium.
- Contrast CTA color to nearby sections; never let it blend in.
Quality-Check in 5 Minutes
- Open an incognito tab—scroll once.
- Ask yourself: Do I instantly see a promise, a proof point, and a next step?
- If any piece is missing, revise copy or swap an image until clarity is undeniable.
Master these elements and your mid-page turns curious visitors into confident buyers—before they even reach the final CTA.
Fine-Tune the Visual Design and Branding
Now that the content is in good shape, it’s time to make sure the page looks polished and on-brand. AI builders do a decent job with layout, but you’ll want to review the design details. Start with the overall theme: does the color scheme and font style fit your personal or business brand? For example, if your freelance brand color is blue, you don’t want a template that’s all red. Most builders allow easy theme changes – try selecting a preset color palette or manually adjust the primary color to match your logo or preferences. The same goes for fonts: choose clean, easy-to-read fonts (nothing too fancy that might be hard to read) and use at most two different fonts for a professional look.
Pay attention to spacing and alignment. Ensure that sections aren’t overly cluttered – plenty of white space actually makes content more readable and attractive. If an element is not in the right place, use the drag-and-drop editor to move it or resize it. For instance, you might want to center an image or make a button larger. Check the text color against the background for readability (the builder may have chosen a grey text on white which can be hard to read – if so, darken it). Consistency is key: use the same style for all your buttons, and consistent heading sizes for section titles. This step might seem subtle, but these tweaks make your page look like it was crafted by a pro rather than generated by a machine.
Most importantly, preview your landing page on mobile. With around 60% (or more) of web traffic coming from mobile devices in 2025, you want to be sure your page is mobile-friendly. Use the builder’s mobile preview mode (or simply open the page on your phone) to see how it appears. Check that images resize correctly, text isn’t too small, and buttons are easy to tap. Many AI builders automatically make designs responsive, but it’s always worth a look. If something appears off on mobile (like a wide image that doesn’t scale down), the builder may let you hide or swap it just for the mobile view. Tweak as needed so that both desktop and phone visitors will get a great experience.
Pro Tip: Keep an eye on load time. Since you added images and possibly custom sections, make sure the page still loads quickly – slow pages can turn off visitors. Most builders optimize images automatically; if not, use slightly lower-resolution images to improve speed. A fast, clean design not only looks good but also helps conversions. Plus, Google loves fast sites, which could give you a tiny SEO boost too!
Set Up Your Call-to-Action (CTA) and Form
Every great landing page has a single, prominent call-to-action. This is usually a button or a sign-up form that tells visitors what to do next (e.g., “Contact Me”, “Get Started Free”, “Download the Guide”). Locate the CTA section on your page – it might be at the top in your hero or down near the bottom, or sometimes both. Make sure the wording on your button is clear and action-oriented. Use strong verbs and highlight the benefit where possible. For example, “Get My Free Quote” is more enticing than a generic “Submit”. Also, ensure the button or form stands out visually – use a contrasting color that catches the eye. If your background is white, a bold colored button like blue or green will pop. The AI design likely chose a decent color, but adjust it if it doesn’t grab attention at first glance.
If your goal involves collecting information (like email sign-ups or lead info), you might have a form on your landing page. Check that the form is working and only asks for what you actually need. As a rule of thumb, keep forms short and simple – the fewer fields, the better your conversion rate tends to be. Often just a name and email is enough to start, or even just an email address for newsletters. Asking for too much (like full address, age, etc.) can scare people off from filling it out. So delete any unnecessary fields the template may have included. Make sure the form’s submit button also has clear text like “Get Started” or “Send Request”. Finally, test the form or button: in preview mode, fill it out to see what happens. Does it say “message sent” or take you to a confirmation page? If you haven’t set up an email list or destination for the form yet, at least know where those inquiries will go (many builders will store them or email them to you by default). For a simple contact form, you might just get an email with the details – which is fine for now.
Pro Tip: It’s a good idea to place a second CTA or button on longer pages. Some templates include a repeat of the call-to-action in the middle or after the first screenful of content. If your page ended up long, consider adding another button halfway down that scrolls the user back to the form or opens it. This way, they don’t have to scroll back up to take action. Also, use microcopy (small text) near your CTA to reduce anxiety if needed – for example, “I’ll respond within 24 hours” below a contact button can reassure users. Little touches like that can improve your conversion rate.
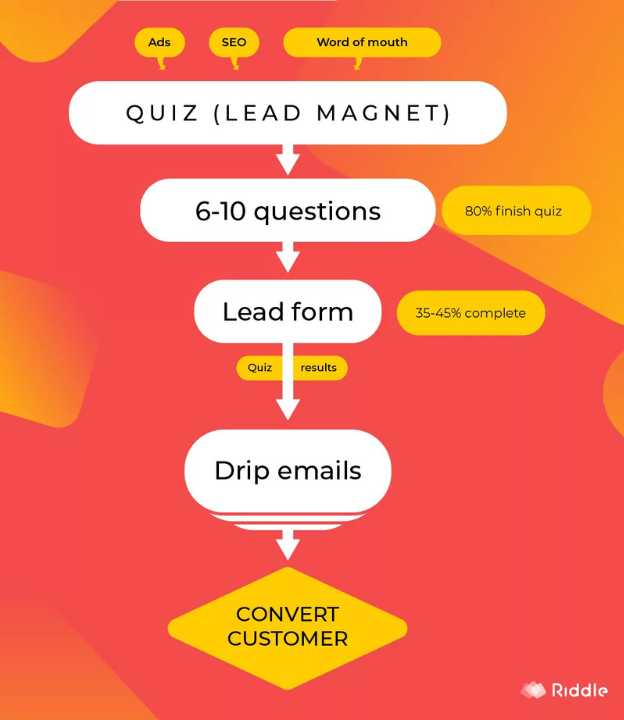
What about quizzes over basic forms?
Read our companion guide — “High-Conversion Quiz Funnels for Creators (2025).”
• Framework to map questions → personalized results → product pitches
• 35-question symptom template + scoring spreadsheet (free download)
• Zapier recipes to tag leads and trigger tailored email sequences
• Real-world teardown: 41 % opt-in rate case study
Publish, Test, and Keep Improving
1. Publish fast, then polish.
Hit Publish on Dorik, Wix, Webflow, or Kajabi—even if it’s on a temporary subdomain. Speed beats perfection. Add your custom domain later (Namecheap, Porkbun, or Cloudflare) and switch DNS when ready. Ensure SSL is active (most builders enable it automatically).
2. Run a 5-minute QA sweep.
- Scan every section for leftover lorem-ipsum.
- Click each link and button.
- Submit the form; confirm the notification email hit your inbox.
- Open mobile view on a real phone, not just the builder preview.
3. Instrument analytics on day one.
- Google Analytics 4 or privacy-first alternatives Plausible / Fathom track traffic, sources, and goal completions.
- Fire up Google Tag Manager (or your builder’s built-in events) and tag the primary CTA as a conversion.
4. Capture behavior, not just numbers.
- Hotjar or Microsoft Clarity heatmaps show scroll depth and rage clicks.
- Enable a one-question on-exit survey (“What stopped you from signing up today?”) to collect plain-English objections.
5. Set up A/B testing from the start.
- Wix, Webflow, and Framer all offer native split-testing; otherwise plug in VWO or Convert.com.
- Test single variables only—headline, hero image, or CTA color—until you hit ~200 visitors per variant.
6. Automate the follow-up.
- New form submissions → Zapier / Make → CRM (HubSpot, Pipedrive) + “Thank-you” email via ConvertKit.
- Slack or Discord alert for instant lead notification so you reply while intent is hot.
7. Watch performance like a hawk.
- Run Google PageSpeed Insights and GTmetrix weekly. Anything under 85 desktop / 75 mobile? Compress images (ShortPixel) or lazy-load videos.
- Use Lighthouse inside Chrome DevTools for real-time diagnostics; fix red flags first (large layout shift, unused CSS).
8. Schedule a recurring improvement sprint.
Every 14 days:
- Export the past two weeks of analytics.
- Ask ChatGPT: “Summarize key insights from this CSV—any drop-off or conversion anomalies?”
- Choose one hypothesis (e.g., “CTA too low on mobile”) and ship a micro-change.
- Re-publish, note the timestamp, and track the metric shift.
9. Keep content fresh.
- Rotate a new testimonial or case snippet monthly.
- Use Copy.ai or Jasper to generate three headline variations; test the winner next cycle.
- If SEO matters, run SurferSEO’s audit and add one missing keyword cluster per quarter.
10. Protect your gains.
- Set daily uptime monitoring with StatusCake or Better Uptime.
- Enable automatic backups inside your builder or via DropInBlog / GitHub export.
Reminder: a live page you iterate beats a perfect draft that never ships. Publish early, measure obsessively, tweak continuously—and your landing page will compound conversions over time.
Pro-Level Power-Ups
Once your page is up, you can take it even further. Here are some pro-level enhancements to boost your landing page’s performance and save you even more time:
Connect Analytics & Tracking → Data-Driven Decisions
Install Google Analytics (or a similar analytics tool) on your page from day one. This lets you see how many people visit, where they click, and when they leave. Armed with those insights, you can tweak your content or layout based on real user data instead of guesswork. For example, if you notice most visitors drop off before scrolling, you’ll know to put your key info and CTA higher up on the page.
A/B Test Page Elements → Higher Conversion Rates
Don’t assume your first version is the best it can be. Try running an A/B test on a key element like your headline or call-to-action. For example, show half your visitors Headline A (“Build Your Site in 30 Minutes”) and the other half Headline B (“Affordable Web Design for Coaches”) and see which one gets more clicks or sign-ups. You can use a third-party tool or built-in feature to split traffic. Over time, you’ll learn which content converts better and can optimize your page accordingly.
Add Testimonials or Logos → Instant Credibility
Leverage social proof to give visitors confidence in what you’re offering. A glowing one-liner testimonial from a happy client or a few logos of well-known brands you’ve worked with can work wonders. These elements signal to new visitors that others trust you, so they should feel comfortable doing the same. Even if you’re just starting out, consider adding a short quote from a beta user or mentioning a notable milestone (“500+ clients served”) to boost credibility at a glance.
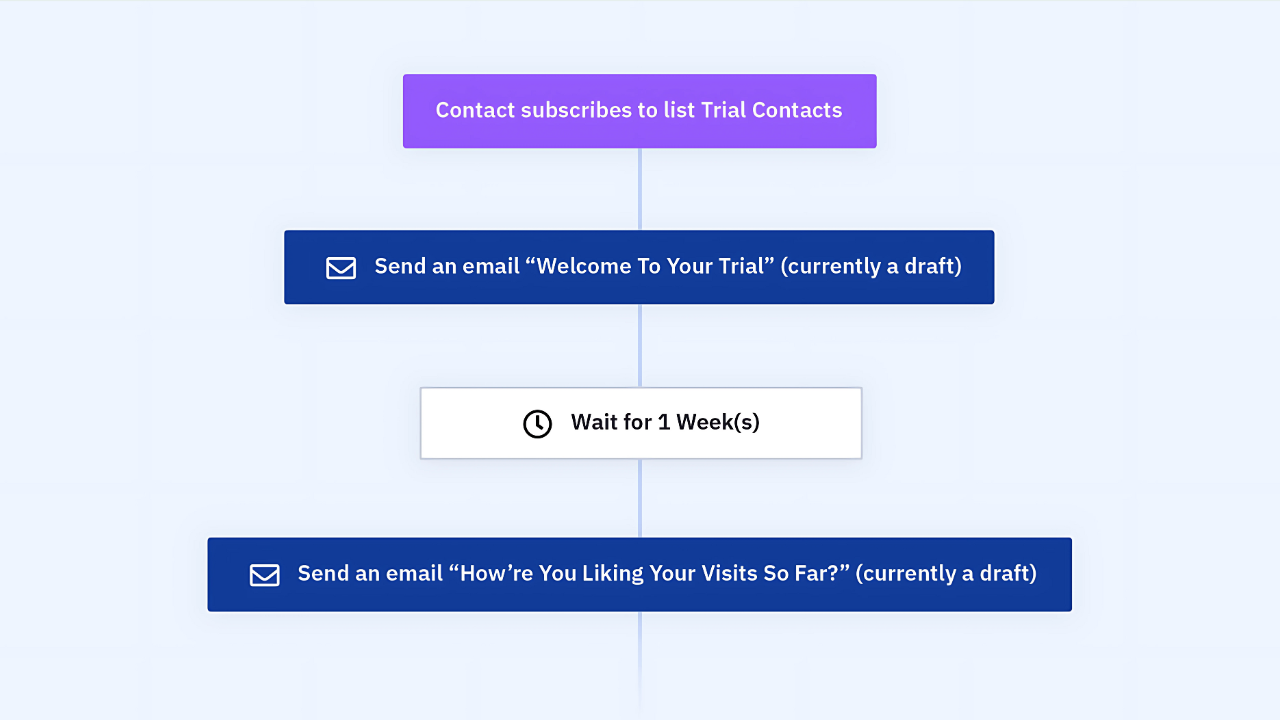
Set Up an Email Auto-Responder → Prompt Follow-Ups
Strike while the iron is hot. If your landing page includes a sign-up or contact form, configure an automatic email response to anyone who submits it. It can be a simple “Thanks for signing up! Here’s what to expect next…” message. Prompt follow-ups keep potential customers warm and show that you’re responsive. Plus, it saves you from having to reply to each new lead manually, ensuring no one falls through the cracks.
Automate follow-ups like a pro.
Dig into the “No-Code Automation Blueprint for Creators in 2025.”
• 12 plug-and-play workflows (lead capture → CRM → Slack ping)
• Tool stack comparison: Zapier vs. Make vs. native embeds
• ROI calculator: estimate hours saved & revenue unlocked per flow
• Loom walkthroughs for each recipe—no coding required
Add a Chatbot or Live Chat → 24/7 Engagement
Consider embedding a chat widget on your page. An AI-powered chatbot can greet visitors and answer common questions on the spot, adding a personal touch even when you’re not online. Visitors who get quick answers are more likely to stick around instead of bouncing. You can even program the bot to politely ask for an email address if someone needs extra help, capturing leads for you around the clock without lifting a finger.
Avoid These Mistakes
Even with top-tier AI, creators still hit the same potholes over and over. Below are the big ones—each with context, creator-tested fixes, and tool shortcuts so you never stall your launch (or your conversions).
1. Turning Your Page into a Wall of Text
Long, unbroken paragraphs overwhelm skimmers and bury your most persuasive lines. Eye-tracking studies show readers decide whether to keep scrolling within 3–5 seconds. If they see a blocky essay, they bounce.
Fix it fast
- Break every paragraph at two sentences max.
- Add micro-headings (“⚡ Faster setup,” “📈 Proven ROI”) every 120–150 words.
- Use ChatGPT: “Rewrite this paragraph as 3 scannable bullets, ≤12 words each, second-person voice.”
2. Copy-Paste AI Blandness
Out-of-the-box AI copy lacks edge, humor, and the quirky phrasing that makes your brand memorable. Readers sniff out this sameness instantly.
Fix it fast
- Feed GPT your brand voice guidelines (slang, tone, inside jokes).
- Prompt: “Rewrite in our voice: confident, playful, no corporate clichés, use ‘you’ and ‘we’.”
- Layer specific details: numbers, niche jargon, real product names—AI can’t guess these on its own.
3. Burying or Weakening the CTA
If visitors have to hunt for your button, you’ve already lost them. Heatmaps routinely show the highest click density on buttons placed above the fold and repeated mid-page.
Fix it fast
- Drop a sticky CTA bar on mobile (Wix, Webflow, Framer all support it).
- Color-contrast: CTA hue should share zero palette shades with other elements.
- Text: start with an action verb + outcome (“Start My Free Trial,” “Book My Strategy Call”).
4. Ignoring Mobile Layout
More than half your traffic comes from phones, and Google now indexes mobile-first. Yet creators still launch pages with desktop-only font sizes and off-screen images.
Fix it fast
- Test on a real device: scroll, tap buttons, watch for pinch-zoom moments.
- In Webflow/Dorik, set font sizes with
clamp()so they scale automatically. - Make buttons full-width on phones; thumbs don’t like tiny targets.
5. Slow Load Times
Every second of extra load drops conversions by roughly 4–7 %. Uncompressed hero JPEGs and autoplay videos are the usual culprits.
Fix it fast
- Compress images with ShortPixel or TinyPNG; serve
.webp. - Lazy-load YouTube with a thumbnail overlay (Instantly set in Framer and Elementor).
- Run Lighthouse: any “Largest Contentful Paint” over 2.5 s? Fix before driving traffic.
6. Missing or Weak Trust Signals
No proof, no buy. Social proof reassures skeptical visitors that “people like me already use this.”
Fix it fast
- One punchy testimonial above the fold, logo strip mid-page, numeric proof (“Trusted by 2,300 creators”) near the CTA.
- Use Senja or Testimonial.to to auto-pull new reviews, keeping the page fresh without manual updates.
- If brand-new, lean on personal credibility: “10 years in UX design,” “Featured in Indie Hackers.”
7. Launching Without Analytics
Flying blind means guessing which tweaks matter. Creators often add tracking only after traffic disappoints—too late to see what went wrong.
Fix it fast
- Install GA4 or Plausible before publishing.
- Tag your primary CTA as a conversion event.
- Layer Microsoft Clarity for session replays; it’s free and takes five minutes to embed.
8. Copy That Doesn’t Match Ad Promise
Your ad says “Launch a site in 10 minutes,” but the hero headline says “Beautiful websites, no coding.” That disconnect kills trust and spikes bounce rates.
Fix it fast
- Mirror the exact headline or keyword from the ad inside the hero.
- Keep imagery consistent: if the ad shows a phone mock-up, show the same device in the hero.
Key takeaway: AI can build the frame, but avoiding these real-world pitfalls is what turns a pretty draft into a money-making asset. Bookmark this list—run through it before every launch or major update, and you’ll dodge 90 % of the headaches that slow down solo creators and small teams.
Time-Saving Automations & Must-Follow Rules
Building your page is just the start. Take advantage of automation to handle routine tasks, and stick to some key rules to keep your site professional and compliant.
Automation Recipes: Set up these automations to take tasks off your plate:
- New form entry → Instant notification: Configure an automation so that whenever someone fills out your landing page form, you get an email or text alert immediately. You’ll never miss a hot lead and can follow up while their interest is high.
- Page published → Auto-share on social media: Connect your site to a tool (or use a built-in feature) that posts to your social media whenever you publish or update your page. The moment you go live, a post can go out to Facebook, Twitter, etc., driving traffic to your page without manual work.
- New signup → Add to email list: Use an integration or Zapier to automatically add new sign-ups to your email marketing platform (or even a Google Sheet). This way, your leads are organized for follow-up, and you don’t have to export/import anything—no new contact falls through the cracks.
Must-Follow Rules: Keep your site polished and user-friendly with these guidelines:
- Add descriptive alt text to every image — it’s essential for accessibility and SEO.
- Include a visible privacy policy if you collect user data — transparency builds trust and meets legal requirements.
- Use a cookie consent notice when using analytics — comply with privacy laws and let visitors control their data.
- Ensure strong color contrast and legible fonts — everyone (including low-vision users) should easily read your content.
- Optimize images for fast loading — compress files so your page loads quickly on any connection.
- Keep content up-to-date — regularly refresh info and links to avoid outdated content on your page.
Prefer quizzes over basic forms?
Read our companion guide — “High-Conversion Quiz Funnels for Creators (2025).”
• Framework to map questions → personalized results → product pitches
• 35-question symptom template + scoring spreadsheet (free download)
• Zapier recipes to tag leads and trigger tailored email sequences
• Real-world teardown: 41 % opt-in rate case study
➜ Explore the full guide here
Publish, Test, and Keep Improving
1. Publish fast, then polish.
Hit Publish on Dorik, Wix, Webflow, or Kajabi—even if it’s on a temporary subdomain. Speed beats perfection. Add your custom domain later (Namecheap, Porkbun, or Cloudflare) and switch DNS when ready. Ensure SSL is active (most builders enable it automatically).
2. Run a 5-minute QA sweep.
- Scan every section for leftover lorem-ipsum.
- Click each link and button.
- Submit the form; confirm the notification email hit your inbox.
- Open mobile view on a real phone, not just the builder preview.
3. Instrument analytics on day one.
- Google Analytics 4 or privacy-first alternatives Plausible / Fathom track traffic, sources, and goal completions.
- Fire up Google Tag Manager (or your builder’s built-in events) and tag the primary CTA as a conversion.
4. Capture behavior, not just numbers.
- Hotjar or Microsoft Clarity heatmaps show scroll depth and rage clicks.
- Enable a one-question on-exit survey (“What stopped you from signing up today?”) to collect plain-English objections.
5. Set up A/B testing from the start.
- Wix, Webflow, and Framer all offer native split-testing; otherwise plug in VWO or Convert.com.
- Test single variables only—headline, hero image, or CTA color—until you hit ~200 visitors per variant.
6. Automate the follow-up.
- New form submissions → Zapier / Make → CRM (HubSpot, Pipedrive) + “Thank-you” email via ConvertKit.
- Slack or Discord alert for instant lead notification so you reply while intent is hot.
7. Watch performance like a hawk.
- Run Google PageSpeed Insights and GTmetrix weekly. Anything under 85 desktop / 75 mobile? Compress images (ShortPixel) or lazy-load videos.
- Use Lighthouse inside Chrome DevTools for real-time diagnostics; fix red flags first (large layout shift, unused CSS).
8. Schedule a recurring improvement sprint.
Every 14 days:
- Export the past two weeks of analytics.
- Ask ChatGPT: “Summarize key insights from this CSV—any drop-off or conversion anomalies?”
- Choose one hypothesis (e.g., “CTA too low on mobile”) and ship a micro-change.
- Re-publish, note the timestamp, and track the metric shift.
9. Keep content fresh.
- Rotate a new testimonial or case snippet monthly.
- Use Copy.ai or Jasper to generate three headline variations; test the winner next cycle.
- If SEO matters, run SurferSEO’s audit and add one missing keyword cluster per quarter.
10. Protect your gains.
- Set daily uptime monitoring with StatusCake or Better Uptime.
- Enable automatic backups inside your builder or via DropInBlog / GitHub export.
Reminder: a live page you iterate beats a perfect draft that never ships. Publish early, measure obsessively, tweak continuously—and your landing page will compound conversions over time.
Pro-Level Power-Ups
Once your page is up, you can take it even further. Here are some pro-level enhancements to boost your landing page’s performance and save you even more time:
Connect Analytics & Tracking → Data-Driven Decisions
Install Google Analytics (or a similar analytics tool) on your page from day one. This lets you see how many people visit, where they click, and when they leave. Armed with those insights, you can tweak your content or layout based on real user data instead of guesswork. For example, if you notice most visitors drop off before scrolling, you’ll know to put your key info and CTA higher up on the page.
A/B Test Page Elements → Higher Conversion Rates
Don’t assume your first version is the best it can be. Try running an A/B test on a key element like your headline or call-to-action. For example, show half your visitors Headline A (“Build Your Site in 20 Minutes”) and the other half Headline B (“Affordable Web Design for Coaches”) and see which one gets more clicks or sign-ups. You can use a third-party tool or built-in feature to split traffic. Over time, you’ll learn which content converts better and can optimize your page accordingly.
Add Testimonials or Logos → Instant Credibility
Leverage social proof to give visitors confidence in what you’re offering. A glowing one-liner testimonial from a happy client or a few logos of well-known brands you’ve worked with can work wonders. These elements signal to new visitors that others trust you, so they should feel comfortable doing the same. Even if you’re just starting out, consider adding a short quote from a beta user or mentioning a notable milestone (“500+ clients served”) to boost credibility at a glance.
Set Up an Email Auto-Responder → Prompt Follow-Ups
Strike while the iron is hot. If your landing page includes a sign-up or contact form, configure an automatic email response to anyone who submits it. It can be a simple “Thanks for signing up! Here’s what to expect next…” message. Prompt follow-ups keep potential customers warm and show that you’re responsive. Plus, it saves you from having to reply to each new lead manually, ensuring no one falls through the cracks.
Add a Chatbot or Live Chat → 24/7 Engagement
Consider embedding a chat widget on your page. An AI-powered chatbot can greet visitors and answer common questions on the spot, adding a personal touch even when you’re not online. Visitors who get quick answers are more likely to stick around instead of bouncing. You can even program the bot to politely ask for an email address if someone needs extra help, capturing leads for you around the clock without lifting a finger.
Avoid These Mistakes
Even with top-tier AI, creators still hit the same potholes over and over. Below are the big ones—each with context, creator-tested fixes, and tool shortcuts so you never stall your launch (or your conversions).
1. Turning Your Page into a Wall of Text
Long, unbroken paragraphs overwhelm skimmers and bury your most persuasive lines. Eye-tracking studies show readers decide whether to keep scrolling within 3–5 seconds. If they see a blocky essay, they bounce.
Fix it fast
- Break every paragraph at two sentences max.
- Add micro-headings (“⚡ Faster setup,” “📈 Proven ROI”) every 120–150 words.
- Use ChatGPT: “Rewrite this paragraph as 3 scannable bullets, ≤12 words each, second-person voice.”
2. Copy-Paste AI Blandness
Out-of-the-box AI copy lacks edge, humor, and the quirky phrasing that makes your brand memorable. Readers sniff out this sameness instantly.
Fix it fast
- Feed GPT your brand voice guidelines (slang, tone, inside jokes).
- Prompt: “Rewrite in our voice: confident, playful, no corporate clichés, use ‘you’ and ‘we’.”
- Layer specific details: numbers, niche jargon, real product names—AI can’t guess these on its own.
3. Burying or Weakening the CTA
If visitors have to hunt for your button, you’ve already lost them. Heatmaps routinely show the highest click density on buttons placed above the fold and repeated mid-page.
Fix it fast
- Drop a sticky CTA bar on mobile (Wix, Webflow, Framer all support it).
- Color-contrast: CTA hue should share zero palette shades with other elements.
- Text: start with an action verb + outcome (“Start My Free Trial,” “Book My Strategy Call”).
4. Ignoring Mobile Layout
More than half your traffic comes from phones, and Google now indexes mobile-first. Yet creators still launch pages with desktop-only font sizes and off-screen images.
Fix it fast
- Test on a real device: scroll, tap buttons, watch for pinch-zoom moments.
- In Webflow/Dorik, set font sizes with
clamp()so they scale automatically. - Make buttons full-width on phones; thumbs don’t like tiny targets.
5. Slow Load Times
Every second of extra load drops conversions by roughly 4–7 %. Uncompressed hero JPEGs and autoplay videos are the usual culprits.
Fix it fast
- Compress images with ShortPixel or TinyPNG; serve
.webp. - Lazy-load YouTube with a thumbnail overlay (Instantly set in Framer and Elementor).
- Run Lighthouse: any “Largest Contentful Paint” over 2.5 s? Fix before driving traffic.
6. Missing or Weak Trust Signals
No proof, no buy. Social proof reassures skeptical visitors that “people like me already use this.”
Fix it fast
- One punchy testimonial above the fold, logo strip mid-page, numeric proof (“Trusted by 2,300 creators”) near the CTA.
- Use Senja or Testimonial.to to auto-pull new reviews, keeping the page fresh without manual updates.
- If brand-new, lean on personal credibility: “10 years in UX design,” “Featured in Indie Hackers.”
7. Launching Without Analytics
Flying blind means guessing which tweaks matter. Creators often add tracking only after traffic disappoints—too late to see what went wrong.
Fix it fast
- Install GA4 or Plausible before publishing.
- Tag your primary CTA as a conversion event.
- Layer Microsoft Clarity for session replays; it’s free and takes five minutes to embed.

8. Copy That Doesn’t Match Ad Promise
Your ad says “Launch a site in 10 minutes,” but the hero headline says “Beautiful websites, no coding.” That disconnect kills trust and spikes bounce rates.
Fix it fast
- Mirror the exact headline or keyword from the ad inside the hero.
- Keep imagery consistent: if the ad shows a phone mock-up, show the same device in the hero.
Key takeaway: AI can build the frame, but avoiding these real-world pitfalls is what turns a pretty draft into a money-making asset. Bookmark this list—run through it before every launch or major update, and you’ll dodge 90 % of the headaches that slow down solo creators and small teams.
Time-Saving Automations & Must-Follow Rules
Building your page is just the start. Take advantage of automation to handle routine tasks, and stick to some key rules to keep your site professional and compliant.
Automation Recipes: Set up these automations to take tasks off your plate:
- New form entry → Instant notification: Configure an automation so that whenever someone fills out your landing page form, you get an email or text alert immediately. You’ll never miss a hot lead and can follow up while their interest is high.
- Page published → Auto-share on social media: Connect your site to a tool (or use a built-in feature) that posts to your social media whenever you publish or update your page. The moment you go live, a post can go out to Facebook, Twitter, etc., driving traffic to your page without manual work.
- New signup → Add to email list: Use an integration or Zapier to automatically add new sign-ups to your email marketing platform (or even a Google Sheet). This way, your leads are organized for follow-up, and you don’t have to export/import anything—no new contact falls through the cracks.
Must-Follow Rules: Keep your site polished and user-friendly with these guidelines:
- Add descriptive alt text to every image — it’s essential for accessibility and SEO.
- Include a visible privacy policy if you collect user data — transparency builds trust and meets legal requirements.
- Use a cookie consent notice when using analytics — comply with privacy laws and let visitors control their data.
- Ensure strong color contrast and legible fonts — everyone (including low-vision users) should easily read your content.
- Optimize images for fast loading — compress files so your page loads quickly on any connection.
- Keep content up-to-date — regularly refresh info and links to avoid outdated content on your page.
FAQs
Modern website builders let you create a site with zero coding. Here’s how: choose a website builder platform, pick a template (or let its AI generate a design), add your text and images, and then hit publish. The builder handles all the technical code in the background. In short, you just drag, drop, and edit – the platform writes the code for you.
Absolutely. If you use a modern template and fill it with quality content, a free site can look as polished as a paid one. The main differences are minor: your site will have the platform’s branding (a small banner) and a platform subdomain in the URL instead of a custom .com. Those are small trade-offs – your pages can still look clean and professional at no cost.
Use an all-in-one platform made for course creators, like Kajabi or Podia. These tools let you design a landing page and also handle all the back-end needs (payments, member logins, email lists) in one place. Kajabi offers advanced features but is pricier, while Podia is more affordable and easy to use. Both provide templates tailored for course or membership landing pages, so you can launch a professional-looking page quickly and start selling your content.
To create a quiz for your website, you’ll need to use an online quiz builder tool or plugin. Start by choosing a platform (such as Interact, ScoreApp, involve.me, Thrive Quiz Builder for WordPress, etc.). These tools typically let you craft questions, define answers, and set up outcomes without any coding. Once your quiz is created, you can usually embed it on your website via a simple embed code or plugin shortcode. The steps are: brainstorm your quiz topic and questions, build it using the quiz maker’s interface, design the outcome pages, set up the lead capture form, and then copy-paste the provided embed snippet into a page on your site (or use the platform’s hosted link if you prefer). If using WordPress, plugins like Thrive Quiz Builder integrate directly, so you’d design the quiz in WordPress and place it on a page via a block or shortcode.
Yes. Platforms like Wix, WordPress.com, and Weebly have free plans where you get a basic site on a subdomain with limited features. It’s enough to launch and test your idea. As you gain traction, you can upgrade to a paid plan for a custom domain and more tools.
There’s no one-size-fits-all. Many creators start with easy builders like Wix or Squarespace for quick results. WordPress is a favorite as you grow for its flexibility and plugins. Choose a platform that fits your current needs—simple to launch now, scalable later.
Yes, but it’s not automatic. You’ll have to rebuild by copying content and redoing the design on the new platform. Some parts (like blog posts) can export, but your exact layout won’t. It’s doable with planning—just set up redirects from your old URLs so visitors land on the new site.
Use the SEO tools provided: set custom page titles and descriptions, use headings (H1, H2, etc.), and add alt text to images. Ensure your site loads fast and is mobile-friendly. Most importantly, keep creating valuable content and get reputable sites to link to yours—backlinks boost your SEO.
There are several ways. You can run ads (like Google AdSense) for passive income, use affiliate links to earn commissions on recommended products, sell digital products or merchandise, offer paid services or coaching, or introduce membership subscriptions for exclusive content. Many creators mix these methods to build a sustainable income.


.png)


